
You are staring at your kitchen counter, and it feels like a losing battle. The coffee maker fights for space with the toaster, the spice cabinet is an avalanche waiting to happen, and you simply cannot find a place for that new blender. You feel cramped, inefficient, and honestly, a little overwhelmed. It’s not just about clutter; it’s about the frustration of a workspace that fights against you every time you try to cook a meal.
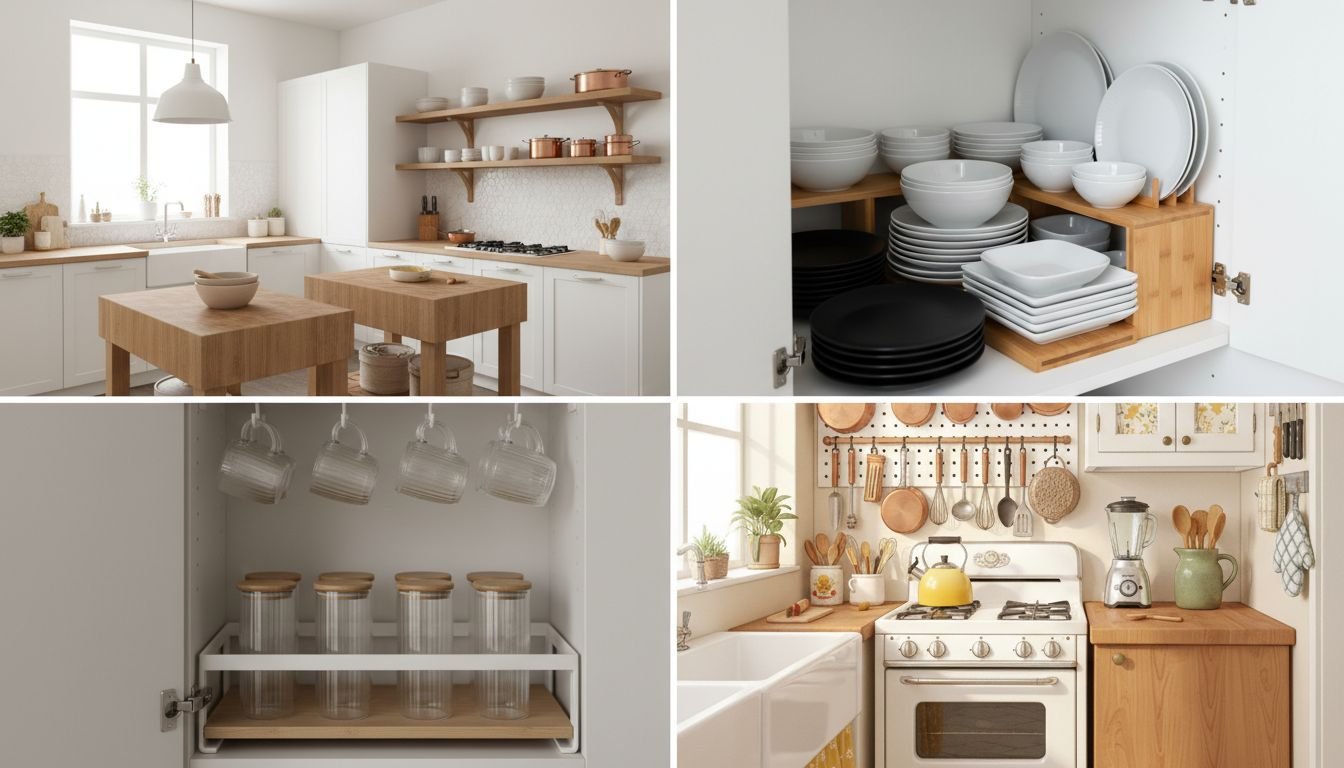
But a small footprint doesn’t have to mean small functionality. In fact, some of the most stylish kitchens in the world are less than 100 square feet. The secret isn’t knocking down walls; it’s mastering the art of verticality and hidden utility. This guide ignores generic advice and focuses on high-impact, architectural, and organizational shifts that instantly double your usable space. You will learn how to turn dead air into storage gold mines and visual chaos into a streamlined sanctuary.
Key Takeaways
- Go Vertical, Not Horizontal: The most underutilized real estate in any small kitchen is the air space between the top of your cabinets and the ceiling.
- Uniformity Creates Space: Decanting mismatched packaging into uniform glass jars doesn’t just look pretty; it actually tricks the eye into seeing more open space.
- Mobile “Islands” are Key: Fixed islands kill flow in tight rooms. Rolling carts allow you to customize your floor plan based on the task at hand.
- Light Reflects Size: Using glossy textures, mirrors, and strategic lighting eliminates shadowy corners that make a room feel boxy.
Table of Contents
- Decor Above Kitchen Cabinets
- Pots & Pans Organization
- Rolling Kitchen Island
- Floating Shelves for Storage
- Kitchen Cart for Storage
- Narrow Side Cabinets
- Pop of Color
- Floating Shelves with Labeled Glass Jars
- Open Shelving Pantry Details
- Utilize Space Above the Fridge
- Magnetic Fridge Racks
- Small Kitchen Counter Shelf
- Fun Accent Color and/or Wallpaper
- Vertical Mugs & Bowls Cabinet Organization
- Plates Racks & Adjustable Shelves
- Additional Kitchen Cart (On Wheels) with Shelving
- Popular Asked Questions
- Conclusion
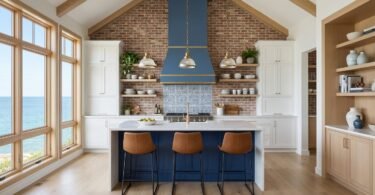
Decor Above Kitchen Cabinets
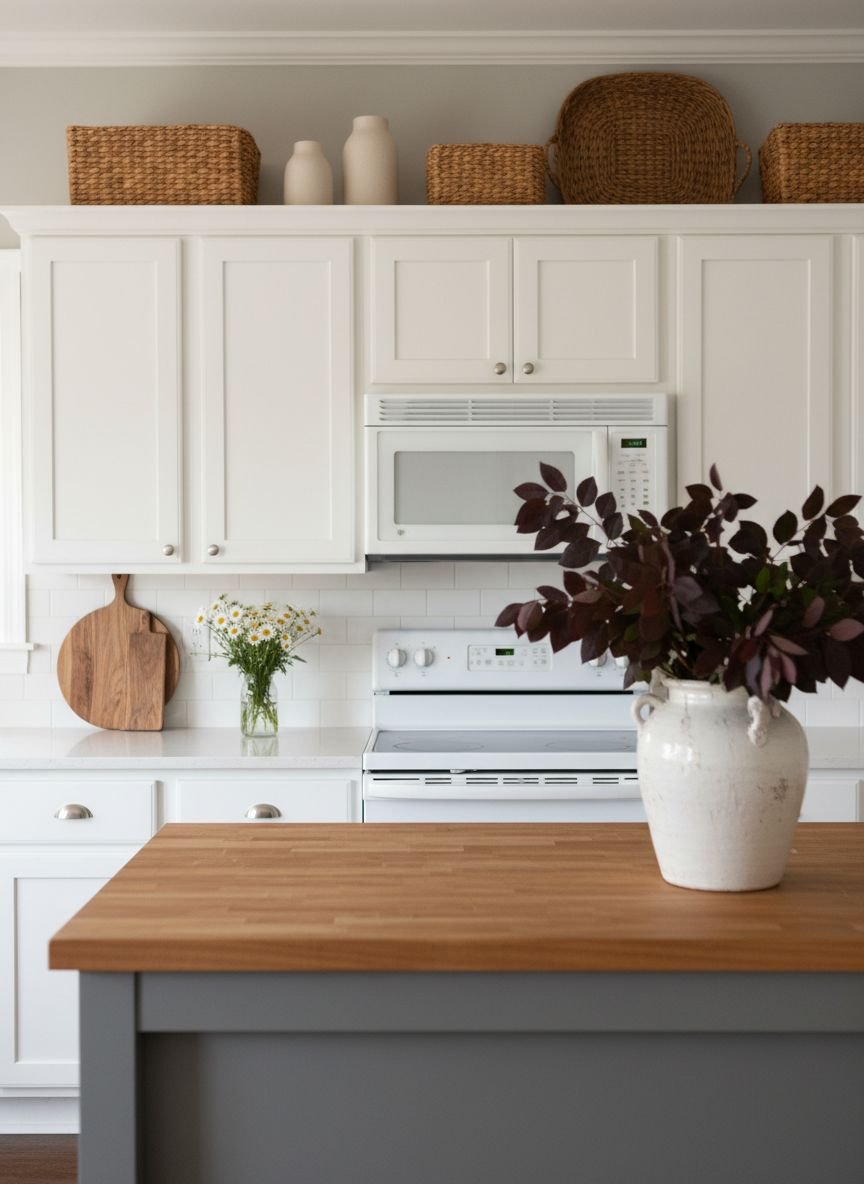
That awkward gap between your upper cabinets and the ceiling is often a graveyard for dust bunnies, but it represents prime real estate in a compact kitchen. Leaving it empty creates a dark shadow line that visually lowers your ceiling height. Instead, treat this area as a curated display that doubles as long-term storage. The key here is to balance aesthetics with utility. You don’t want to store daily essentials up there, as you’ll need a step stool to reach them, but it is the perfect home for seasonal items like holiday platters, the turkey roaster, or extra paper goods.
Visually, you want to maintain a sense of airiness. Avoid cramming cardboard boxes or mismatched appliances up there, which creates a “hoarder” vibe. Woven baskets are your best friend here. They introduce a warm, organic texture that softens the hard lines of cabinetry while concealing the clutter inside. If your kitchen leans more modern, opt for wire bins or sleek white boxes that blend into the wall color. This draws the eye upward, making the room feel taller while hiding the visual noise of rarely used items.
Pro Tip: Line the tops of your cabinets with wax paper before placing your baskets. Every few months, just toss the paper and replace it to remove dust instantly without scrubbing.
Pots & Pans Organization
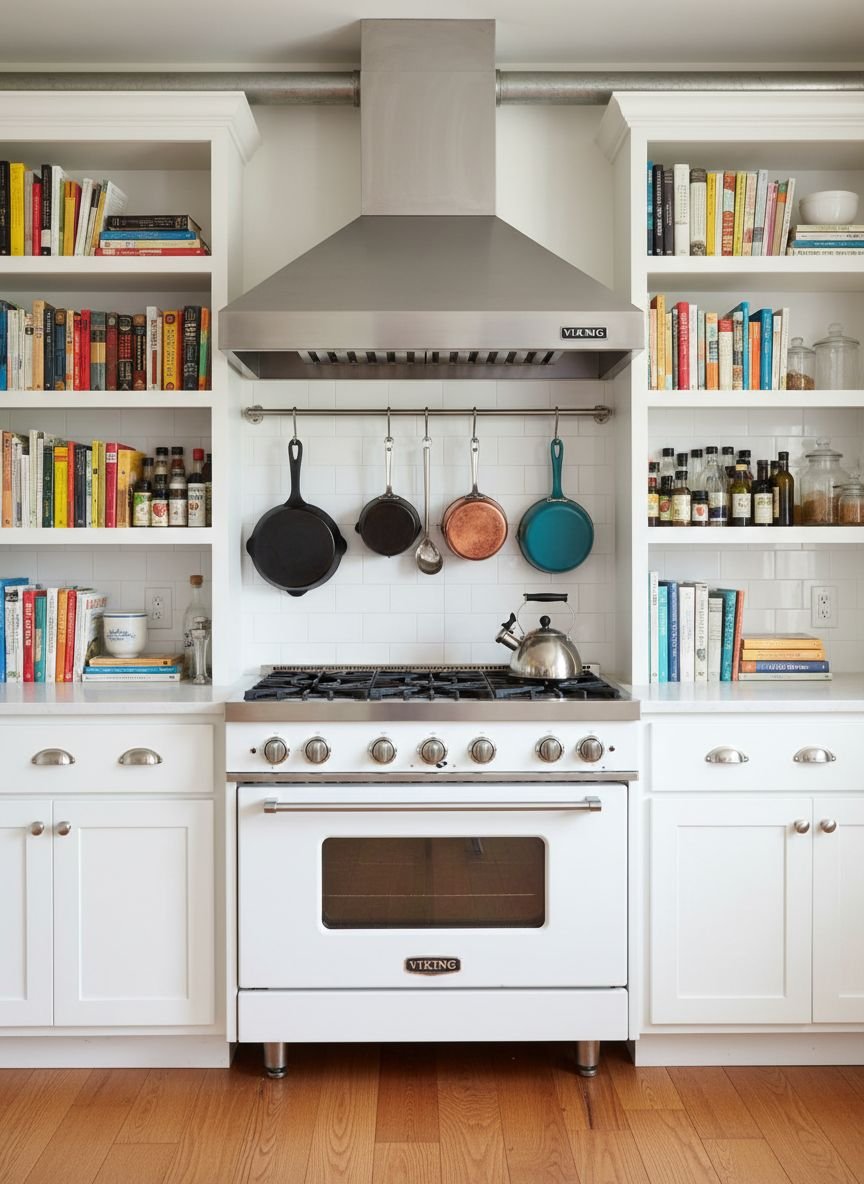
The sound of crashing metal every time you open a lower cabinet is the soundtrack of a disorganized kitchen. Stacking pots and pans in a teetering pile is the quickest way to ruin non-stick surfaces and lose your patience. In a small kitchen, you cannot afford to have a “jumble drawer.” You need a system that prioritizes access. Vertical tension rods or dedicated rack dividers are game-changers here. By filing your frying pans and lids vertically—like books on a shelf—you eliminate the need to unstack four heavy skillets just to reach the one at the bottom.
For those with limited cabinet width, look to the back of the door. Heavy-duty adhesive hooks or screwed-in rails can hold lids, freeing up the shelf space for the actual pots. If you have a deep cabinet that feels like a black hole, install a pull-out wire drawer. This brings the back of the cabinet to you, ensuring you never buy a duplicate saucepan just because you couldn’t see the one you already own. The goal is to see every handle and lid the moment you open the door.
Pro Tip: Use a vintage magazine rack inside the cabinet to hold baking sheets and cutting boards upright. It’s a cheap thrift store find that saves massive amounts of horizontal space.
Rolling Kitchen Island
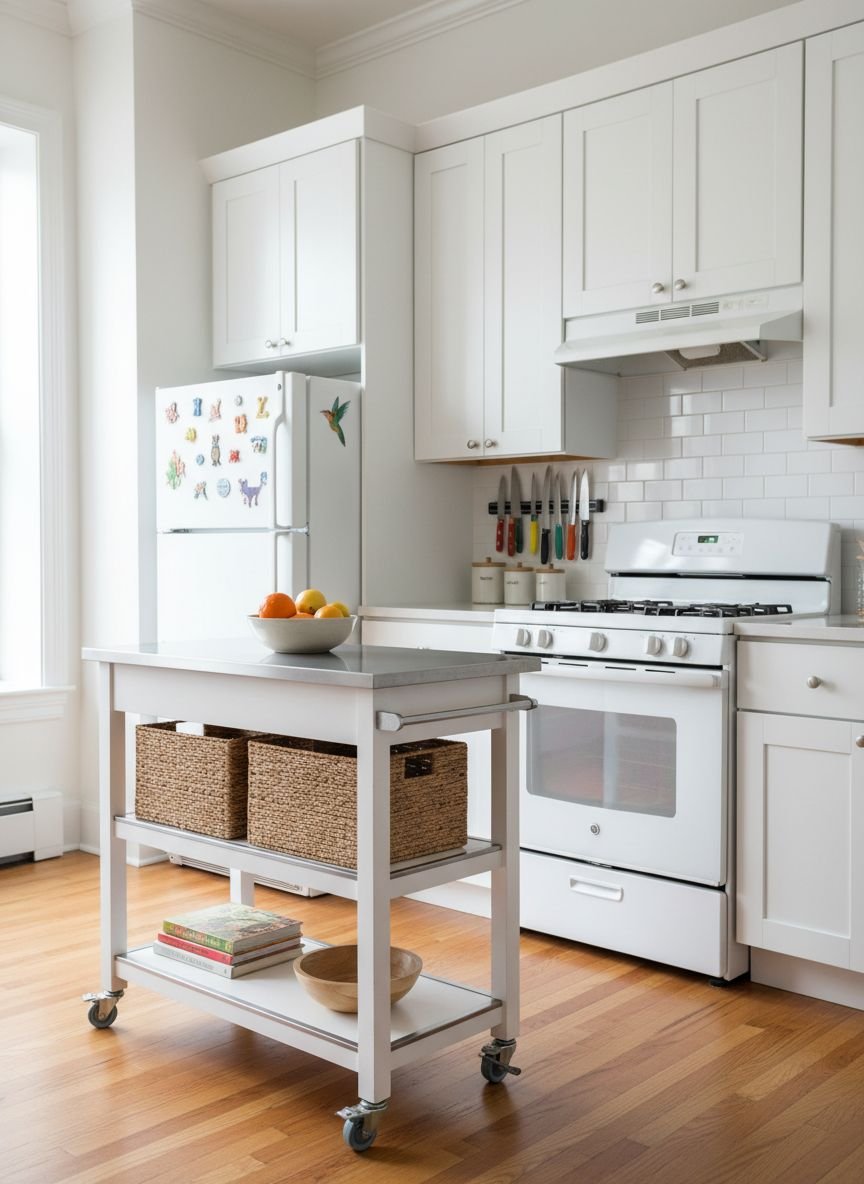
A fixed island in a tiny kitchen is a traffic jam waiting to happen. It blocks the flow from the fridge to the sink and makes the room feel claustrophobic. Enter the rolling island: the ultimate flexible furniture piece. This isn’t just a table on wheels; it is a dynamic workstation that adapts to your needs. When you are prepping a large meal, you roll it to the center for chopping space. When you have guests, you push it against a wall to serve as a buffet or bar.
Material choice matters immensely here. A butcher block top adds warmth and functionality, allowing the cart to serve as a giant cutting board. Look for a unit with open shelving below rather than solid doors. The open structure keeps the visual weight light, allowing you to see through the piece, which tricks the brain into thinking the room is larger than it is. Stainless steel options give a professional “chef’s kitchen” vibe and are incredibly easy to sanitize, reflecting light to brighten the lower half of your room.
Save this idea to your Pinterest.
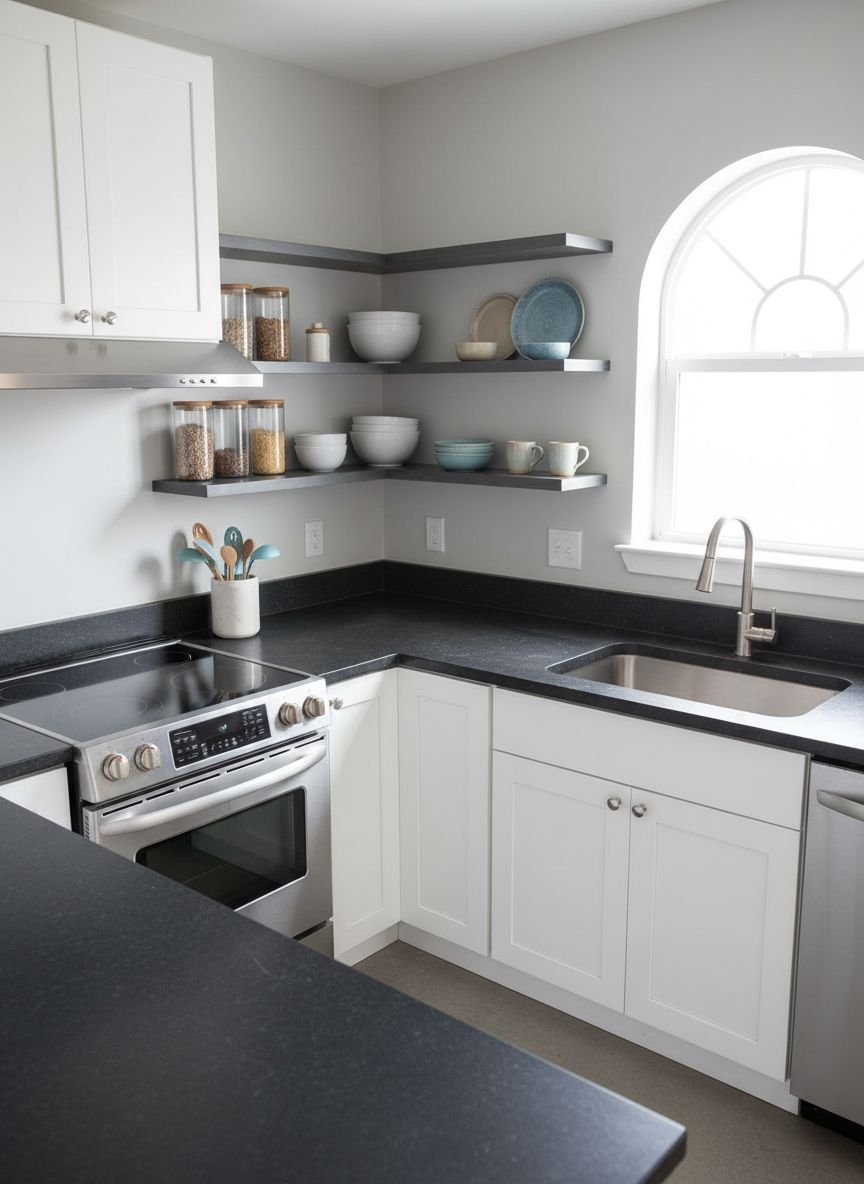
Floating Shelves for Storage
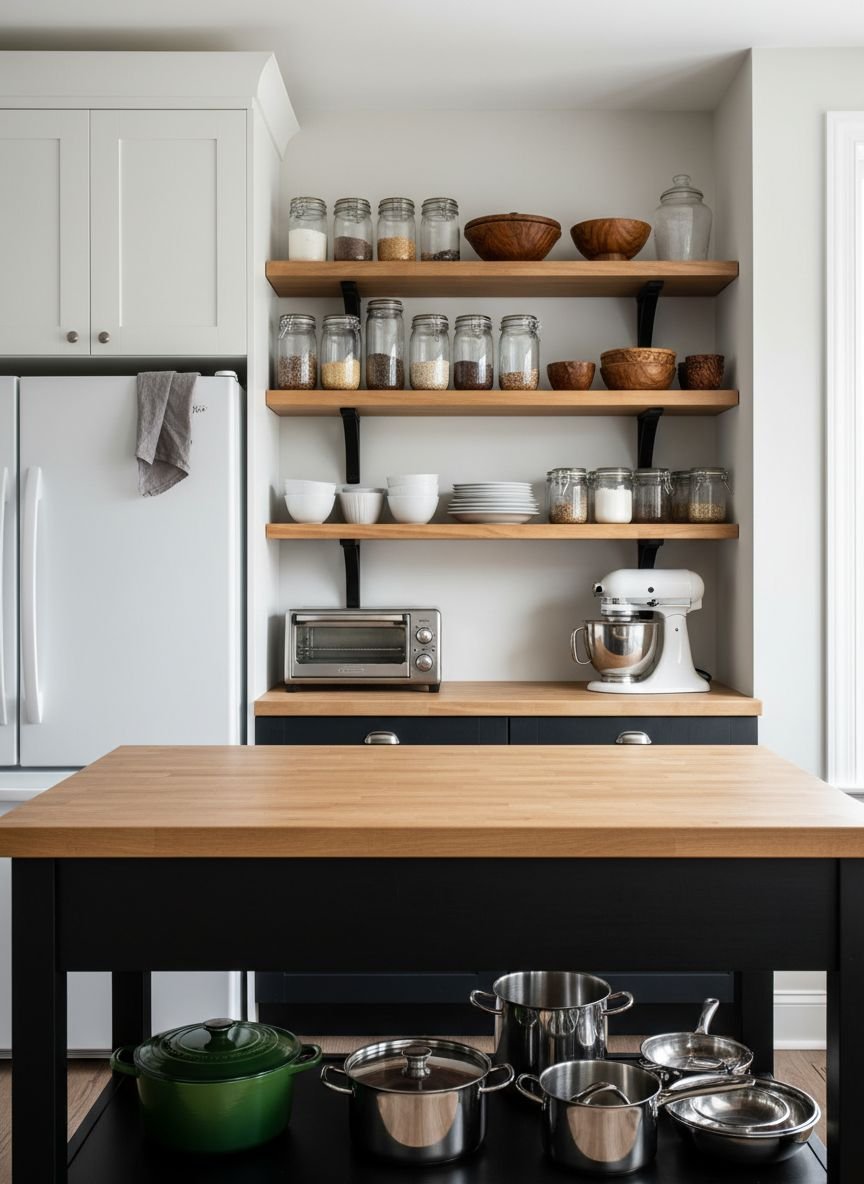
Bulky upper cabinets can make a narrow kitchen feel like a tunnel. They loom over your head and eat up visual bandwidth. Replacing a section of solid cabinetry with floating shelves is a bold move that pays off by instantly “opening” the room. This design choice forces a level of discipline that is actually healthy for small spaces; because everything is on display, you are less likely to hoard chipped mugs or plastic tupperware without lids.
The beauty of floating shelves lies in their versatility. You can install them in awkward nooks where standard cabinets wouldn’t fit, such as corners or above the sink. Use reclaimed wood for a rustic farmhouse touch or sleek white lacquer for a minimalist look. Style them with your daily-use dinnerware—plates, bowls, and glasses. Since you use these items every day, dust won’t have time to settle. This turns your ordinary dishware into decor, adding personality and color to the walls without taking up an inch of extra floor space.
Pro Tip: Install hooks on the underside of the bottom shelf to hang mugs or bundles of drying herbs, doubling the utility of a single shelf.
Kitchen Cart for Storage

While the rolling island is about prep surface, the dedicated kitchen cart is about specialized storage zones. Think of this as a satellite pantry. In a small kitchen, you often lack the drawer space for specific categories like baking supplies or coffee gear. A multi-tiered cart solves this by creating a vertical station for a single purpose. For example, a “Coffee Cart” can hold your machine on top, mugs on the second tier, and beans and syrups on the bottom.
This zoning technique keeps traffic out of the main “work triangle” (sink, stove, fridge). If someone wants a coffee while you are cooking dinner, they don’t need to cross your path. Metal utility carts are particularly effective because they are durable, easy to clean, and often come with mesh bottoms that allow for airflow—perfect for storing root vegetables like onions and potatoes if you prefer a pantry-style setup. The mobility allows you to tuck the cart into a closet or pantry when not in use, keeping the kitchen floor completely clear.
Pro Tip: Use S-hooks on the side rails of the cart to hang hand towels, oven mitts, or even small colanders.
Comparison: Open Shelving vs. Closed Cabinets
| Feature | Open Floating Shelves | Closed Upper Cabinets |
|---|---|---|
| Visual Impact | Makes room feel larger and airier. | Can make small rooms feel boxy/heavy. |
| Storage Capacity | Lower; forces minimalism. | Higher; hides clutter and stacking. |
| Maintenance | High; requires regular dusting/organizing. | Low; doors block dust and hide mess. |
| Cost | Generally cheaper (DIY friendly). | Expensive to purchase and install. |
| Best For | Daily dishes, aesthetic glassware. | Ugly packaging, rarely used appliances. |
Narrow Side Cabinets
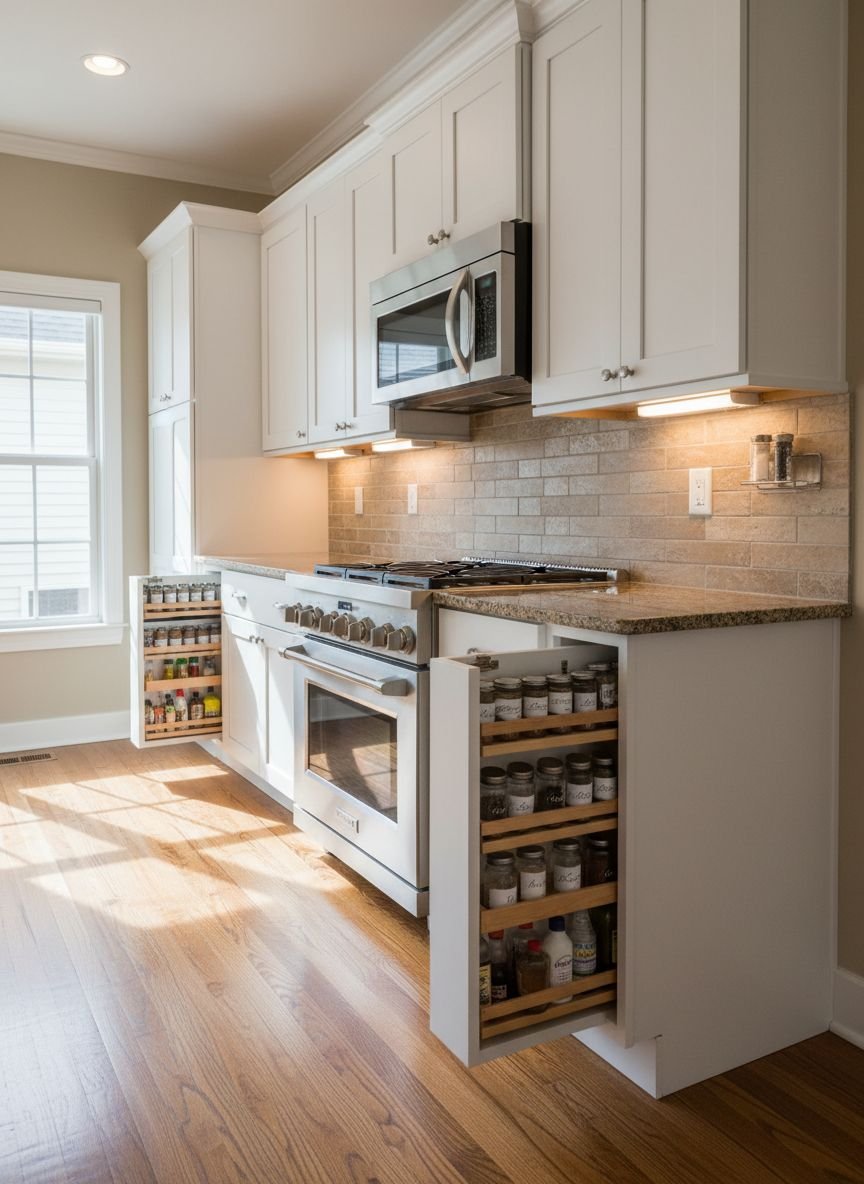
Every kitchen has them: those useless three-inch gaps between the stove and the wall, or the fridge and the counter. We usually ignore them, letting crumbs and dust accumulate in the darkness. However, a slide-out narrow cabinet (often called a “filler pull-out”) can transform this dead zone into a powerhouse of organization. These slim towers are typically on casters or rails and are designed to hold small, uniform items that usually clutter up deep drawers.
This is the ultimate home for your spice collection, oils, and vinegars. By lining them up in a vertical row, you can see every label at a glance—no more digging through the back of a cupboard to find the cumin. It also keeps these heat-sensitive items away from the direct heat of the oven (if insulated properly) or at least organizes them right where you need them: next to the stove. The mechanism is smooth and satisfying, and the hidden nature of the storage keeps your countertops completely clear of bottle clutter.
Pro Tip: If you are renting and can’t install a built-in pull-out, buy a slim rolling laundry cart. They fit in gaps as narrow as 5 inches and work perfectly for cleaning supplies or pantry overflows.
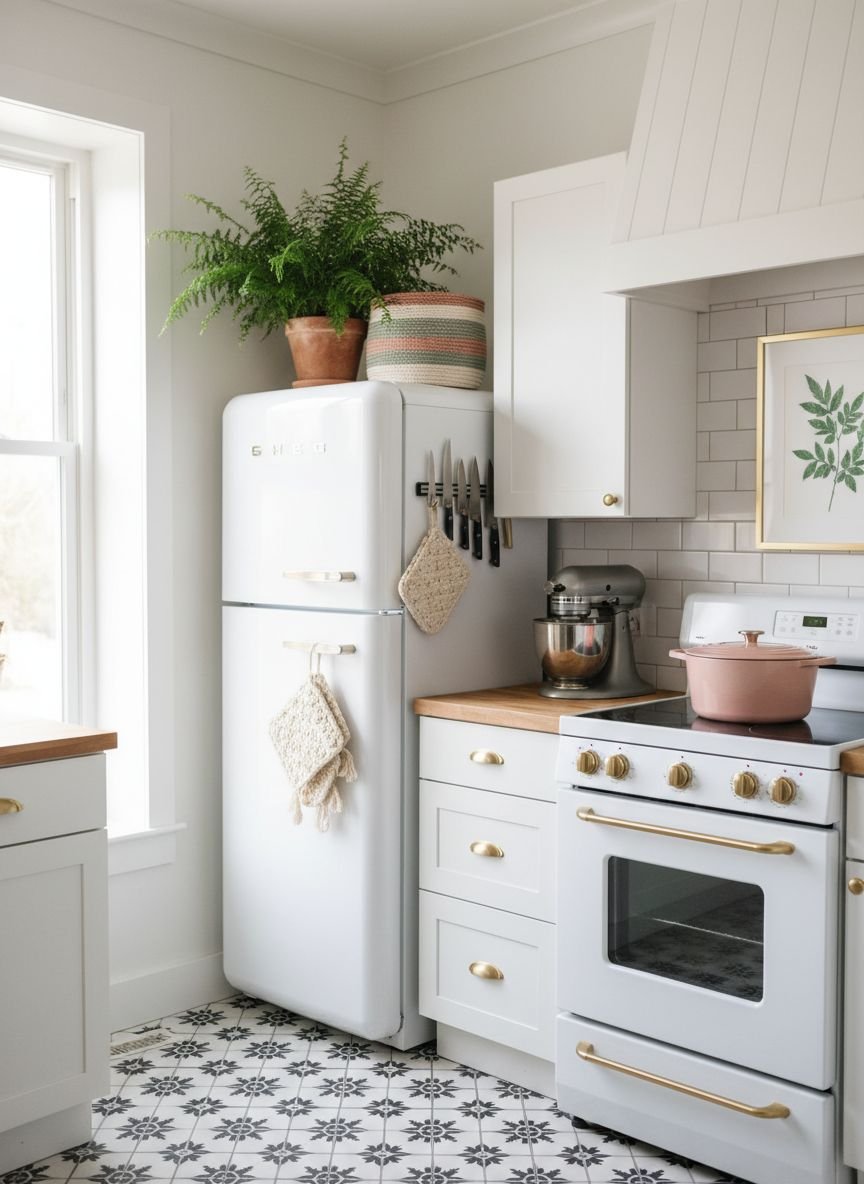
Pop of Color
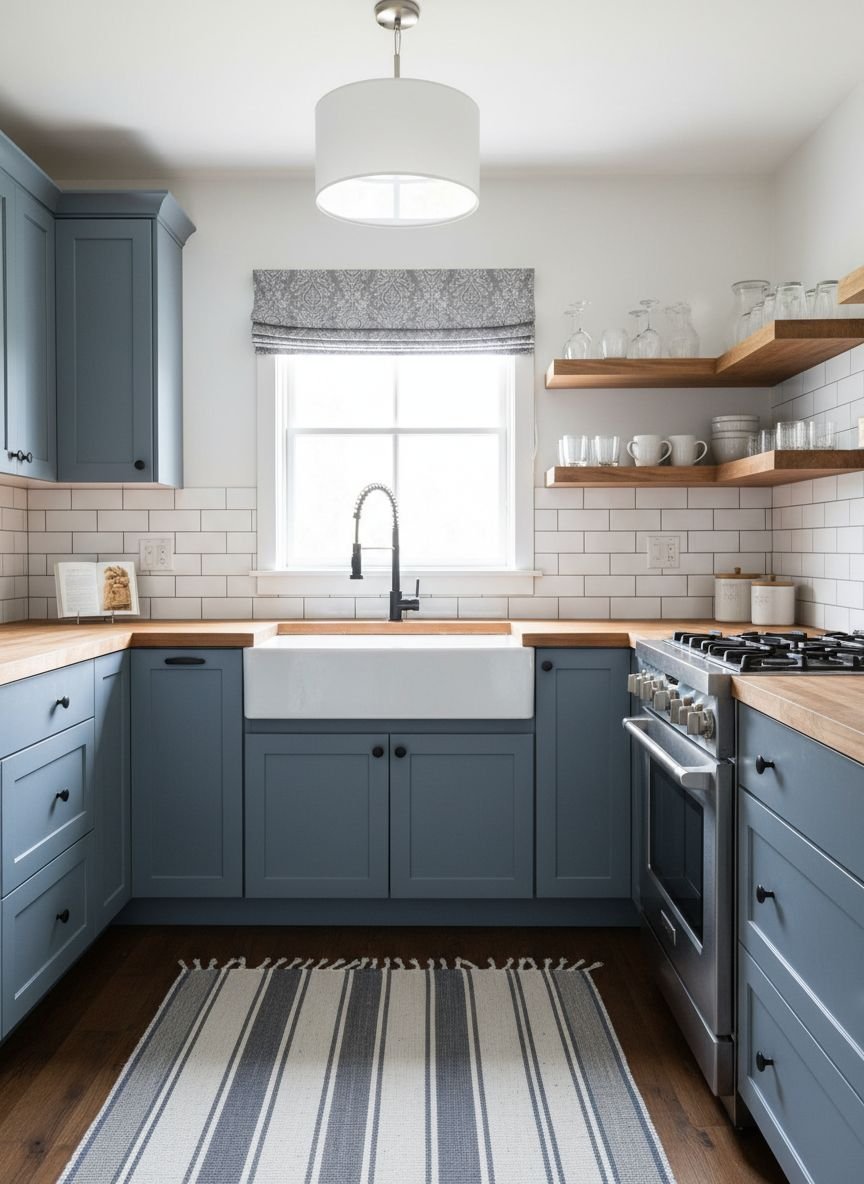
White is the standard advice for small spaces, and while it does reflect light, an all-white box can feel sterile and flat. Introducing a deliberate pop of color adds depth, which paradoxically makes the room feel larger. When your eye has a focal point—like a hunter green lower cabinet, a terracotta backsplash, or a navy blue pantry door—it perceives the room as having layers and dimension rather than just being a small enclosure.
You don’t have to paint the whole room. In fact, “color blocking” is more effective in tight quarters. Try painting just the base cabinets a rich, grounding color while keeping the upper cabinets white. This “grounding” effect makes the ceiling feel higher. Alternatively, paint the inside of your open shelving or glass-front cabinets a vibrant hue. It creates a jewel-box effect that showcases your dishes and adds personality without overwhelming the senses. The texture of the color matters too; matte finishes absorb light and feel cozy, while high-gloss finishes bounce light and feel energetic.
Save this idea to your Pinterest.
Floating Shelves with Labeled Glass Jars
Visual clutter is just as stressful as physical clutter. A small kitchen might actually have enough storage space, but if that space is filled with screaming logos, crinkly plastic bags, and mismatched cardboard boxes, it will feel chaotic. The solution is the “decanting” method paired with floating shelves. By transferring dry goods—pasta, flour, sugar, lentils—into uniform glass jars, you strip away the visual noise of the grocery store packaging.
Glass jars introduce a rhythm and repetition that the human brain finds soothing. When placed on open shelves, the ingredients themselves become the decor. The warm tan of brown sugar, the pale yellow of pasta, and the white of rice add natural, organic colors to your kitchen. Labeling is crucial here, not just for identification, but for style. A simple white grease pencil or a modern embossed label maker adds a professional touch. This system also lets you see exactly how much you have left, preventing overbuying and saving precious pantry space.
Pro Tip: Write the expiration date and cooking instructions on the bottom of the jar with a dry-erase marker before you toss the original box.
Open Shelving Pantry Details
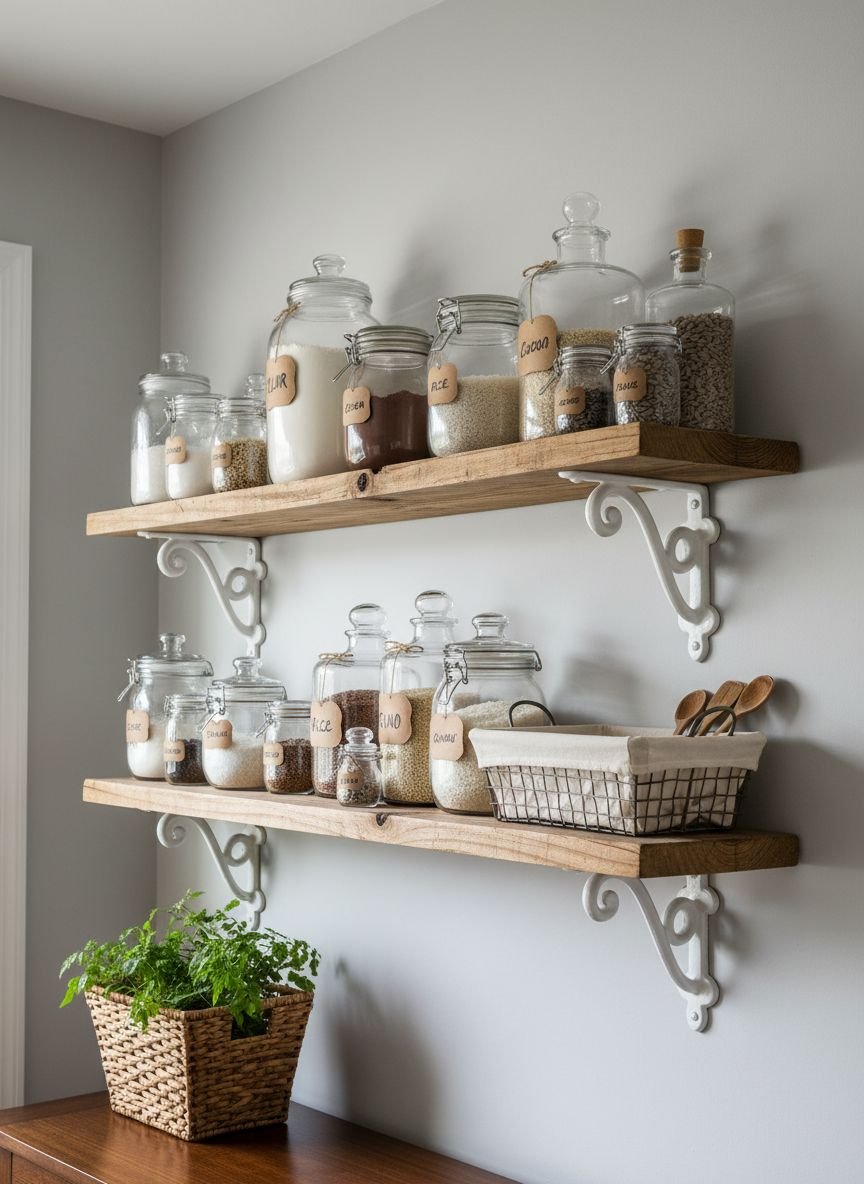
If you lack a built-in pantry, you have to create one. An open shelving unit can serve this function beautifully, but it requires strict curation to avoid looking like a mess. This isn’t just about jars; it’s about grouping. Use large wire baskets to corral “loose” items like bags of chips or granola bars. Use wooden crates to hold heavy items like soda cans or root vegetables at the bottom. The mix of materials—glass, metal wire, wood—adds interest to the room.
The “details” here refer to the layering. Don’t just line things up in a straight row. Stack cake stands to create vertical height on a shelf. Lean wooden cutting boards against the back wall of the shelf to add warmth and hide the wall behind it. Incorporate a small plant or a framed piece of art. When you treat your open pantry like a display case rather than a storage locker, it elevates the entire kitchen. It shifts the narrative from “I don’t have enough closet space” to “I have a beautiful, chef-inspired ingredient wall.”
Pro Tip: Group items by “activity” rather than food type. Create a “Breakfast Bin” with oatmeal, syrup, and pancake mix, so you only pull out one basket in the morning.
Utilize Space Above the Fridge
The top of the refrigerator is often a deep, dark, inaccessible ledge that collects grease and dust. In a small kitchen, ignoring this massive cubic footage is a mistake. However, because it is deep and high, it is difficult to use effectively. If you just push things back there, they are gone forever. The solution is to use deep, structured storage containers or to install a custom cabinet extender that brings the front of the cabinet flush with the fridge doors.
If building a cabinet isn’t an option, use large, rectangular wicker baskets or plastic bins with handles. These act as “drawers” that you can pull down entirely. This is the ideal spot for lightweight, bulky items that take up too much room in lower cabinets—think paper towels, exciting cereal stock, or large plastic serving bowls. By using opaque bins, you hide the contents, keeping the look clean. Ensure you leave a few inches of clearance for the fridge’s ventilation to prevent overheating.
Pro Tip: Store your vertical tray dividers here. The deep space above a fridge is perfect for slotting in cookie sheets, muffin tins, and cutting boards on their sides.
Get The Look: Small Kitchen Essentials
- For The Walls: Magnetic knife strip (Walnut or Stainless Steel).
- For The Cabinets: Acrylic shelf risers and under-shelf wire baskets.
- For The Pantry: 1-Gallon glass jars with bamboo lids.
- For The Floor: A washable runner rug to elongate the walking path.
Related posts :
- 10 Fantastic Outdoor Patio Kitchen Ideas That Will Instantly Upgrade Your Backyard Living Space
- 15 Genius Tiny Bathroom Ideas That Instantly Double Your Space
- 25 Stunning BBQ Island Ideas To Transform Your Backyard Oasis
Magnetic Fridge Racks
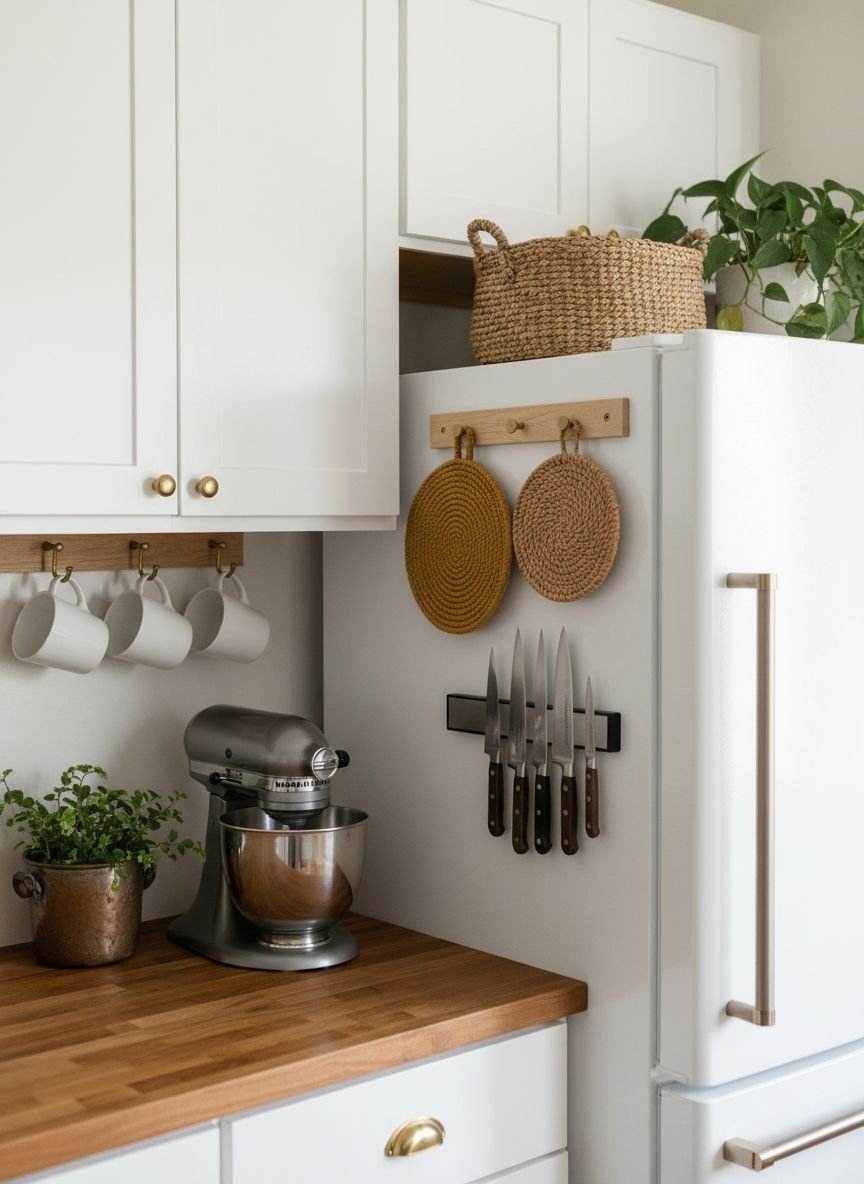
When you have run out of wall space and cabinet space, look to the side of your appliances. The side of your refrigerator is a giant magnetic steel canvas waiting to be used. Magnetic organizational racks have become incredibly sophisticated and strong. They are no longer just flimsy plastic hooks; modern versions are made of matte black steel or brushed nickel and can hold significant weight.
These racks are perfect for the “high reach” items you need while cooking. Store your spice jars, rolls of paper towels, aluminum foil, and parchment paper here. Some units come with hooks for oven mitts or scissors. This keeps these oddly shaped items off your counter and out of your drawers. It turns the “dead side” of the fridge into a functional command center. Because it is magnetic, it is completely rental-friendly—no drilling required.
Save this idea to your Pinterest.
Small Kitchen Counter Shelf
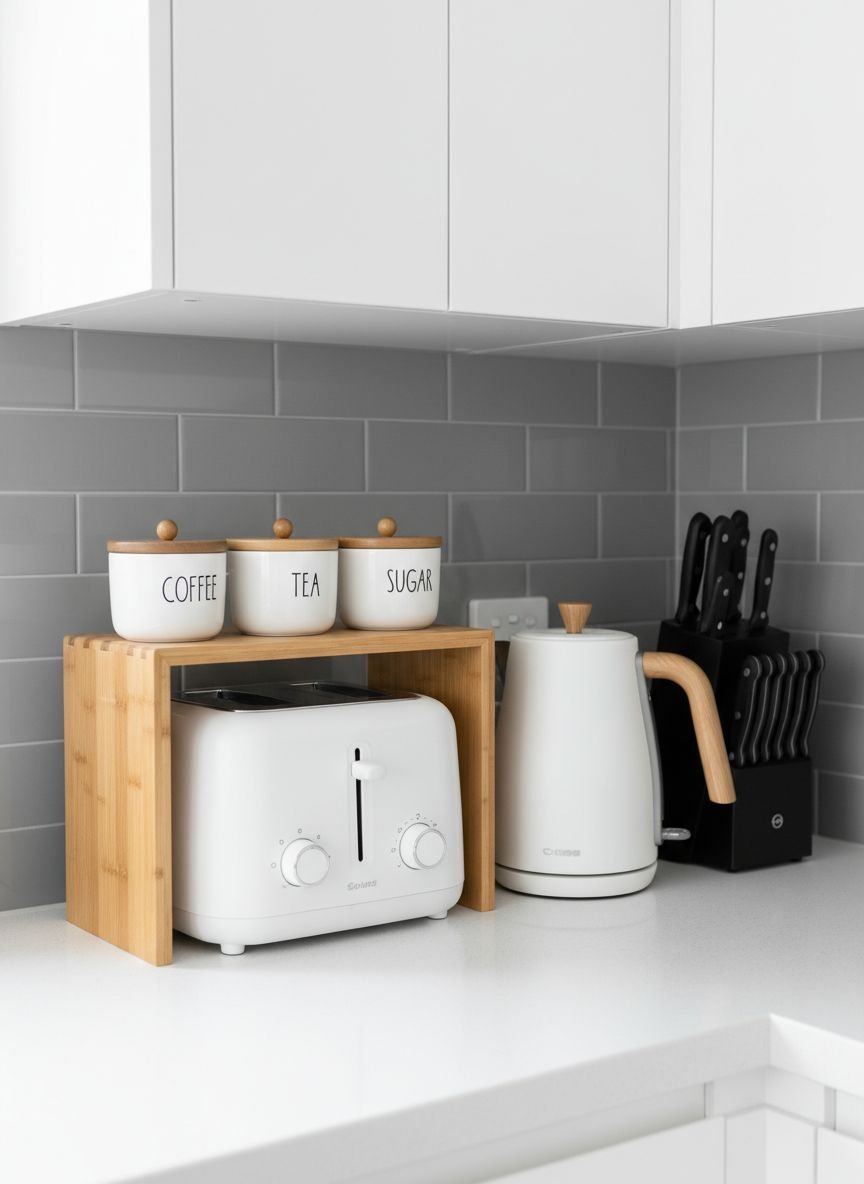
Counter space is the most precious currency in a small kitchen. When you place a toaster or a jar of utensils on the counter, you lose the footprint of that item forever. A counter shelf (or “cabinet riser”) allows you to reclaim the air space above that item. By placing a stylish wood or metal stand over your toaster oven or microwave, you create a second floor for your countertop.
You can stack your coffee mugs, sugar bowl, or fruit basket on top of the riser while the appliance sits snugly underneath. This effectively doubles the surface area of that specific spot. Look for risers with interesting legs or mixed materials (like marble and gold) to make it feel like a deliberate design choice rather than a desperate storage hack. It creates distinct “zones” on your counter—a coffee zone, a baking zone—which helps visually organize the workflow of the kitchen.
Pro Tip: Use a corner-shaped riser to maximize the deep, often unreachable corner of L-shaped countertops.
Fun Accent Color and/or Wallpaper
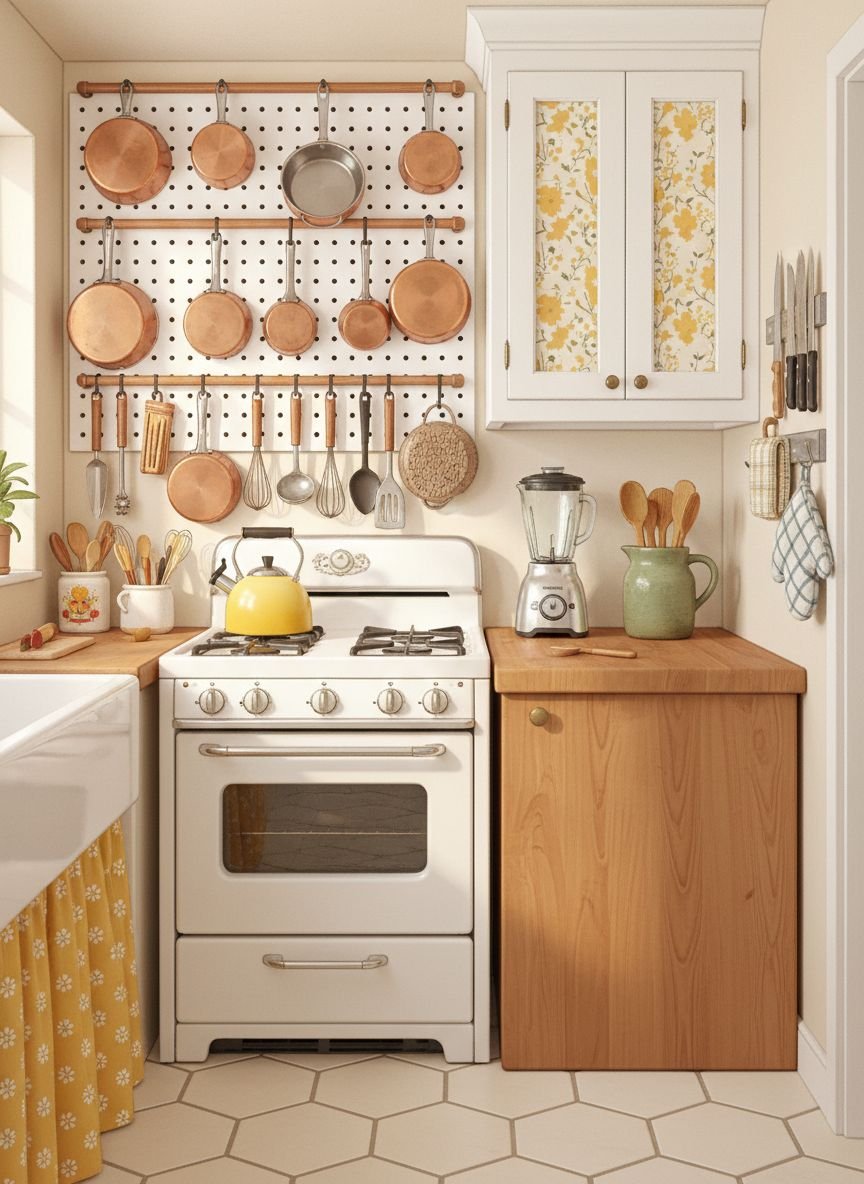
Small spaces are the perfect places to take big risks. In a massive kitchen, a bold wallpaper might feel overwhelming, but in a tiny galley, it feels like a jewelry box. Adding a “fun” accent—whether it’s a peel-and-stick wallpaper with a lemon print, a geometric backsplash, or a bright yellow ceiling—draws the eye away from the size of the room and toward the design details.
Wallpaper can also blur the boundaries of the room. A vertical stripe pattern can make low ceilings feel higher. A busy floral pattern can actually hide the visual clutter of open shelving. If you are nervous about wallpaper, try painting the window trim a surprising color, like teal or coral. This frames the view and brings light into the room. The goal is to create a space that brings you joy, making the lack of square footage feel cozy and bespoke rather than cramped and sad.
Pro Tip: Use leftover wallpaper to line the back of your cabinets or drawers for a secret pop of pattern every time you reach for a spoon.
Vertical Mugs & Bowls Cabinet Organization
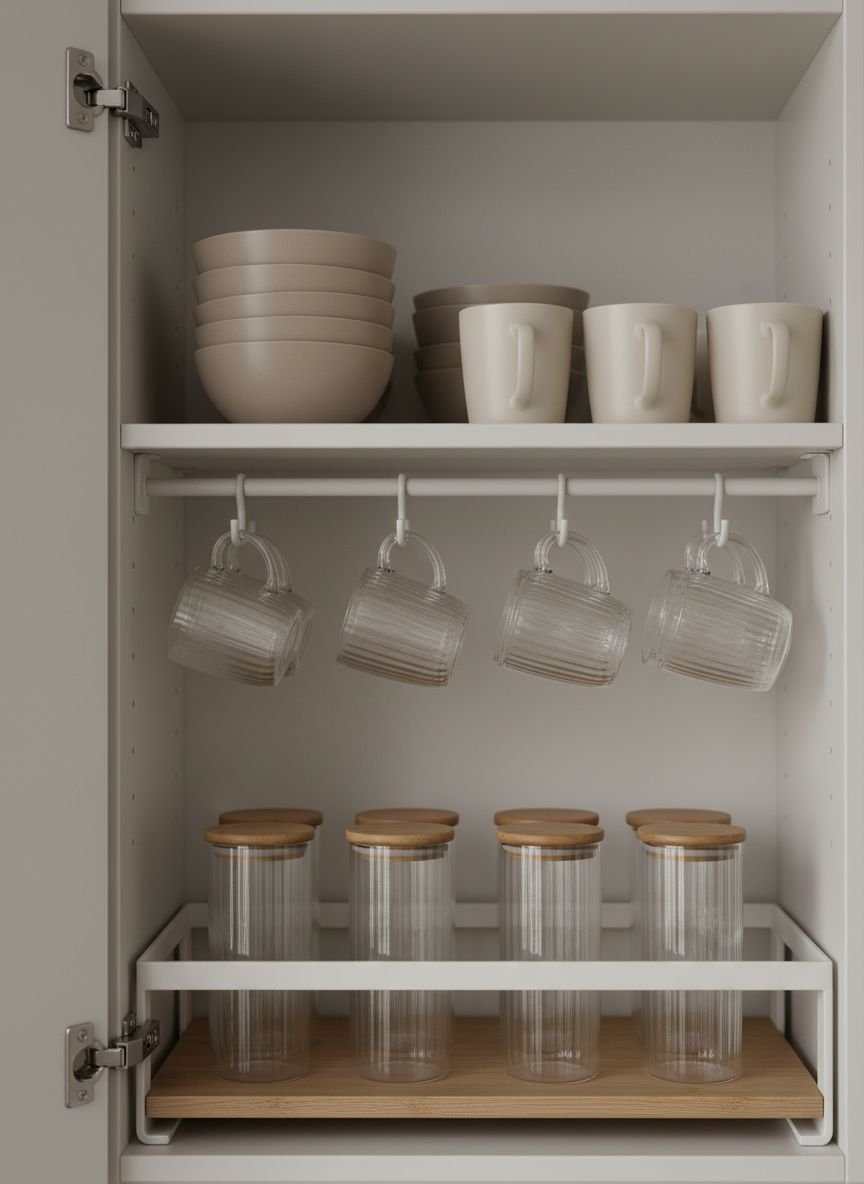
Mugs and bowls are notoriously difficult to stack. Mugs have handles that get in the way, and bowls can only go so high before they topple. Standard shelves leave massive air gaps above these short items. To maximize this, you need to hack the cabinet interior. Under-shelf hooks are a classic solution for mugs, allowing you to hang six to eight cups from the shelf above, leaving the surface below free for saucers or small plates.
For bowls, consider inserting vertical dividers or using “shelf bridges.” A shelf bridge is a small, freestanding shelf that sits inside your cabinet. You slide the large dinner bowls underneath and stack the smaller cereal bowls on top. This allows you to grab a small bowl without unstacking the entire pyramid. It utilizes the full height of the shelf, turning one layer of storage into two.
Pro Tip: Alternate the direction of your nesting bowls (one up, one down) if they have flared rims to fit more in a stack without them getting stuck together.
Plates Racks & Adjustable Shelves

The traditional method of stacking plates—dinner plates on the bottom, salad plates on top—is a recipe for frustration. You always need the plate at the bottom. A vertical plate rack changes the game. By storing plates upright (like records in a crate), you can grab exactly the size you need without lifting a heavy stack. This is particularly useful for heavy stoneware or oddly shaped platters.
If vertical storage isn’t your style, ensure your cabinet shelves are adjustable. Most standard cabinets have pre-drilled holes that allow you to move shelves up or down. We often accept the default spacing, but moving a shelf down by just two inches can create enough room for a second shelf above it. Customize the spacing to fit your specific glassware. If you have short tumblers, tighten the shelf spacing to fit more layers. If you have tall wine glasses, give them the room they need.
Save this idea to your Pinterest.
Additional Kitchen Cart (On Wheels) with Shelving

Sometimes, one cart isn’t enough. If you have a truly tiny kitchen with zero drawers, a secondary cart can act as your “mobile drawer unit.” Look for a cart with shallow wire baskets or solid drawers rather than just open shelves. This unit can hold the chaos of a junk drawer—batteries, tape, twist ties—or serve as a dedicated vegetable station for items that don’t need refrigeration.
The beauty of a secondary cart is its ability to leave the room entirely. When you are hosting a dinner party and need floor space for people to mingle, this cart can be wheeled into the hallway, the living room, or even the bathroom. It is transient storage. Style it with a nice plant on top or a cutting board so it looks like furniture, not just a storage bin. In a studio apartment, this cart can bridge the gap between kitchen and living area, perhaps serving as a bar cart on weekends and a potato storage unit on weekdays.
Pro Tip: Choose a cart that is counter-height so that in a pinch, it can serve as an extension of your workspace.
Popular Asked Questions
How do I organize a small kitchen without a pantry?
You have to “fake” a pantry using your walls and furniture. Use a standalone bookshelf or a rolling utility cart to hold dry goods. Install open floating shelves on an empty wall for jars and cans. You can also dedicate one upper cabinet solely to food, using clear bins to group items so you can fit more on each shelf.
How can I make my small kitchen look bigger?
Light and lines are your best tools. Use light colors (whites, creams, light grays) to reflect light. Keep window treatments minimal to let natural light in. Clear the counters as much as possible; visible surface area tricks the brain into seeing more space. Finally, use vertical lines—tall cabinets or striped wallpaper—to draw the eye upward.
What are the best storage hacks for small cabinets?
The best hacks utilize the “air” inside the cabinet. Use shelf risers to double your stacking space. Install hooks on the back of cabinet doors for measuring spoons and lids. Use lazy Susans (turntables) in corners so nothing gets lost in the back. Finally, use under-shelf baskets that slide onto existing shelves to hold flat items like wraps and foil.
How do I maximize counter space in a tiny kitchen?
Get everything off the horizontal surface that doesn’t need to be there. Mount a magnetic strip for knives instead of using a block. Hang a rail system under your cabinets for utensils and mugs. Use a sink cover (a cutting board that fits over the sink) to create temporary counter space while you chop.
Conclusion
Transforming a small kitchen isn’t about expensive renovations or knocking down walls; it’s about changing how you view the space you have. By embracing vertical storage, utilizing hidden nooks, and choosing mobile furniture, you can turn a cramped cooking area into a streamlined, efficient culinary studio. Remember, the goal is not just to fit everything in, but to create a flow that makes cooking a joy rather than a chore.

Leave a Comment