
Planning a vegetable garden often feels overwhelming. You stare at a patch of grass or a bare plot of dirt and wonder where to start. You want fresh tomatoes, crisp lettuce, and aromatic herbs, but you worry about wasted space or poor plant health. A smart layout solves these problems before you plant a single seed.
The right design increases your yield significantly. It reduces the time you spend weeding and watering. A well-planned garden also looks beautiful, turning a utility space into a backyard sanctuary. Whether you have a sprawling lawn or a tiny balcony, there is a configuration that fits your lifestyle. This guide breaks down twenty specific layouts to help you grow more food with less effort.
Key Takeaways
- Accessibility Matters: The best layouts prioritize easy reach to prevent soil compaction and back strain.
- Sun Orientation: Position tall crops on the north side of your layout to prevent shading smaller plants.
- Vertical Space: Utilizing vertical planes triples your growing area in small footprints.
- Soil Health: Raised and defined beds allow for better soil amendment and drainage control.
Table of Contents
- Raised Bed Layout
- Grid Layout
- Traditional Row Layout
- Keyhole Garden Layout
- Vertical Garden Layout
- Companion Planting Layout
- Mandala Garden Layout
- Potager Garden Layout
- Raised Rows Layout
- Container Garden Layout
- Four-Square Layout
- In-Ground Bed Layout
- Spiral Garden Layout
- Mixed Border Layout
- Themed Garden Layout
- Tiered Layout
- U-Shaped Garden Layout
- Zigzag Path Layout
- Wildlife-Friendly Layout
- Cluster Planting Layout
- Popular Asked Questions
- Conclusion
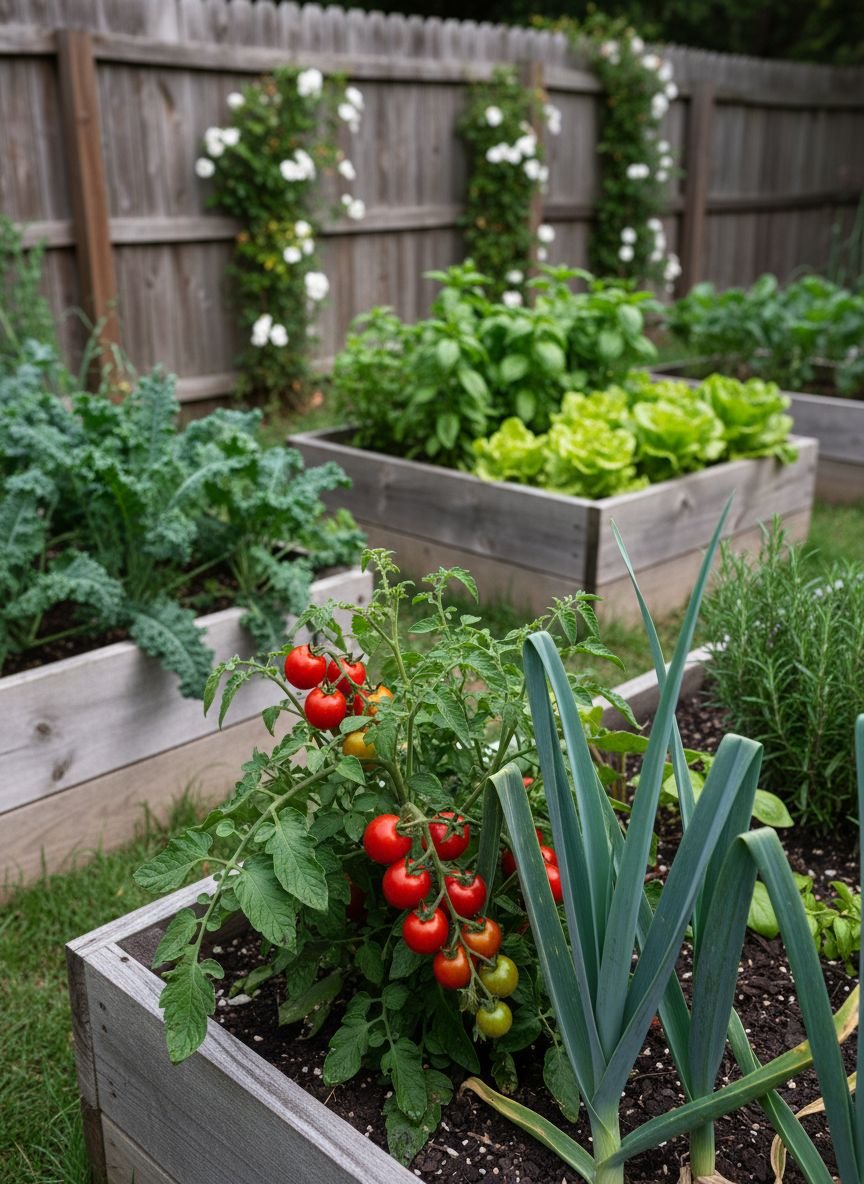
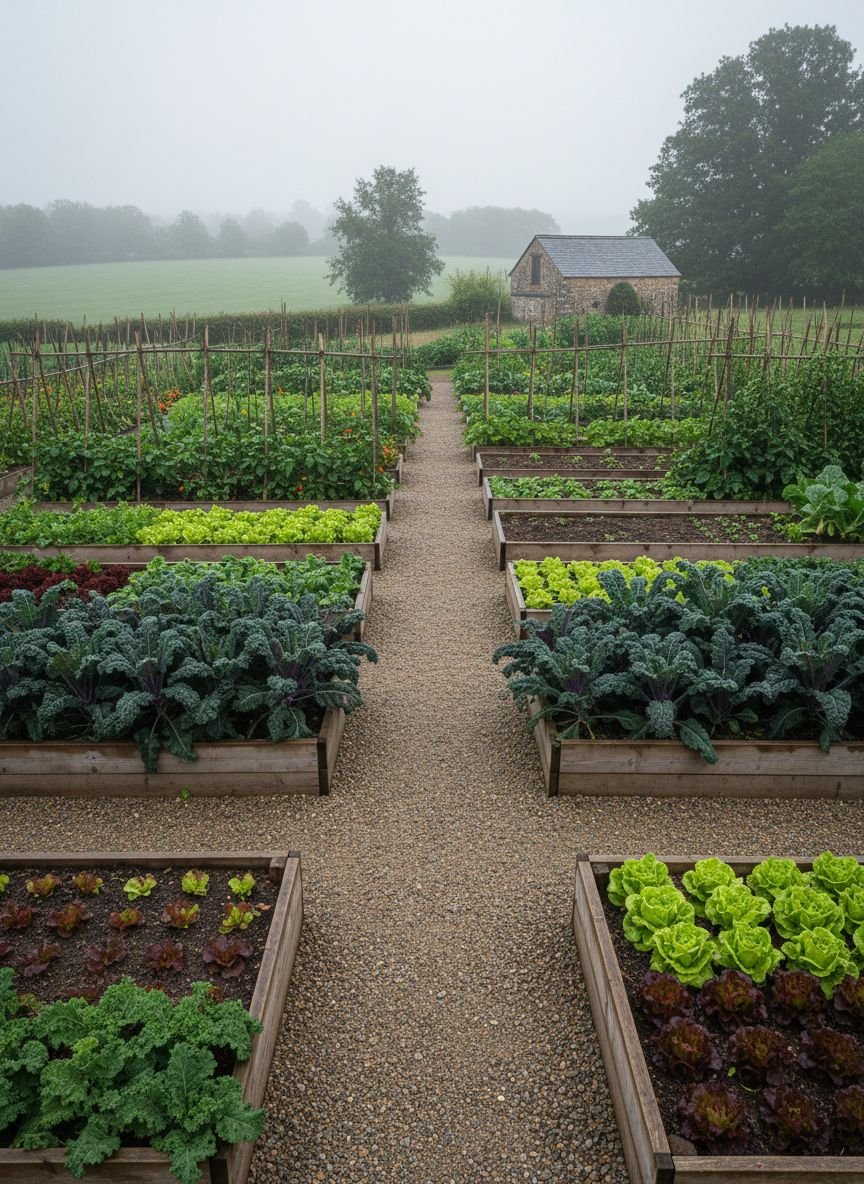
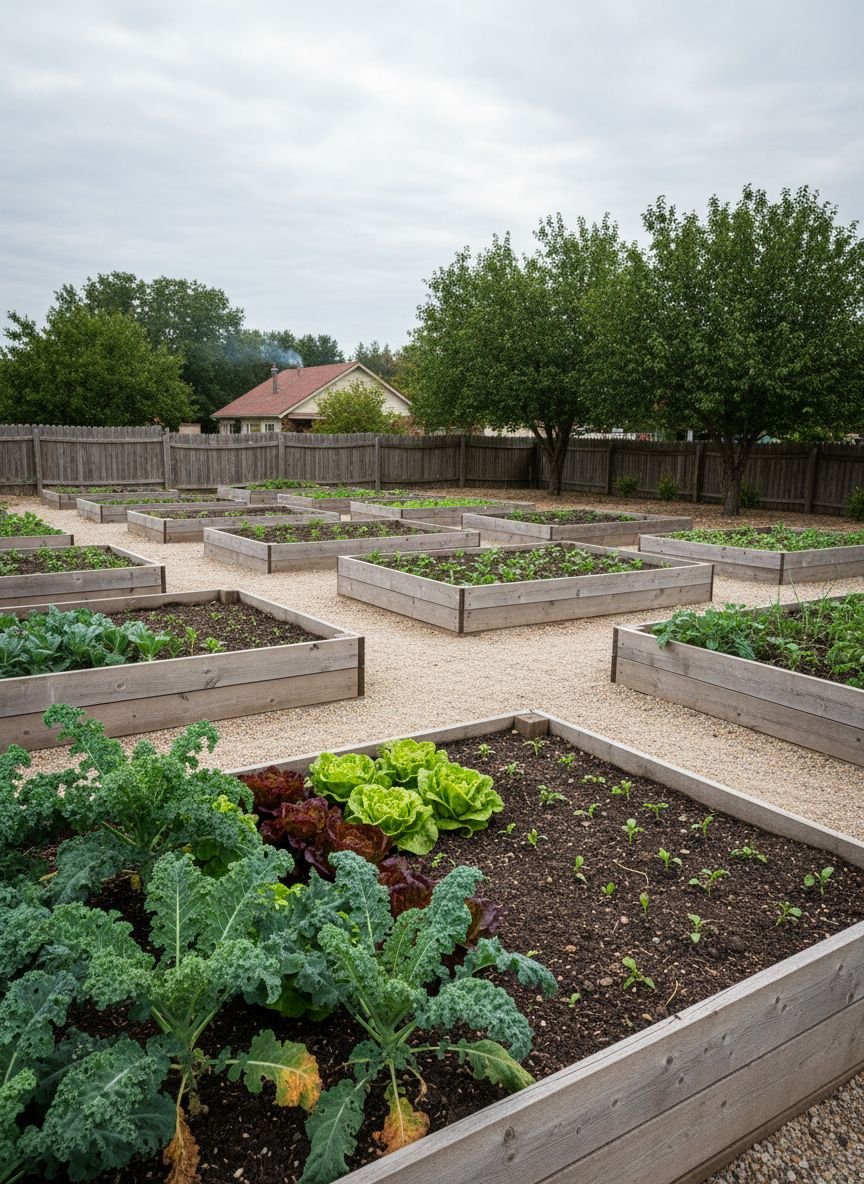
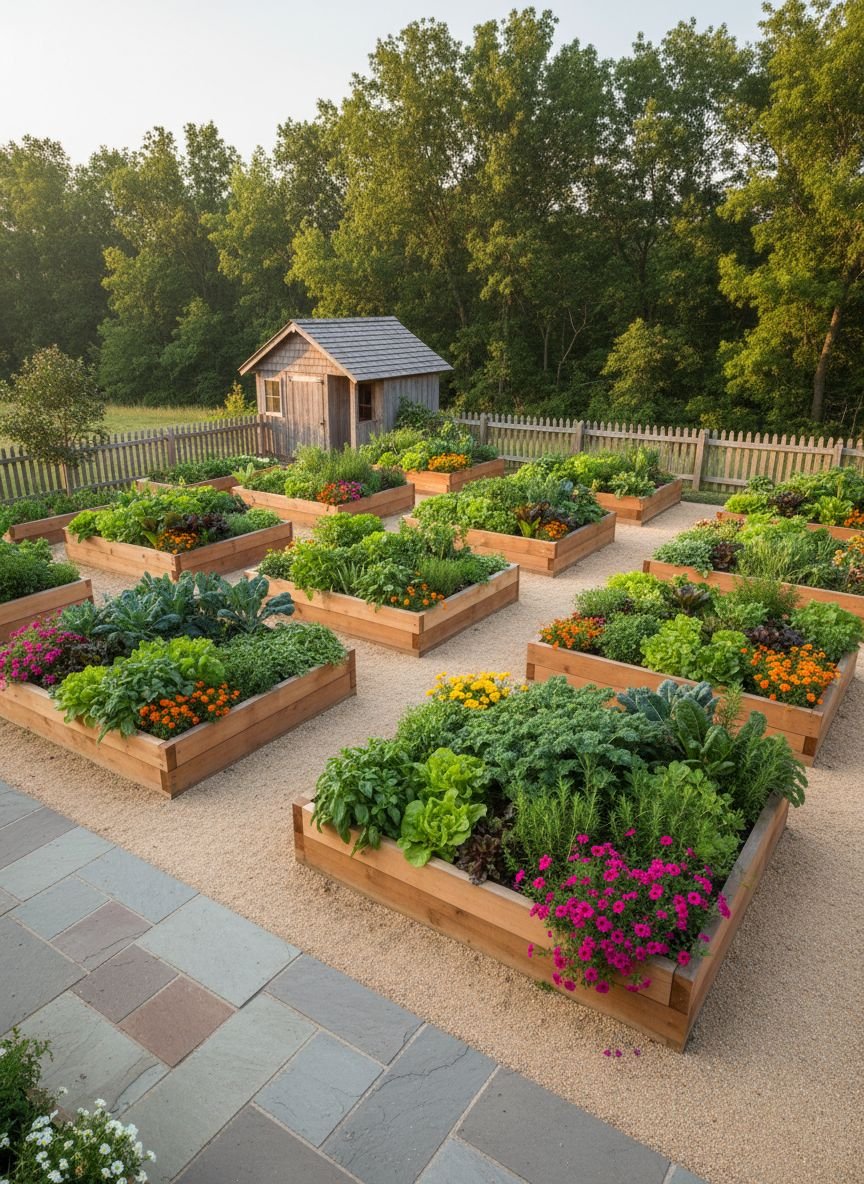
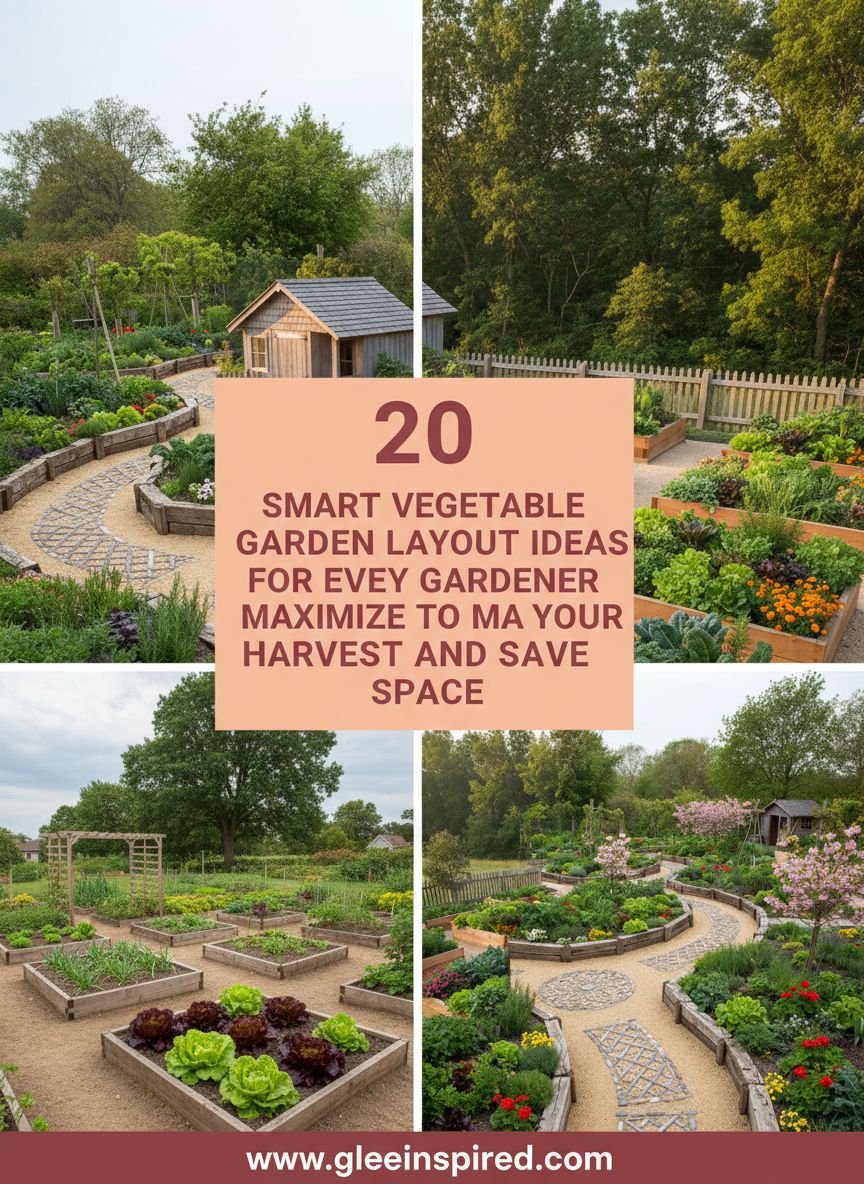
Raised Bed Layout
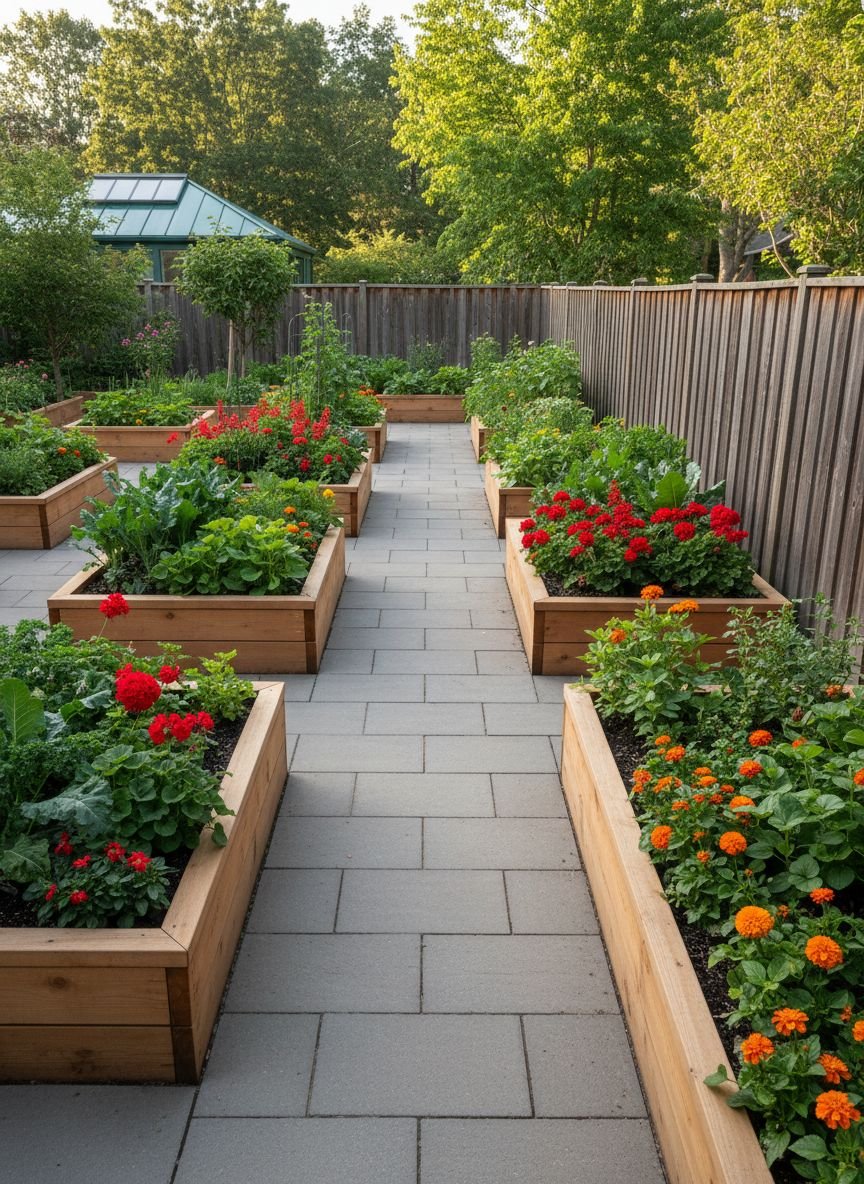
Raised beds remain the gold standard for modern backyard gardeners. This layout involves constructing boxes from wood, stone, or metal and filling them with high-quality soil. The elevation provides superior drainage and warms the soil earlier in the spring, allowing for a longer growing season. You create defined paths between the boxes, which keeps you from stepping on the growing area. This prevents soil compaction, a major enemy of root growth.
Visually, raised beds add structure and order to a yard. They look tidy even when plants are growing wild. You can arrange them in uniform rows or geometric patterns depending on your available space. For materials, cedar and redwood resist rot naturally without chemicals. If you have back issues, building the beds higher (24-30 inches) brings the plants to you, eliminating the need to bend over.
Pro Tip: Line the bottom of your raised beds with hardware cloth to stop moles and voles from burrowing up into your root systems.
Grid Layout
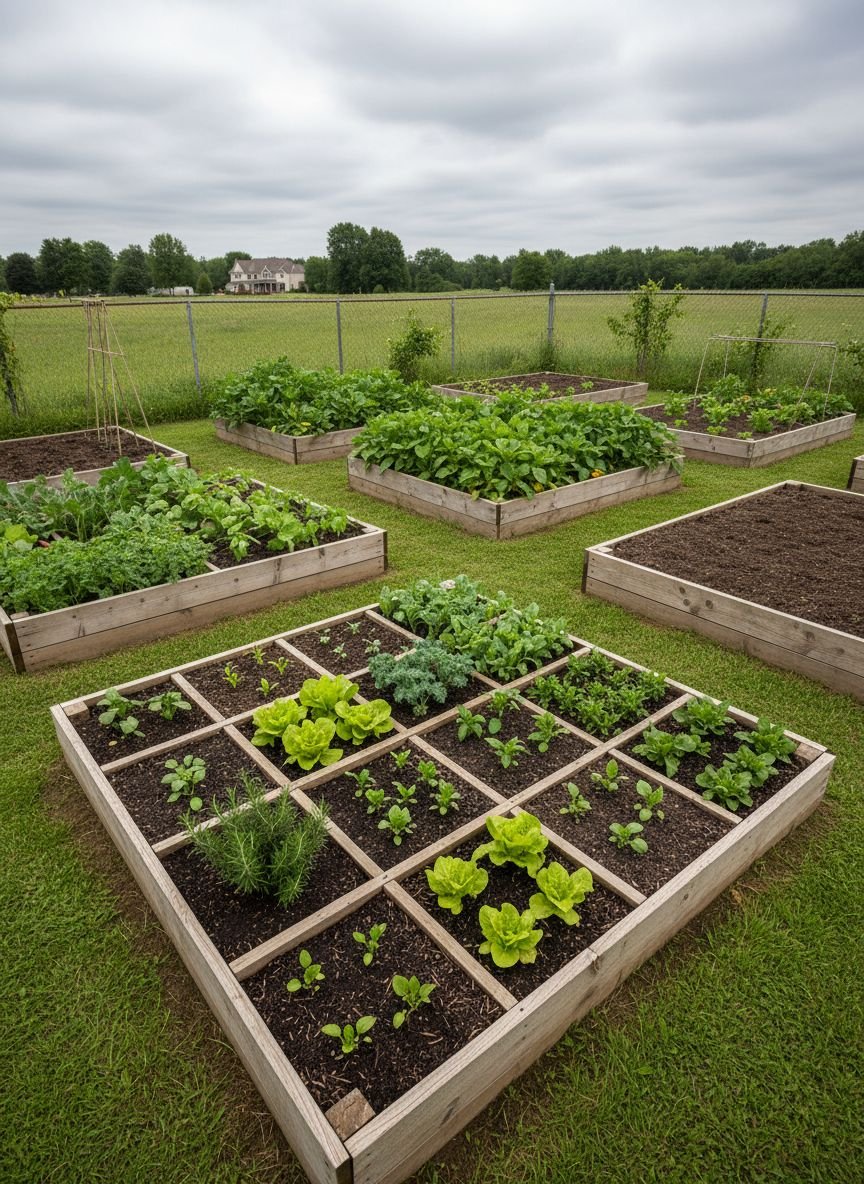
The grid layout, often popularized by the Square Foot Gardening method, focuses on intensive planting. You divide your growing area into small, manageable squares, typically 1×1 foot. Each square holds a specific number of plants based on their size. For example, one square might hold one pepper plant, four lettuce heads, or sixteen carrots. This method maximizes yield in minimal space and makes weed control incredibly simple.
This system eliminates the guesswork of spacing. You see exactly how much room you have and fill it efficiently. It creates a dense canopy of foliage that shades the soil, retaining moisture and suppressing weed germination. The grid is perfect for beginners because it provides a clear map. You can use string, lattice strips, or bamboo to physically mark the grids on top of your soil.
Pro Tip: Rotate crops by moving plant families to different squares each season to prevent nutrient depletion and pest buildup.
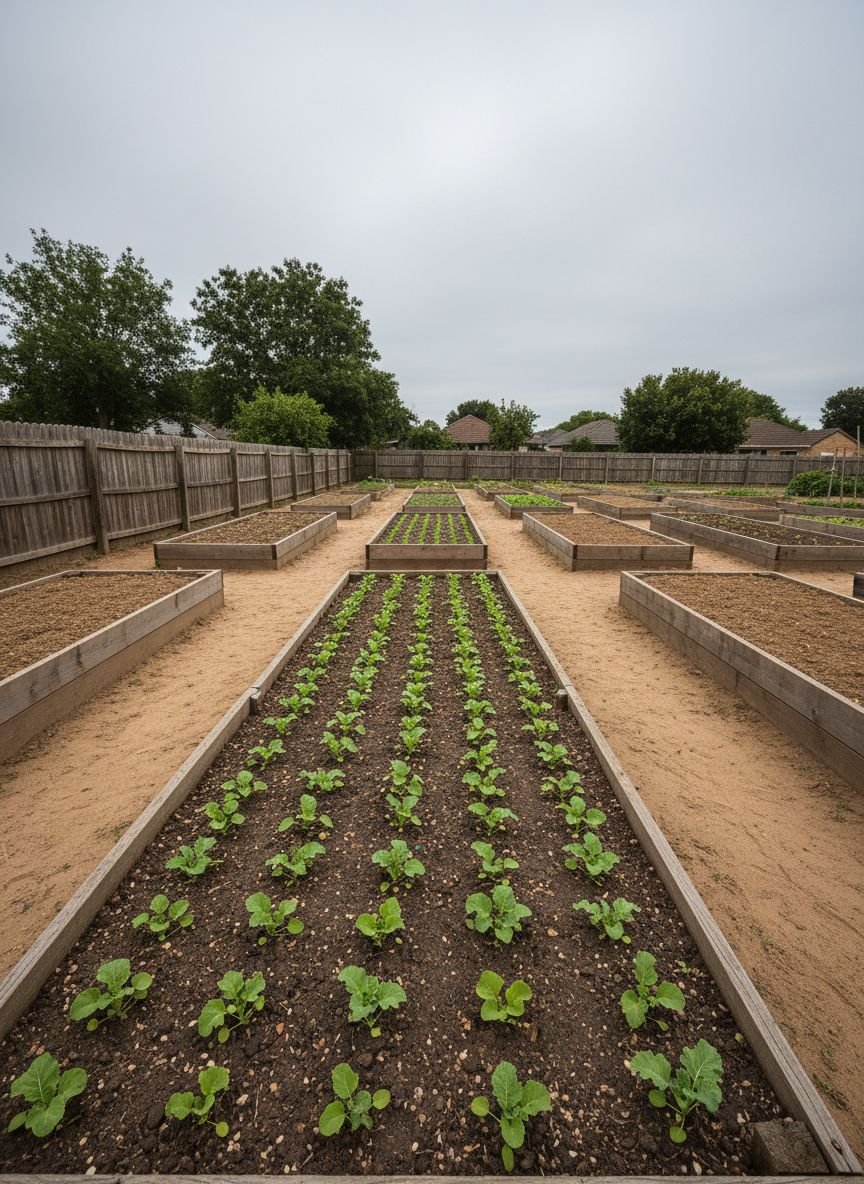
Traditional Row Layout
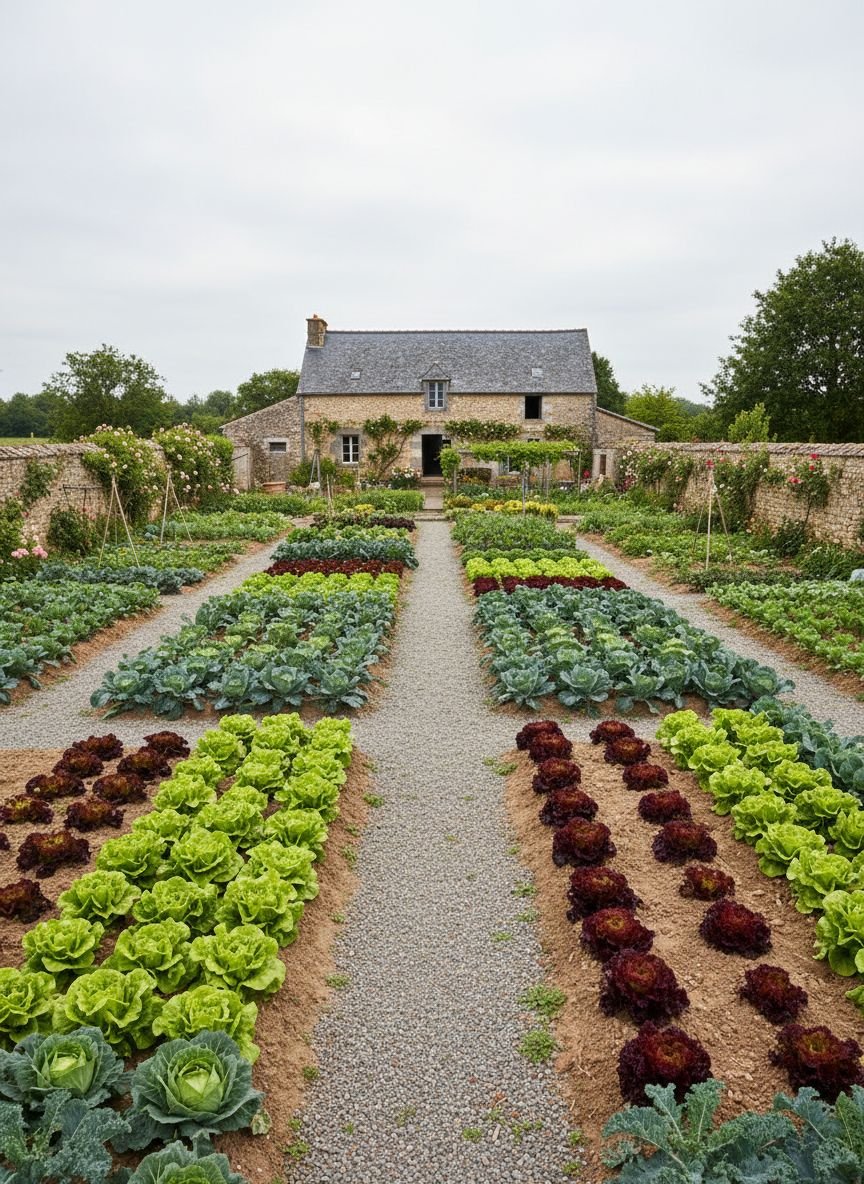
Traditional rows are what most people picture when they think of a farm. You plant crops in long, straight lines with walking paths between each row. This layout works best for large in-ground gardens where you have plenty of space. It is highly efficient for crops that require hilling, like potatoes or corn, and allows for easy irrigation using furrow or drip tape systems running down the line.
Air circulation is excellent in a row layout. The wide spacing helps prevent fungal diseases that thrive in stagnant, humid air. It also accommodates larger equipment. If you use a rototiller or a wheel hoe, the long straight paths allow you to work quickly without maneuvering around tight corners. While it takes up more space than intensive methods, the simplicity of management appeals to those growing staple crops for preservation.
Pro Tip: Orient your rows North to South to ensure all plants receive equal sunlight throughout the day without shading each other.
Keyhole Garden Layout
A keyhole garden is a circular raised bed with a wedge-shaped slice cut out, allowing you to walk into the center. In the very middle stands a composting basket. You dump kitchen scraps and gray water directly into this central basket. As the material decomposes, nutrients and moisture diffuse outward into the surrounding soil, feeding the plants constantly. This design originated in arid climates to maximize water retention and fertility.
This layout is a self-sustaining system. It reduces the need for separate fertilization and watering. The circular shape is space-efficient and eliminates corners where water might stagnate or soil might dry out unevenly. It serves as a beautiful focal point in a landscape. Stone or brick walls retain heat, extending the growing season into the cooler months.
Pro Tip: Place thirstier plants like cucumbers and tomatoes closer to the center compost basket, and drought-tolerant herbs near the outer rim.
Vertical Garden Layout
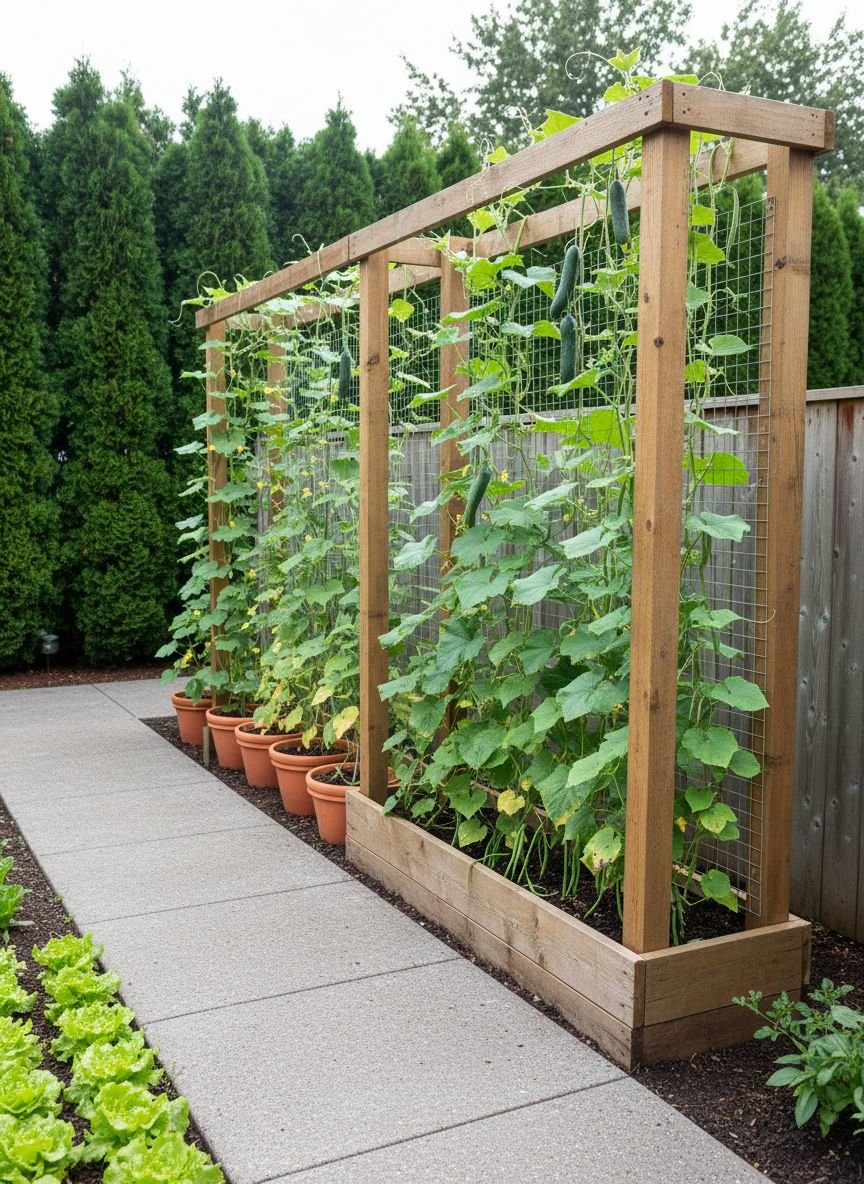
Vertical gardening utilizes upward space rather than outward sprawl. This layout relies on trellises, arbors, wall pockets, and hanging baskets. It is the ultimate solution for urban gardeners with limited square footage. Vining crops like pole beans, peas, cucumbers, and indeterminate tomatoes thrive when trained upward. This keeps the fruit off the ground, reducing rot and pest damage while making harvesting effortless.
The aesthetic impact of a vertical garden is dramatic. It creates living walls that provide privacy and screen unsightly views. By lifting the foliage, you increase airflow and sunlight exposure for every leaf. This setup allows you to plant shade-loving crops, like spinach or lettuce, in the shadow of the vertical structures, effectively doubling your planting capacity in the same footprint.
Pro Tip: Use sturdy cattle panels arched between two raised beds to create a “tunnel” trellis that you can walk underneath.
Save this idea to your Pinterest.
Comparison: Raised Beds vs. In-Ground Gardening
| Feature | Raised Beds | In-Ground Beds |
|---|---|---|
| Initial Cost | High (Materials + Soil) | Low (Tools only) |
| Soil Control | Complete control | Dependent on native soil |
| Drainage | Excellent | Varies widely |
| Warming | Warms up fast in Spring | Slower to warm |
| Watering | Dries out faster | Retains moisture longer |
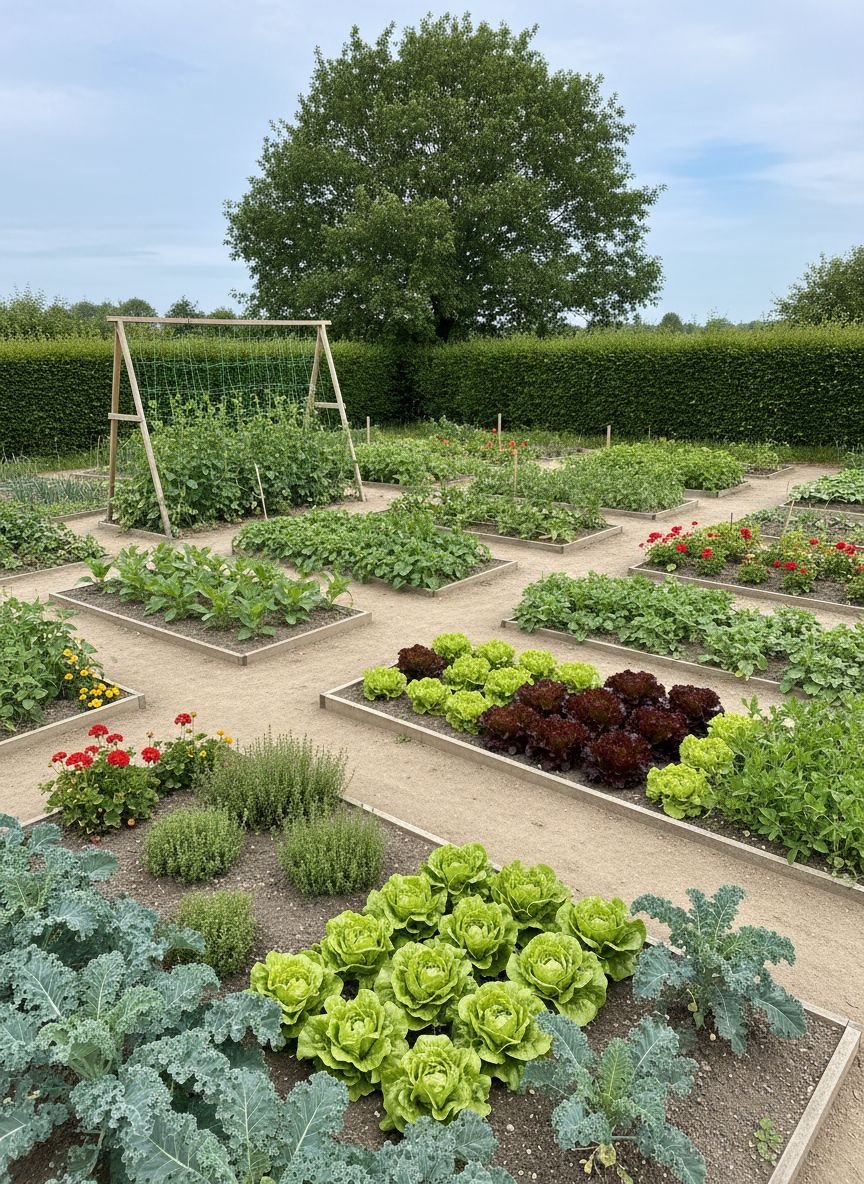
Companion Planting Layout
Companion planting moves away from monoculture blocks and mixes mutually beneficial plants. This layout pairs crops that help each other grow. For example, tall corn provides support for climbing beans, while squash covers the ground to suppress weeds (the “Three Sisters” method). Marigolds planted near tomatoes repel nematodes, and basil improves the flavor of peppers while deterring aphids.
This layout mimics nature’s diversity. It confuses pests that look for large concentrations of a single crop. It also maximizes space by combining plants with different root depths and growth habits. Deep-rooted carrots can grow right next to shallow-rooted onions without competition. The visual effect is a lush, cottage-style tapestry of textures and colors rather than rigid separation.
Pro Tip: Keep a notebook or digital chart of your companions, as some plants (like onions and beans) are enemies and will stunt each other’s growth.
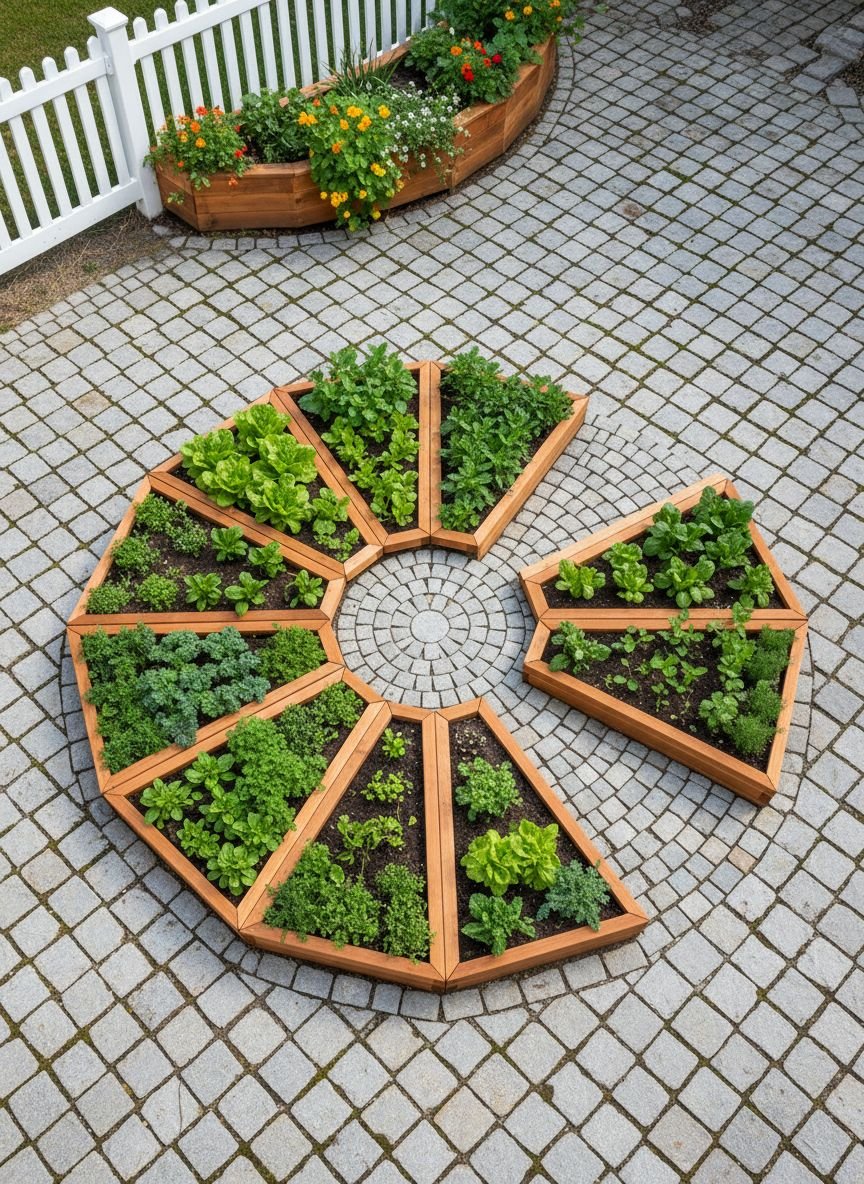
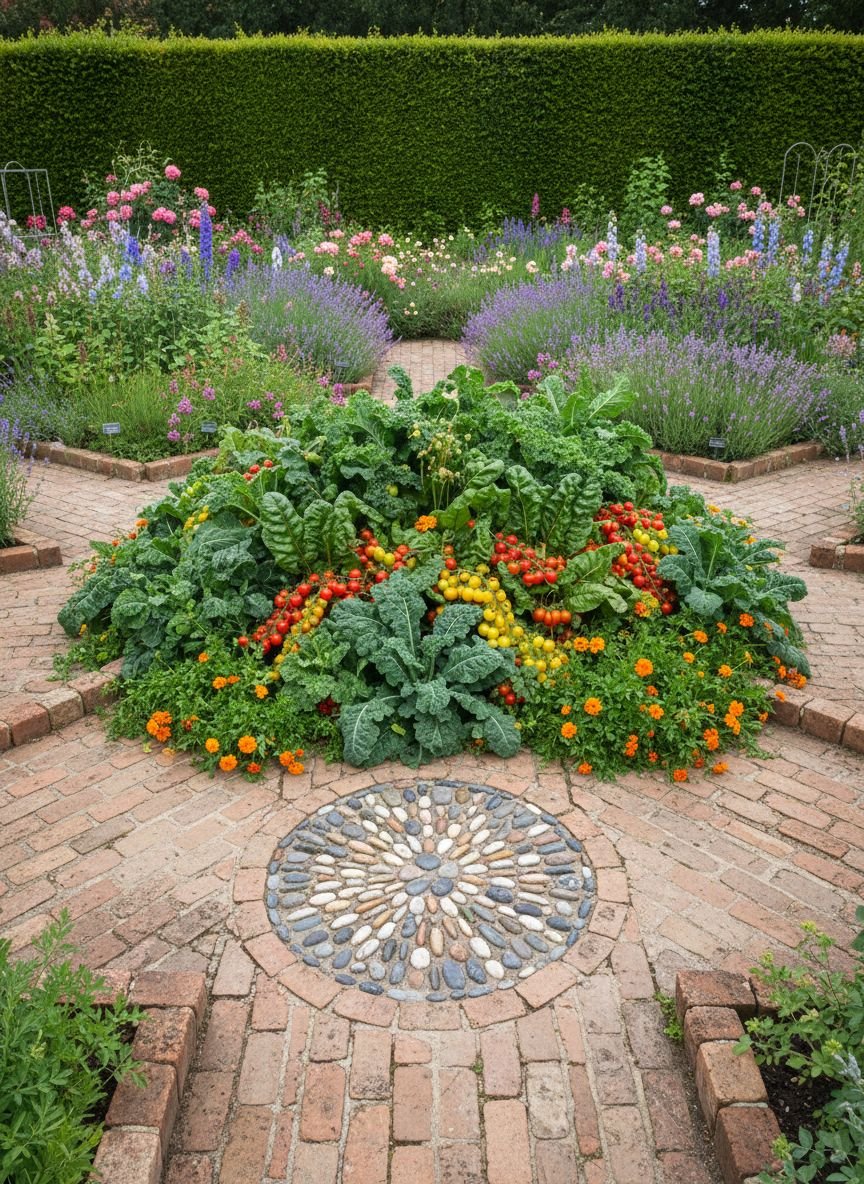
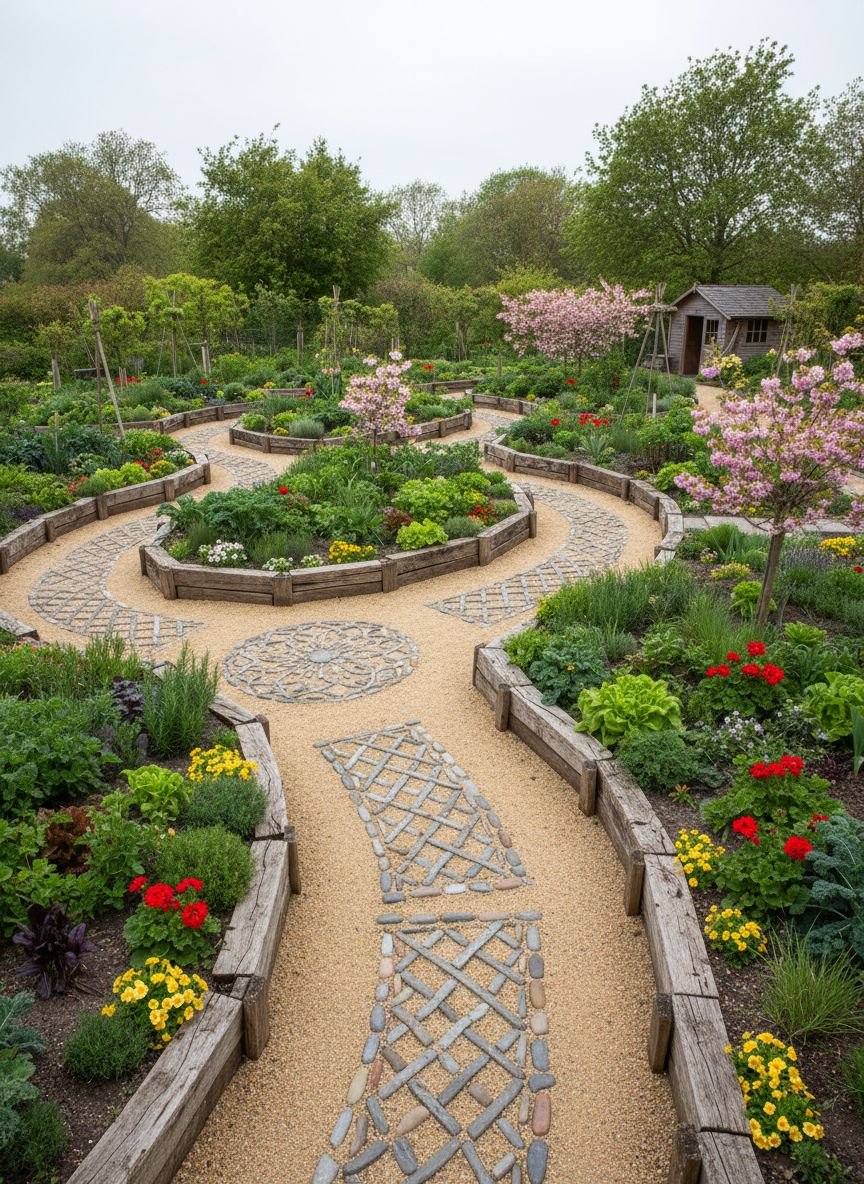
Mandala Garden Layout
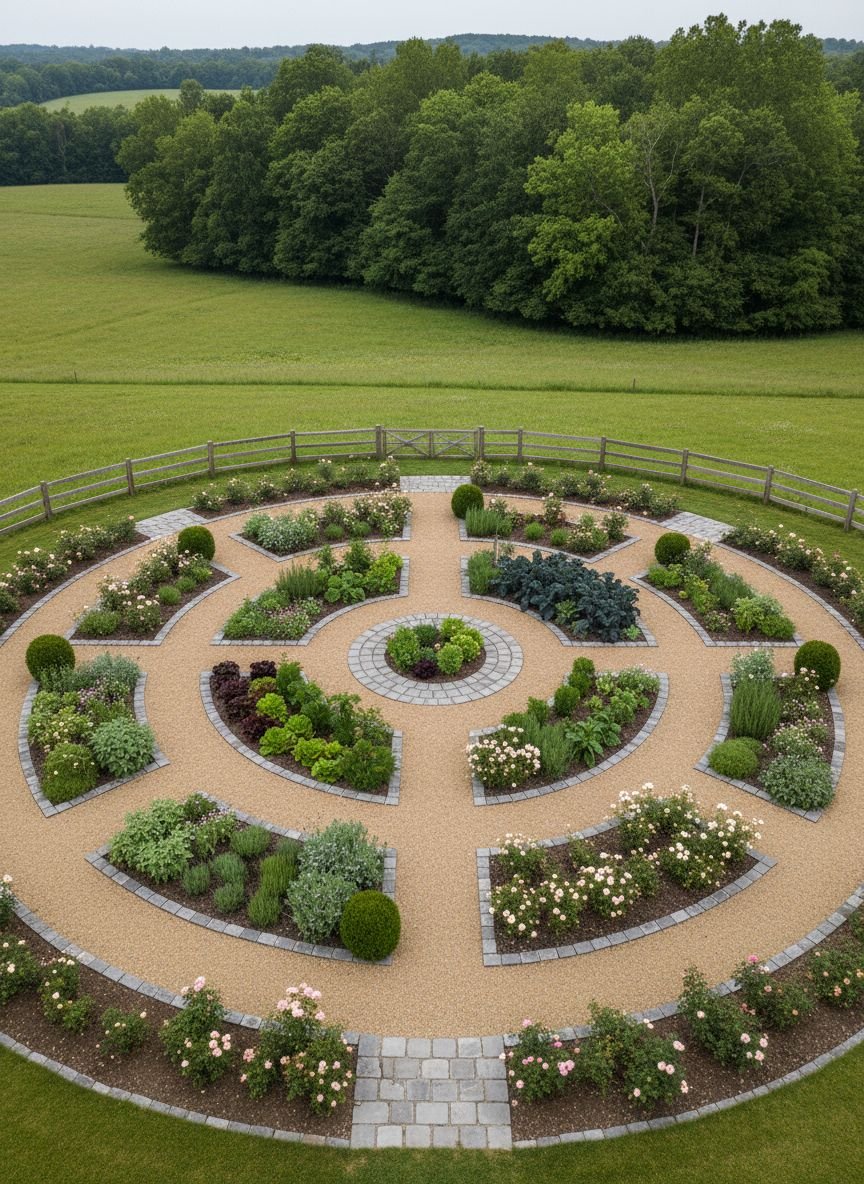
A mandala garden prioritizes sacred geometry and aesthetics alongside food production. Usually circular, this layout features concentric rings or spiral paths radiating from a central point. The design draws the eye inward and creates a meditative space. It breaks the monotony of straight lines and introduces curves that feel more organic and welcoming in a residential backyard.
Keyhole paths are often integrated into the mandala circles to allow access without compacting the growing beds. You can plant different colors in each “slice” or ring to create a living art piece. This layout works exceptionally well for herb gardens or salad greens where you harvest small amounts frequently. The curved edges maximize the planting edge, which is the most productive part of a garden bed.
Pro Tip: Use flexible edging materials like woven willow or metal strips to maintain the crisp curves of your mandala design.
Potager Garden Layout
The French Potager, or kitchen garden, blends flowers, herbs, fruits, and vegetables into a formal design. Unlike a utilitarian vegetable patch hidden in the corner, the potager is meant to be seen. It often uses geometric beds edged with low boxwood hedges or stone. The goal is year-round beauty. You might see ruby chard planted next to bright orange marigolds, or purple kale bordering a bed of white alyssum.
This layout encourages you to harvest daily because it is typically located close to the kitchen door. The mixture of ornamental and edible plants attracts a wide range of pollinators, ensuring excellent fruit set for your vegetables. It treats vegetables as landscape plants, valuing their foliage and form as much as their flavor.
Pro Tip: Install a central focal point, such as a birdbath, obelisk, or small fountain, to anchor the design and add winter interest.
Raised Rows Layout
Raised rows offer the benefits of raised beds without the expense of building materials. You simply mound the soil into wide, flat-topped rows, typically 6-8 inches high and 30 inches wide. The valleys between the rows serve as walking paths. This elevation improves drainage and warms the soil faster than flat ground, crucial for early spring planting in wet climates.
This method is flexible and practically free. If you decide to change your garden layout next year, you simply rake the soil flat and start over. There is no lumber to rot or hardware to buy. The loose, deep soil in the mounds allows roots to penetrate easily, resulting in vigorous plants. It bridges the gap between traditional row cropping and intensive bed gardening.
Pro Tip: Cover the walking paths with heavy mulch or cardboard to suppress weeds and retain moisture in the adjacent soil mounds.
Container Garden Layout
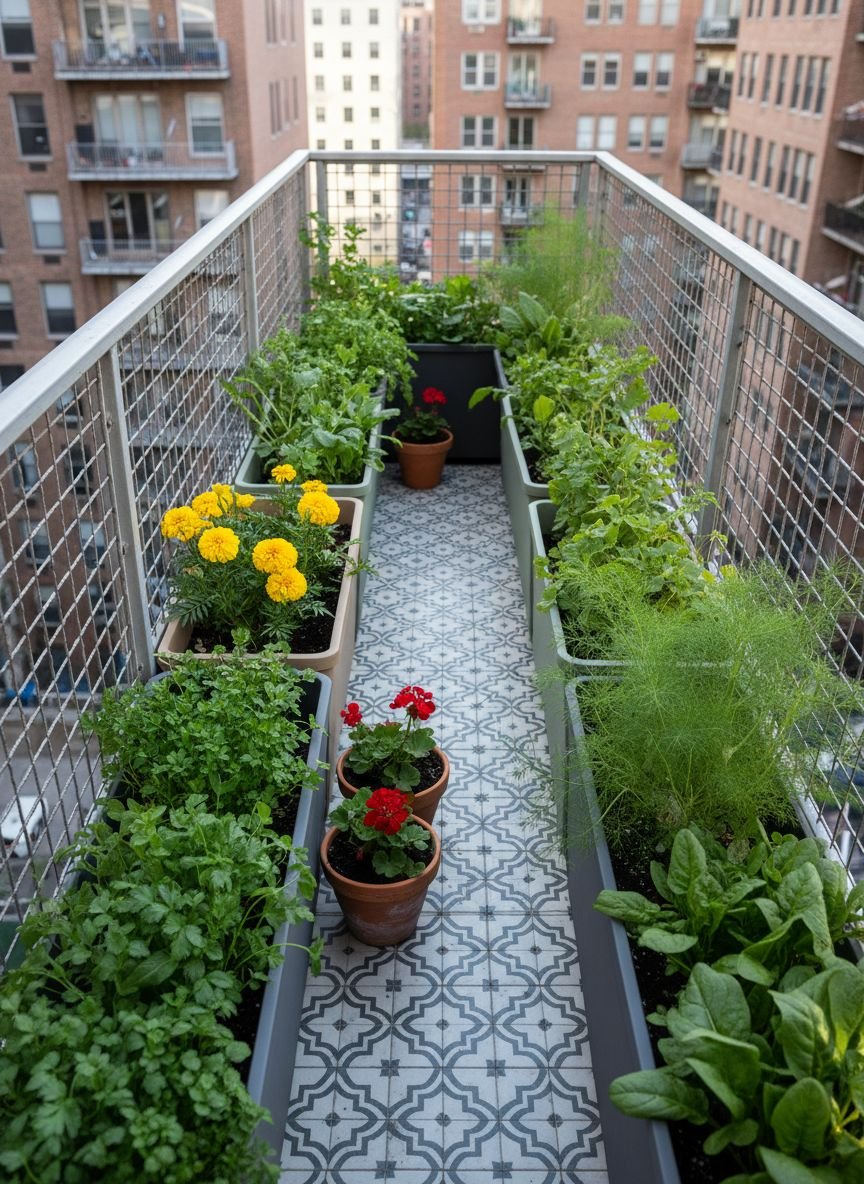
Container gardening frees you from the constraints of your ground soil entirely. You can grow food on concrete patios, wooden decks, or rooftops. This layout uses pots, grow bags, troughs, and window boxes arranged to maximize sun exposure. It offers ultimate mobility; if a plant is getting too much shade, you simply pick it up and move it.
This system creates a cozy, enclosed feeling on a patio. You can arrange pots of varying heights to create a tiered effect, placing tall tomatoes in the back and trailing herbs in the front. It significantly reduces weeding tasks and eliminates soil-borne diseases found in the ground. You have total control over the growing medium, allowing you to cater to specific plant needs, like acidic soil for blueberries.
Pro Tip: Group containers together rather than scattering them; the collective mass of soil and foliage helps raise local humidity and reduces water loss.
Save this idea to your Pinterest.
Related posts :
- 12 Very Small Garden Ideas On a Budget That Will Transform Your Tiny Outdoor Space Into a Paradise
- 18 Enchanting Fairy Garden Designs You’ll Want to Try This Weekend For a Magical Backyard Transformation
- 10 Fantastic Outdoor Patio Kitchen Ideas That Will Instantly Upgrade Your Backyard Living Space
Four-Square Layout
The Four-Square layout is a classic, historical design often found in colonial gardens. It consists of a large square bed divided into four smaller, equal-sized squares by two perpendicular paths that cross in the center. This creates a strong sense of order and symmetry. It is incredibly practical for crop rotation, as you can simply rotate plant families clockwise to a new square each year.
This layout scales well. It can be a small 8×8 foot feature or a massive 40×40 foot production garden. The central intersection is perfect for a feature element like a fruit tree or a trellis arch. The clear separation aids in organization, allowing you to dedicate one square to roots, one to legumes, one to leafy greens, and one to fruiting crops.
Pro Tip: Use brick or gravel for the cross paths to keep feet clean and add a permanent structural element to the garden.
In-Ground Bed Layout
In-ground beds, distinct from long rows, are wide patches of cultivated soil separated by permanent paths. Unlike raised beds, there are no walls. You shape the beds and stick to them year after year. This preserves the soil structure in the growing areas while sacrificing the path areas. It is the most cost-effective way to garden seriously since it requires no construction materials.
This layout connects your plants directly to the earth’s hydrology. Roots can travel deep to find water during droughts. It is easier to expand; you just dig another bed. Without wooden sides, you don’t provide hiding spots for slugs and snails. It feels open and natural, blending seamlessly into the surrounding lawn or landscape.
Pro Tip: Use “permanent” paths of white clover between beds; you can mow them, and they add nitrogen to the soil while enduring foot traffic.
Spiral Garden Layout
The herb spiral is a brilliant permaculture design that packs a massive amount of growing edge into a tiny footprint. You build a spiral ramp of soil held up by stones or bricks. The structure rises in the center. This creates various microclimates within a single 6-foot circle. The top is sunny and dry, perfect for rosemary and thyme. The bottom is moister and shadier, ideal for parsley and mint.
This layout is three-dimensional. It maximizes verticality and creates thermal mass. The stones absorb heat during the day and release it at night, protecting tender plants from frost. It is usually placed right outside the kitchen door for easy access while cooking. The spiral shape is naturally strong and self-supporting.
Pro Tip: Orient the bottom of the spiral to face north (in the Northern Hemisphere) to create the shadiest, coolest pocket for water-loving herbs.
Mixed Border Layout
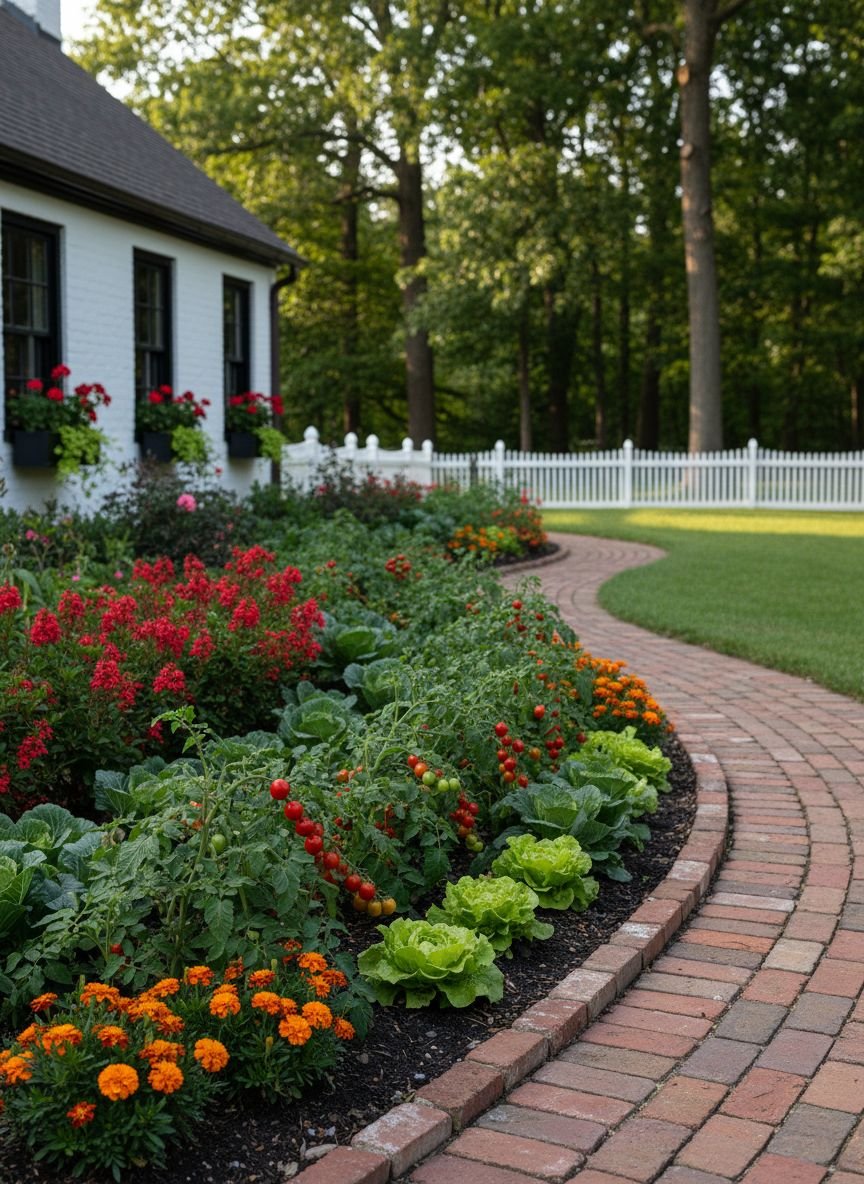
The mixed border layout integrates vegetables directly into your existing ornamental landscape beds. You don’t have a separate “vegetable garden.” Instead, you plant peppers alongside perennials, tuck lettuce behind tulips, and let squash vine through shrubs. This is often called “edible landscaping.” It is the perfect solution for HOA neighborhoods that restrict visible vegetable plots.
This approach camouflages your food production. Many vegetables are stunningly beautiful; artichokes have architectural silver leaves, and rainbow chard stems are vibrant neon. By spreading crops out, you make it harder for pests to find them. It maximizes every inch of soil in your yard, turning the entire property into a garden rather than segregating food to a hidden corner.
Pro Tip: Choose “pretty” varieties, such as ‘Bull’s Blood’ beets or ‘Linato’ kale, which hold their own visually against ornamental flowers.
Themed Garden Layout
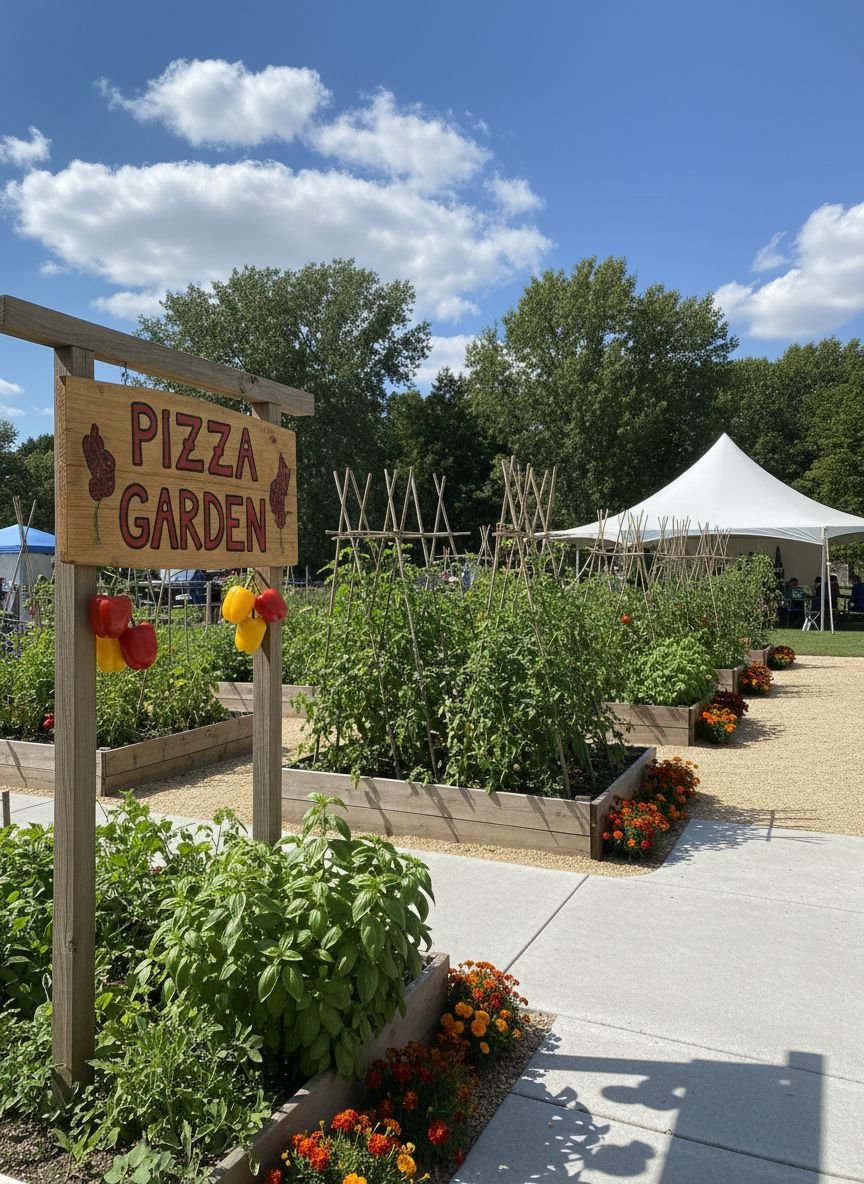
A themed layout organizes plants based on their culinary use rather than botanical family. You might have a “Pizza Garden” containing tomatoes, basil, oregano, and peppers. Or a “Salsa Garden” with cilantro, jalapeños, onions, and tomatillos. A “Tea Garden” could feature chamomile, mint, lemon balm, and lavender. This makes harvesting intuitive; you visit one bed to get everything you need for a specific dish.
This layout is fantastic for teaching children about food. It gives the garden a narrative and a purpose. It simplifies planning because the plant list is dictated by the theme. You can create small, distinct pockets for each theme, perhaps using different containers or small raised beds for each culinary group.
Pro Tip: For a “Salad Bar” theme, practice succession planting—sowing new seeds every two weeks—so you never run out of fresh greens.
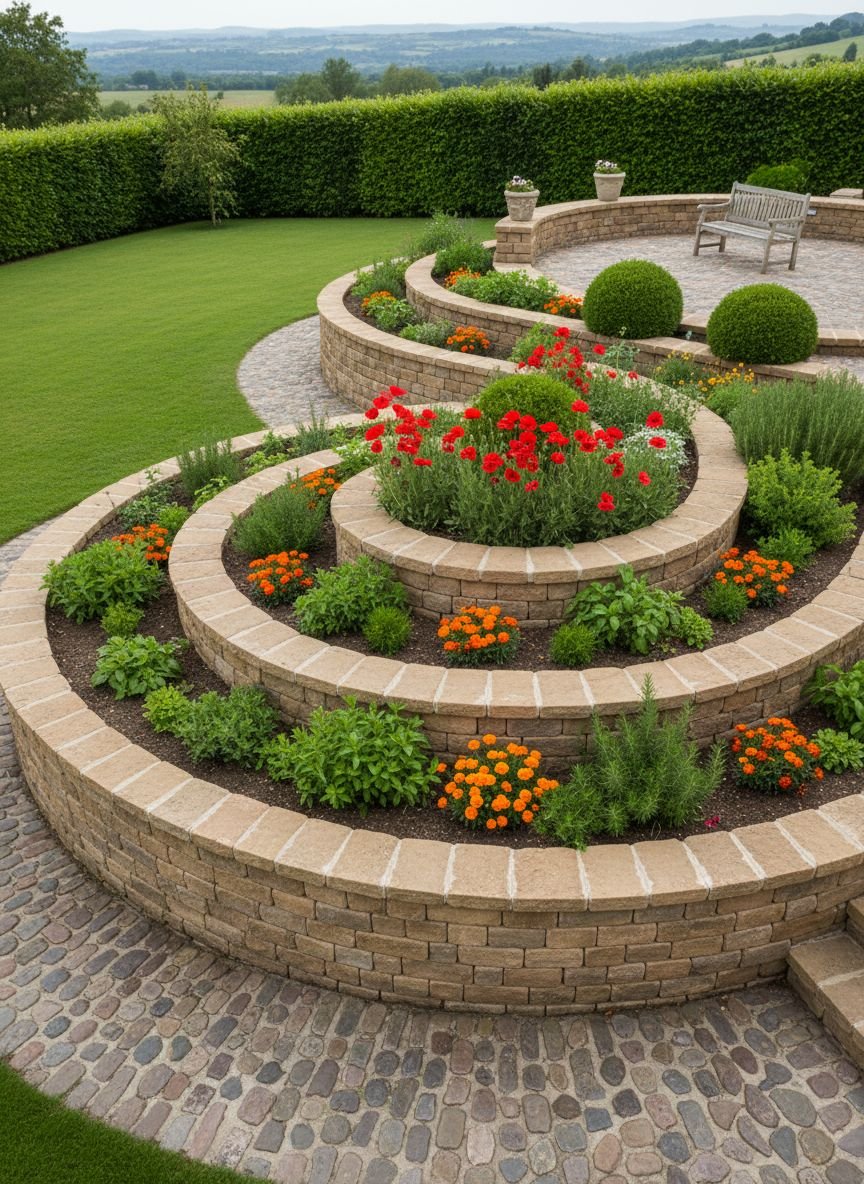
Tiered Layout

If your yard has a slope, a tiered layout is not just an option; it’s a necessity. You create terraces or steps down the hillside. Each level acts as a flat planting bed supported by a retaining wall. This prevents soil erosion and water runoff, turning a difficult unusable slope into a highly productive asset. The terracing catches water, allowing it to soak in rather than rush to the bottom of the hill.
Tiered gardens have excellent air drainage. Cold air sinks, so frost often flows down the steps, protecting plants on the higher levels. The vertical aspect displays plants beautifully, creating a wall of greenery. Access is usually via stairs built into the side of the terraces, making maintenance an intense but rewarding workout.
Pro Tip: Plant perennials or deep-rooted crops on the edges of the terraces to help stabilize the soil and reinforce the retaining walls.
Save this idea to your Pinterest.
“Get The Look” : Essential Tools
- Heavy Duty Landscape Fabric: For lining paths in row layouts.
- Cedar Lumber (2×6 or 4×4): The gold standard for rot-resistant raised beds.
- Cattle Panels: Cheap, industrial-strength wire mesh for vertical arches.
- Soaker Hoses: For efficient irrigation in grid and row layouts.
U-Shaped Garden Layout
The U-shaped layout wraps the garden around you. This is often done with raised beds arranged in a horseshoe pattern. You stand in the center “keyhole” and can reach three different planting zones by simply turning your body. It is arguably the most ergonomic design available. It minimizes the amount of path space needed relative to the growing space.
This layout fits perfectly into corners of a yard. It creates a sense of enclosure and privacy. If you orient the open end of the “U” towards the south, the entire garden captures the sun like a solar collector. It is highly efficient for watering and harvesting, as you don’t have to walk long distances to get from one side of the bed to the other.
Pro Tip: Place a small bench or potting table in the open center of the U to create a functional workstation right in the middle of the action.
Zigzag Path Layout
Straight paths are efficient, but zigzag paths are magical. By creating beds with jagged or sawtooth edges, you increase the “edge effect.” The edge where the garden meets the path is often the most productive zone because plants there receive more light and air. A zigzag pattern significantly increases the total length of this edge compared to a straight line.
This layout slows you down. It forces you to meander through the garden, observing plants from different angles. It creates micro-pockets for planting that are sheltered from the wind. Visually, it adds dynamic energy to the garden, making a small space feel much larger and more complex.
Pro Tip: Plant low-growing herbs like thyme or creeping jenny in the crevices of the zigzag path to soften the hard edges.
Wildlife-Friendly Layout
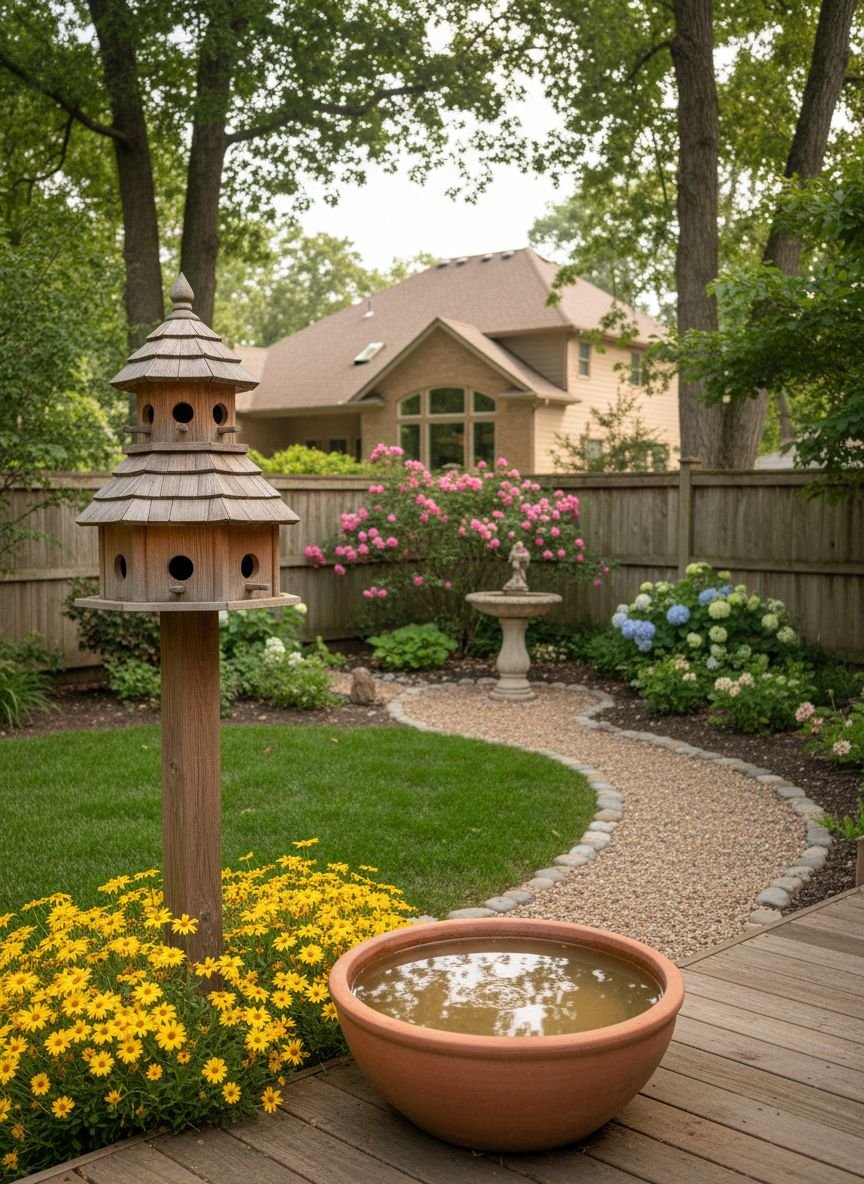
This layout dedicates specific zones to support the local ecosystem. You intersperse vegetable beds with “insectary” strips—rows of native flowers that attract pollinators and predatory insects. You might include a small pond for frogs (who eat slugs) and leave a pile of logs for beetles and hedgehogs. The goal is to create a balanced food web where nature controls the pests for you.
This garden buzzes with life. It is not a sterile production factory but a living habitat. By supporting pollinators, you ensure better yields for your squash, cucumbers, and melons. You also create a corridor for wildlife to move through your property safely. It requires a shift in mindset; a few holes in kale leaves are tolerated as part of the ecosystem tax.
Pro Tip: Let some of your vegetables, like broccoli or radishes, bolt (go to flower) at the end of the season; bees absolutely love brassica flowers.
Cluster Planting Layout
Cluster planting, or “guild” planting, is a permaculture technique often used around fruit trees. Instead of a separate vegetable patch, you plant vegetables in a circle around a central tree or shrub. The tree provides light shade for cool-weather crops like lettuce or spinach during the heat of summer. The vegetables act as a living mulch, retaining moisture for the tree roots.
This layout saves space by stacking crops vertically. It utilizes the area under trees that is often wasted on grass. It creates symbiotic relationships; for example, planting comfrey around a fruit tree allows you to “chop and drop” the comfrey leaves to fertilize the tree naturally. It is a decentralized way of gardening that integrates food production into the wider landscape.
Pro Tip: Ensure the central tree is pruned high enough to allow sufficient light to reach the vegetable cluster beneath.
Popular Asked Questions
What is the most efficient vegetable garden layout?
The Grid Layout (or Square Foot Gardening) is widely considered the most efficient for yield per square foot. By eliminating wide rows and planting in dense blocks, you can grow 100% of the harvest in just 20% of the space required by traditional rows. It minimizes weeding and water waste.
Which direction should vegetable garden rows run?
In the Northern Hemisphere, rows should ideally run North to South. This orientation allows the sun to travel over the garden from east to west, ensuring that plants on both sides of the row get equal sunlight throughout the day. If rows run East-West, the plants in the southern row will shade the plants behind them.
How wide should a vegetable garden path be?
Paths should be at least 18 to 24 inches wide for comfortable walking. If you plan to use a wheelbarrow, you need a minimum of 36 inches. Main central paths are often wider (4 feet) to accommodate equipment and movement, while access paths between beds can be narrower.
How do I layout a garden for beginners?
Start small with a Raised Bed Layout. Build two 4×8 foot beds. This size is manageable, doesn’t require tilling poor soil, and allows you to reach the center from the sides without stepping in. It prevents the overwhelm that often leads beginners to quit by mid-summer.
Can you plant vegetables close together?
Yes, but with caution. Intensive planting (like in the Grid Layout) places plants so their leaves just touch at maturity. This creates a “living mulch” that shades the soil. However, overcrowding leads to poor air circulation and fungal diseases. Always follow the spacing guidelines on seed packets but look for the “intensive” or “block” spacing numbers.
Conclusion
Choosing the right vegetable garden layout is the first step toward a bountiful season. Whether you opt for the structured elegance of a Potager, the high-efficiency Grid, or the space-saving Vertical Garden, the “perfect” design is the one that gets you outside.
Don’t be afraid to mix and match these ideas. Your garden is a living experiment. Start with a plan that fits your current space and energy levels, and let it evolve as you grow.


Leave a Comment