

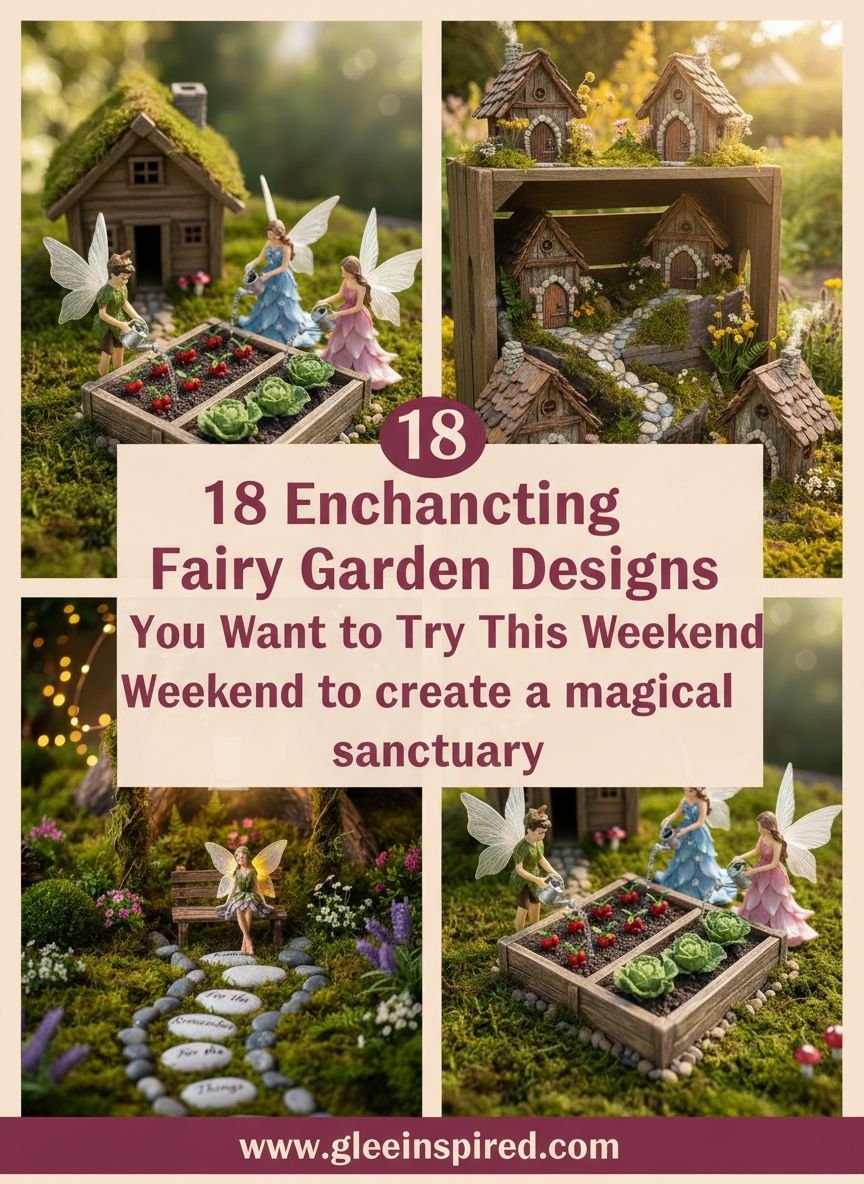
Creating a miniature world brings a touch of magic to any outdoor space. You do not need a massive backyard or a big budget to start. Small containers, broken pots, and tiny corners work perfectly for these whimsical projects. This guide breaks down specific, high-retention designs you can build this weekend. We focus on texture, scale, and plant selection to keep your miniature landscape thriving.
You will find designs here ranging from rustic tree stumps to intricate broken pot arrangements. Each idea solves a common problem, whether that is limited space, lack of sunlight, or the need for budget-friendly decor. Get ready to turn ordinary soil and plants into a captivating story.
Check out our related guide on [Small Garden Ideas].
Key Takeaways
- Scale matters: Choose plants with small leaves and slow growth rates to maintain the illusion of a tiny world.
- Repurpose everything: Broken pots, old birdcages, and tree stumps make the best foundations for these designs.
- Texture creates depth: Mix moss, smooth stones, and rough bark to make the scene look realistic and established.
- Lighting adds magic: Solar fairy lights or LED candles turn these gardens into evening features.
Table of Contents
- Tree Stump Fairy Garden Village
- DIY Fairy Garden in a Broken Pot
- Enchanted Forest Fairy Garden Theme
- Raised Bed Fairy Garden with Gnome Path
- Fairy Garden in a Vintage Lantern
- Fairy Garden with a Tree Trunk Doorway
- Flower Pot Fairy Garden for Small Spaces
- Whimsical Mushroom Fairy Cottage Scene
- Fairy Garden in a Hanging Basket
- Rustic Fairy Garden with Clay Accents
- Indoor Fairy Garden in a Glass Bowl
- Fairy Garden with a Stone Path and Archway
- Fairy Garden in a Repurposed Birdcage
- Gnome and Fairy Garden Combo Scene
- Fairy Garden with Miniature Vegetable Patch
- Memorial Fairy Garden with Candle Lantern
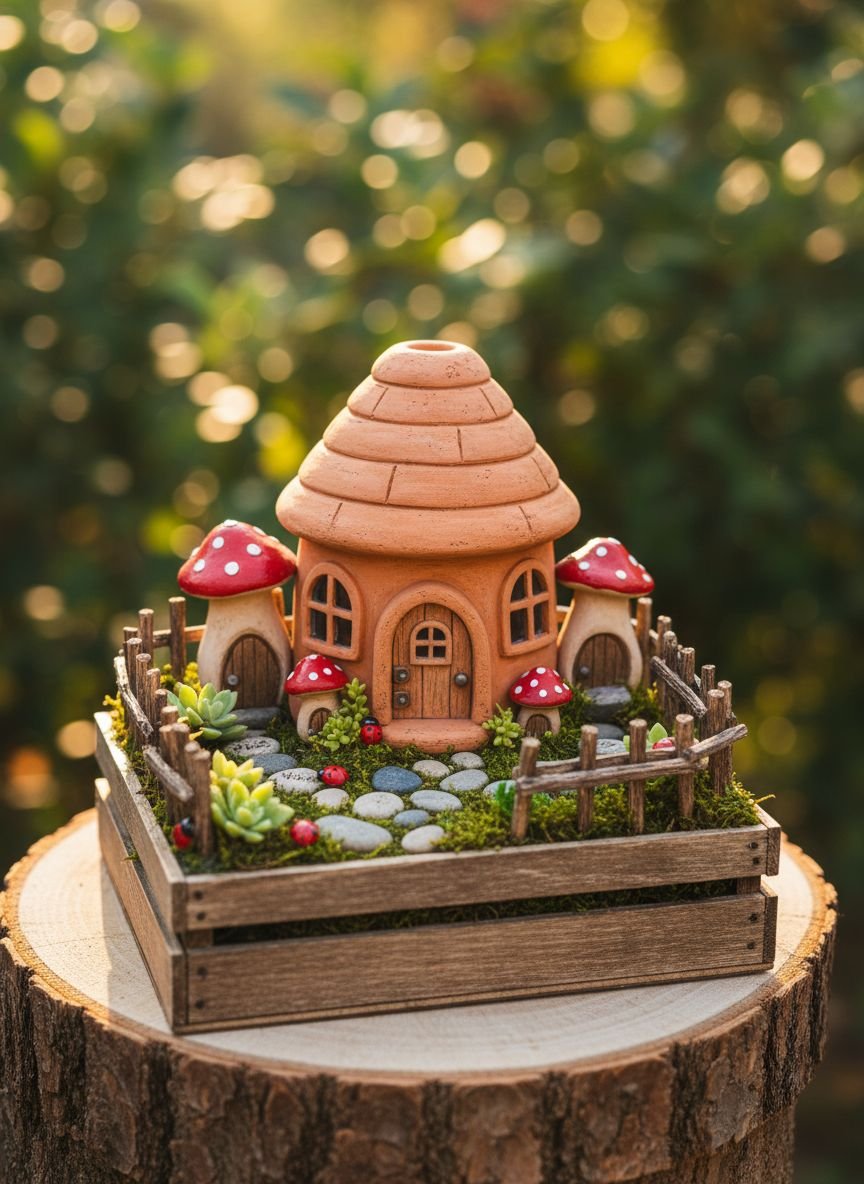
- Fairy Village in a Raised Wooden Crate
- Fairy Garden with Whimsical Water Feature
- Popular Asked Questions
- Conclusion
Tree Stump Fairy Garden Village
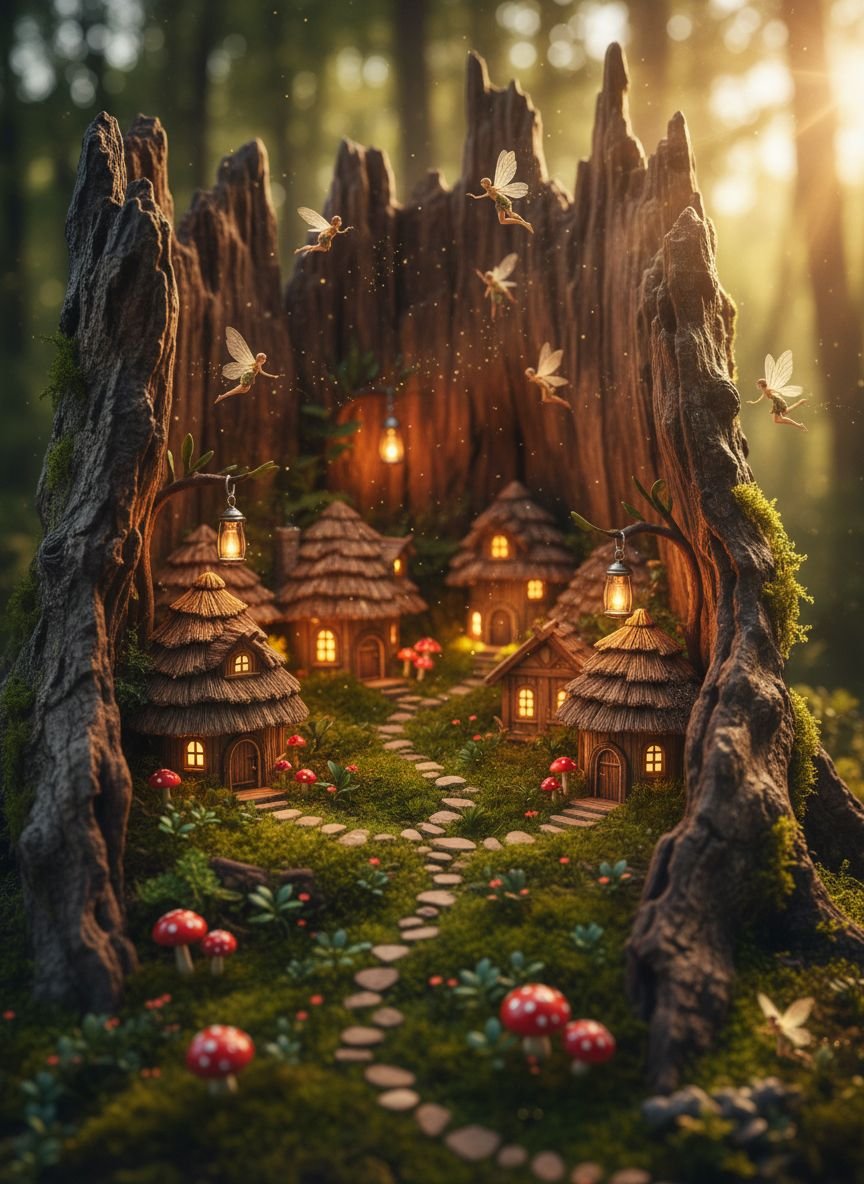
Old tree stumps often become eyesores in a yard, but they offer the perfect foundation for a natural fairy village. The wood texture provides an organic backdrop that plastic containers cannot match. To build this, you hollow out sections of the rotting wood or build directly on top of a flat cut. Moss is your best friend here. It clings to the bark and instantly makes the setup look ancient and established.
Add height by placing miniature houses on different levels of the stump. Connect these levels with ladders made from twigs or stairs carved into the wood. Ferns work well around the base to blend the stump into the surrounding grass. This design works because it uses existing vertical space and requires zero container purchases. The rotting wood also holds moisture, which helps keep moss and shade-loving plants alive with less watering.
Pro Tip: Drill small drainage holes if you hollow out the wood to prevent the stump from rotting too fast or drowning your plants.
DIY Fairy Garden in a Broken Pot
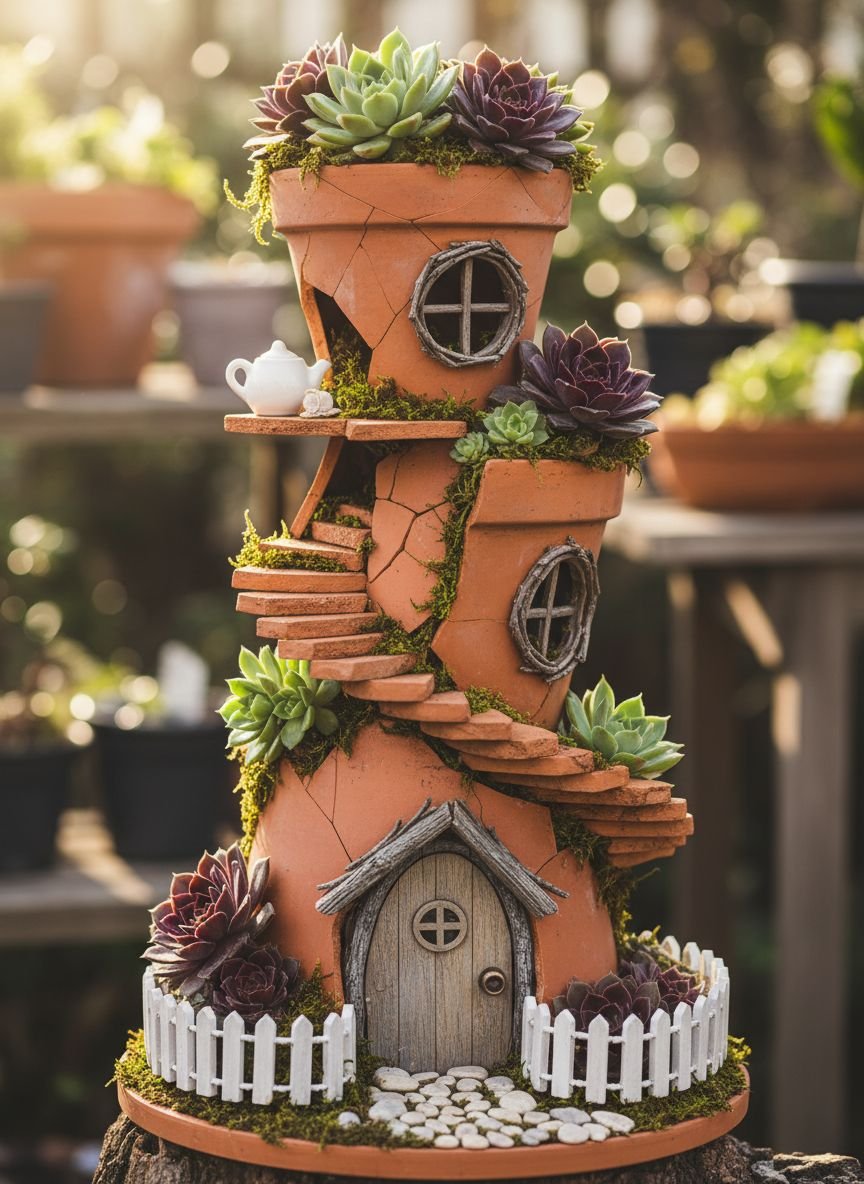
Do not throw away that cracked terracotta planter. The broken pot fairy garden is a classic trend that turns waste into a tiered masterpiece. You use the large shards to create retaining walls inside the main pot. This builds a winding staircase effect that leads from the soil line up to a “castle” or cottage at the top. The visual appeal comes from the exposed layers of soil and the spiral movement your eye follows.
Succulents are the top choice for this design. They have shallow roots that fit into the tight crevices between shards. They also require very little water, which keeps the soil structure stable. Plant trailing sedum over the edges of the shards to soften the sharp terracotta lines. This project fits perfectly on a patio table or a sunny balcony ledge. It creates a contained, vertical scene that looks far more complex than it actually is.
Pro Tip: Use a hammer to break shards further if they are too big, but wear safety glasses to protect your eyes.
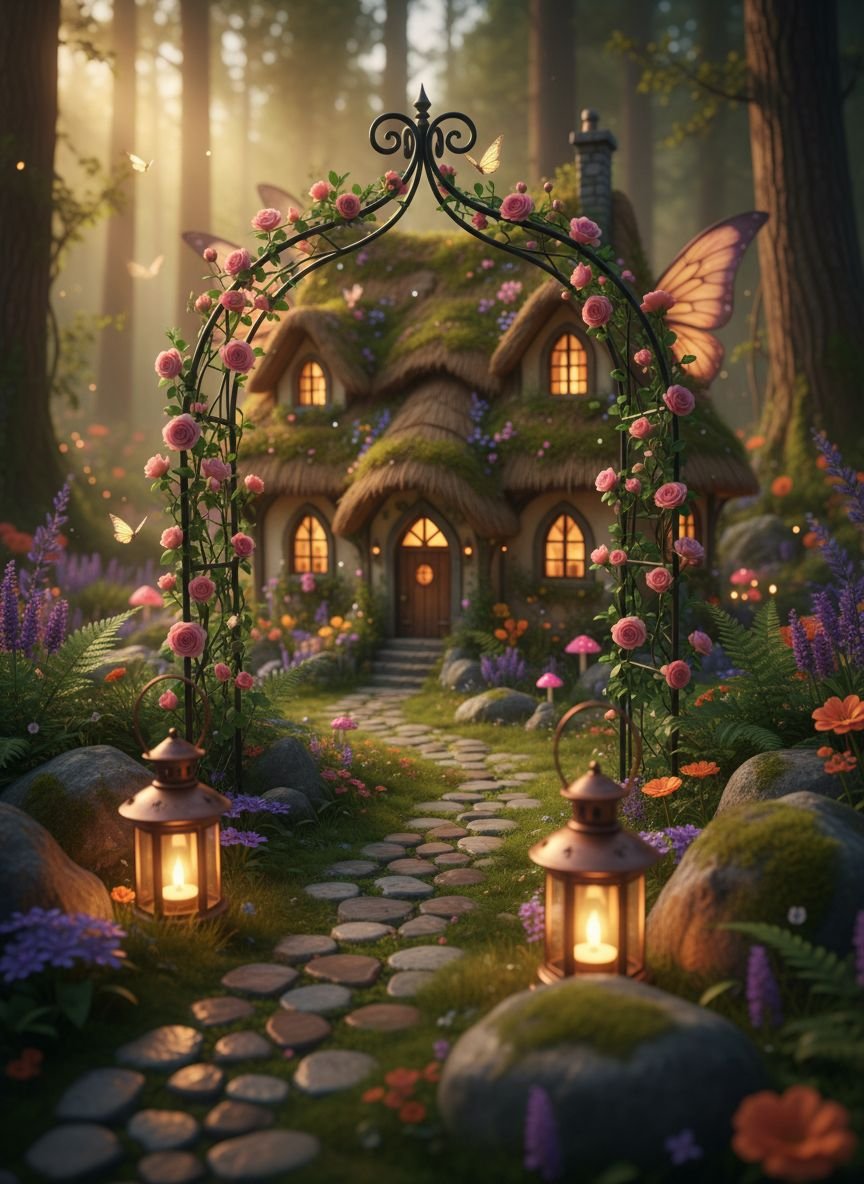
Enchanted Forest Fairy Garden Theme
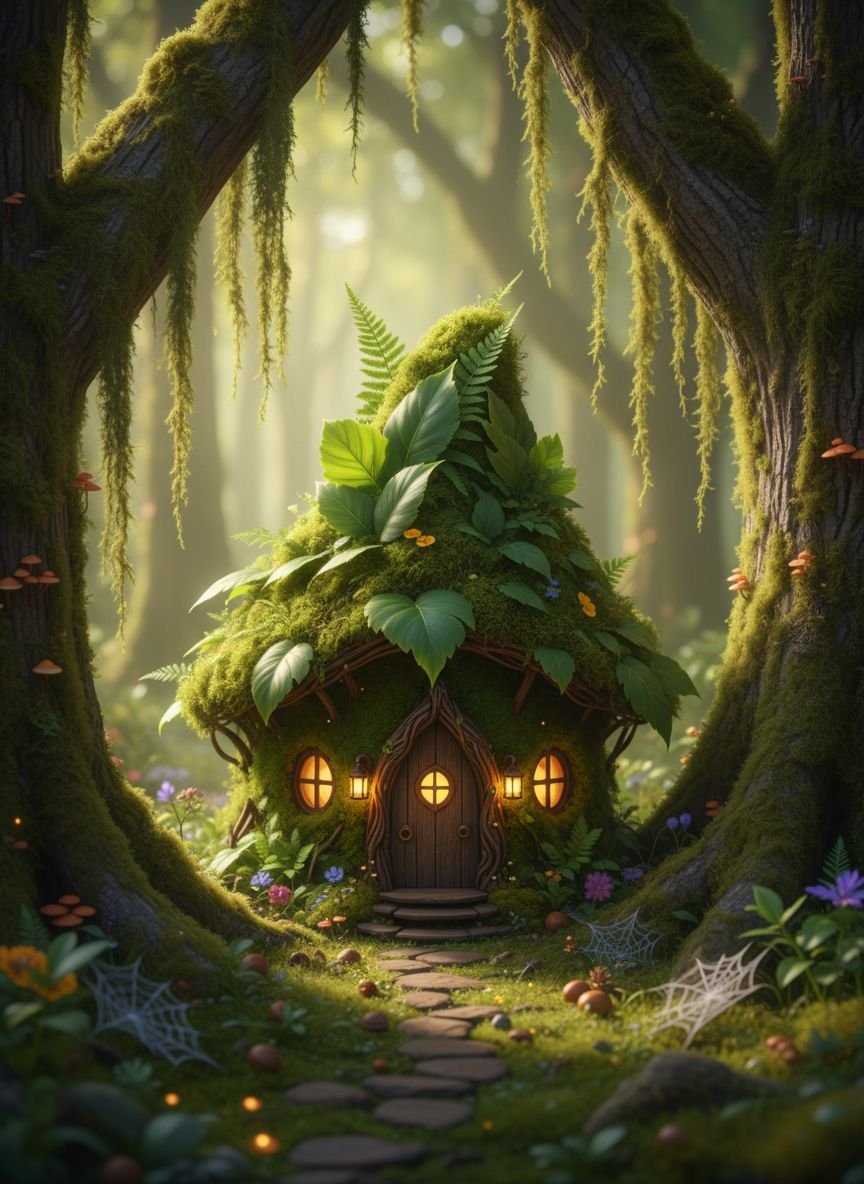
This theme focuses on density and greenery to mimic a deep, magical woods. You want to create a canopy. Use plants like miniature conifers, boxwoods, or woody herbs like rosemary that look like tiny trees. The ground needs to be covered completely. Irish moss or baby’s tears create a lush, green carpet that hides the soil. The goal is to make the viewer feel like they are peering into a secret, overgrown world.
Keep the accessories subtle. A small bench tucked under a fern or a hidden door at the base of your “tree” works better than bright, plastic figures. Natural materials like pinecones, acorns, and river stones reinforce the forest vibe. The contrast between the dark green foliage and the brown earth tones creates a moody, relaxing aesthetic. This design works best in a shaded area where these moisture-loving ground covers can thrive without scorching.
Pro Tip: Prune your miniature “trees” regularly to keep the scale correct; otherwise, they will overshadow the tiny accessories.
Raised Bed Fairy Garden with Gnome Path
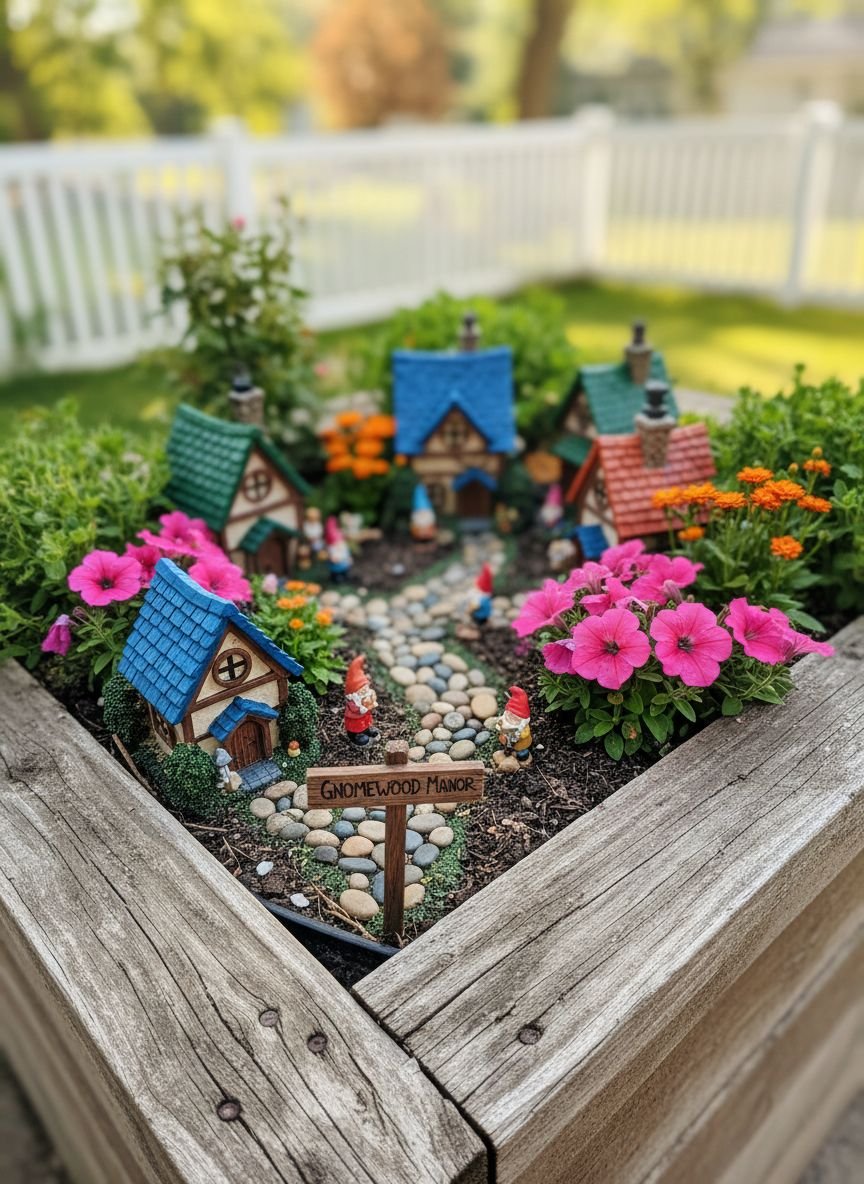
If you have a vegetable patch or a raised flower bed, dedicate a corner to this whimsical landscape. A raised bed lifts the fairy garden to eye level, making it easier to enjoy the details without crouching. The focus here is the pathway. Use flat slate pieces, crushed gravel, or penny tiles to create a winding road that disappears behind a plant. This “road to nowhere” trick adds mystery and makes the space feel larger.
Incorporate gnomes as the caretakers of this space. Position them so they look like they are tending to the surrounding plants. Because this is part of a larger garden bed, you can use slightly larger plants. Marigolds or dwarf lavender add bursts of color that attract real butterflies and bees, adding life to the static scene. The soil volume in a raised bed is greater, meaning less frequent watering than in pots.
Pro Tip: Lay down a small piece of weed barrier fabric under your gravel path to stop dirt from mixing with your stones.
Fairy Garden in a Vintage Lantern
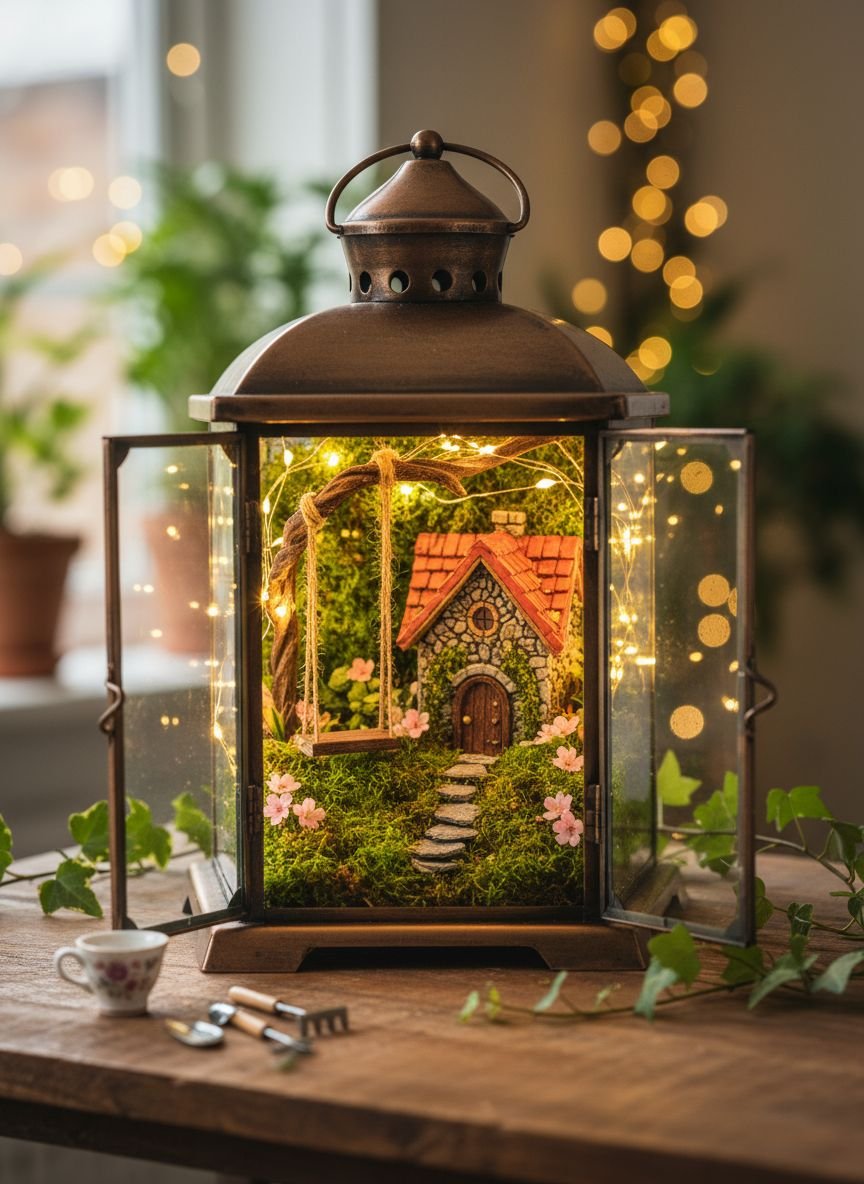
A vintage lantern acts as a greenhouse and a display case in one. This is an ideal indoor fairy garden option or a centerpiece for an outdoor dining table. The glass panes protect the interior from strong winds and heavy rain while creating a humid microclimate. This environment is perfect for tropical terrarium plants like fittonia or small ferns that love moisture and stable temperatures.
Visually, the metal frame of the lantern frames the scene like a picture. Keep the design simple because space is tight. A single tiny chair, a pebble floor, and one focal plant are often enough. The vertical height of the lantern allows for hanging elements, like a tiny birdcage or a suspended vine. This design brings the fairy garden trend into small apartments or winter settings where outdoor gardening is impossible.
Pro Tip: Leave the lantern door slightly ajar if you see condensation building up on the glass to let air circulate.
Comparison: Container vs. Ground Fairy Gardens
| Feature | Container Fairy Garden | In-Ground Fairy Garden |
|---|---|---|
| Space Required | Minimal (Balcony/Tabletop) | Moderate (Yard corner/Tree base) |
| Mobility | High (Move indoors/shade) | None (Fixed location) |
| Watering | Frequent (Dries out fast) | Moderate (Soil holds moisture) |
| Control | Total control over soil/weeds | Must battle local weeds/pests |
| Best For | Beginners & Apartment Dwellers | Homeowners with established yards |
Fairy Garden with a Tree Trunk Doorway
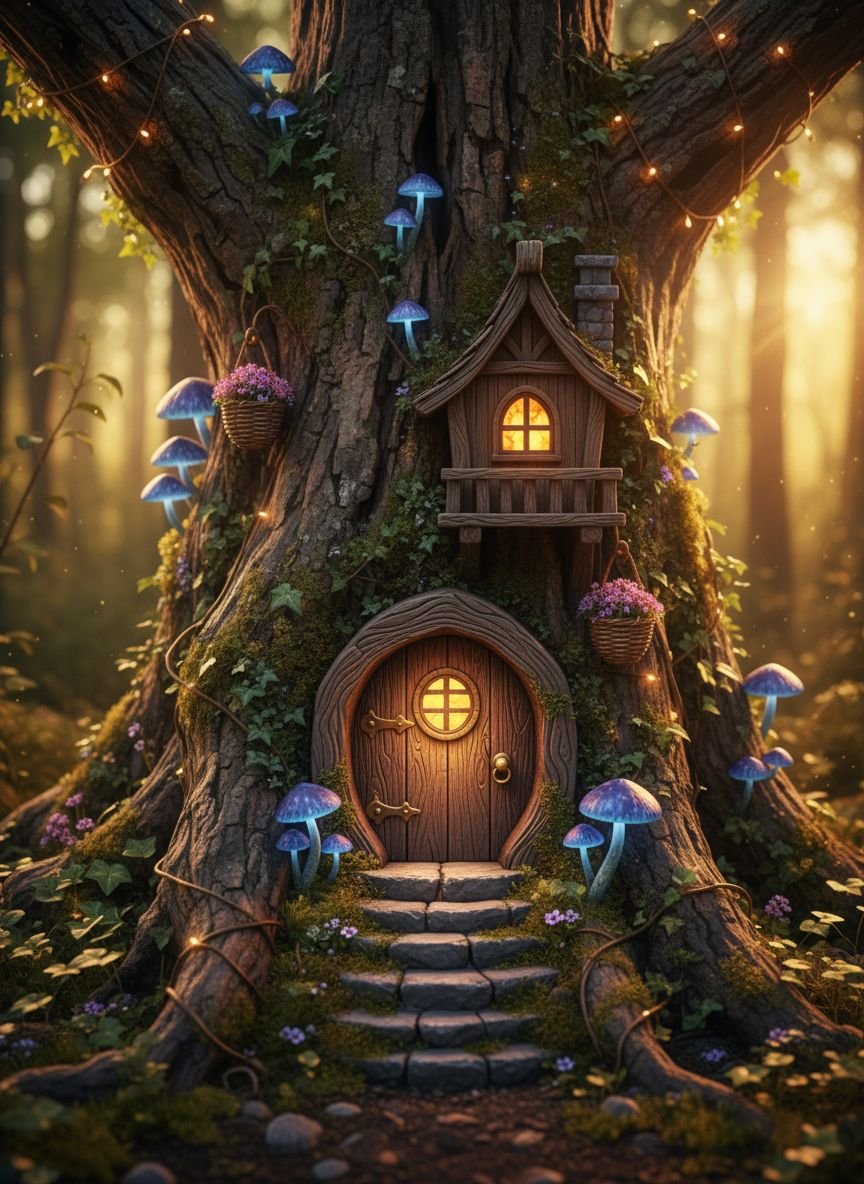
This design relies on illusion. You place a miniature door at the base of a living tree in your yard. It suggests that fairies live inside the trunk. The key to making this look good is blending the door with the bark. Use a door with natural wood tones or stone frames. Pile dirt and moss around the edges of the door frame so there are no gaps.
To expand the scene, create a “front yard” for the door. Outline a small semi-circle with stones and plant low-growing flowers like lobelia or alyssum. This defines the space and stops the lawnmower from getting too close. It is a low-effort project that sparks huge imagination, especially for children. It requires minimal maintenance since the tree provides the primary structure.
Pro Tip: Use a bit of silicone adhesive to attach the door if the tree bark is too rough to hold it in place with nails.
Flower Pot Fairy Garden for Small Spaces
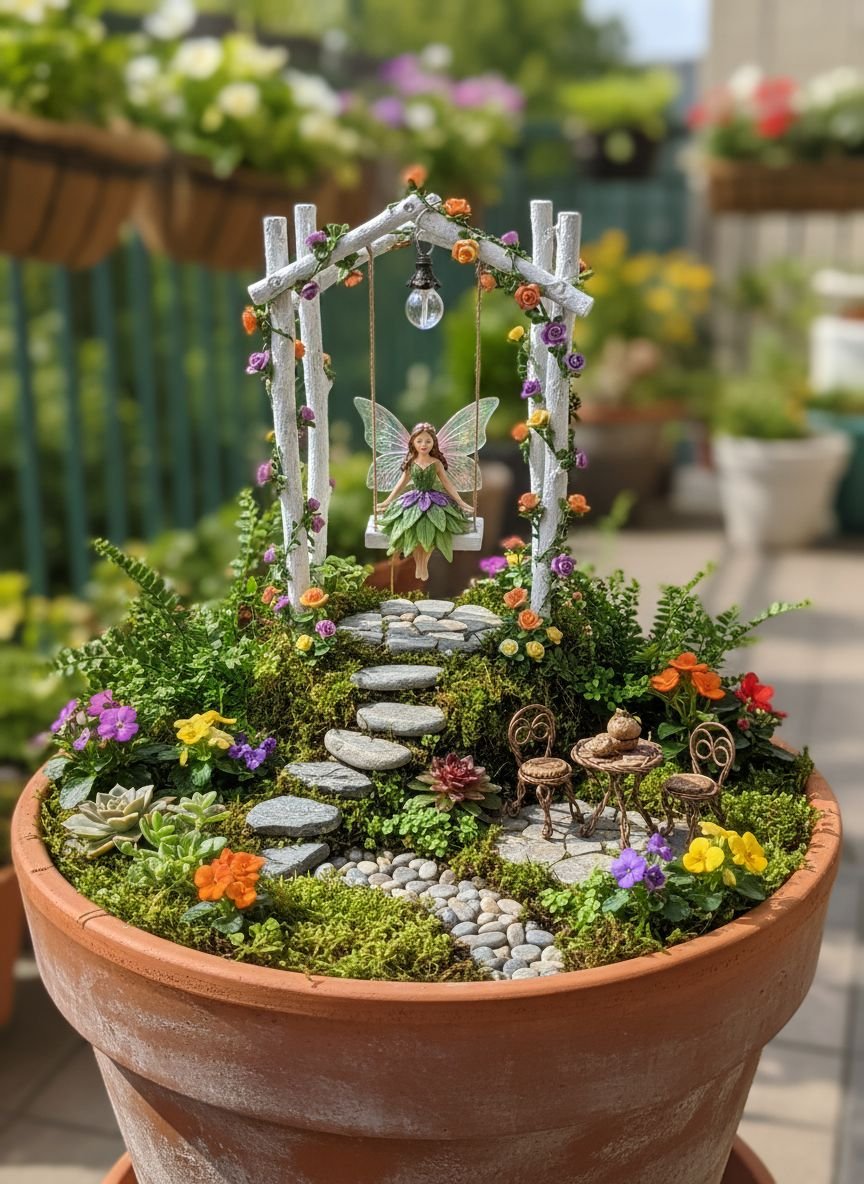
This is the quintessential small space garden solution. A standard 12-inch flower pot offers enough surface area for a house, a path, and three to four plants. The round shape naturally focuses the eye toward the center. Create a focal point, such as a wishing well or a cottage, and arrange plants in a crescent shape around it. This leaves the front open for a viewing angle.
Vary the height of your plants. Put a tall spike plant like a dracaena in the back and trailing ivy in the front. This layering mimics a full-sized landscape. Use a saucer under the pot to catch water, making it safe for patio furniture. This is the most portable design, allowing you to chase the sun or move the garden out of the rain as seasons change.
Pro Tip: Stick to odd numbers when grouping plants (1, 3, or 5) for a more natural, aesthetically pleasing arrangement.
Whimsical Mushroom Fairy Cottage Scene
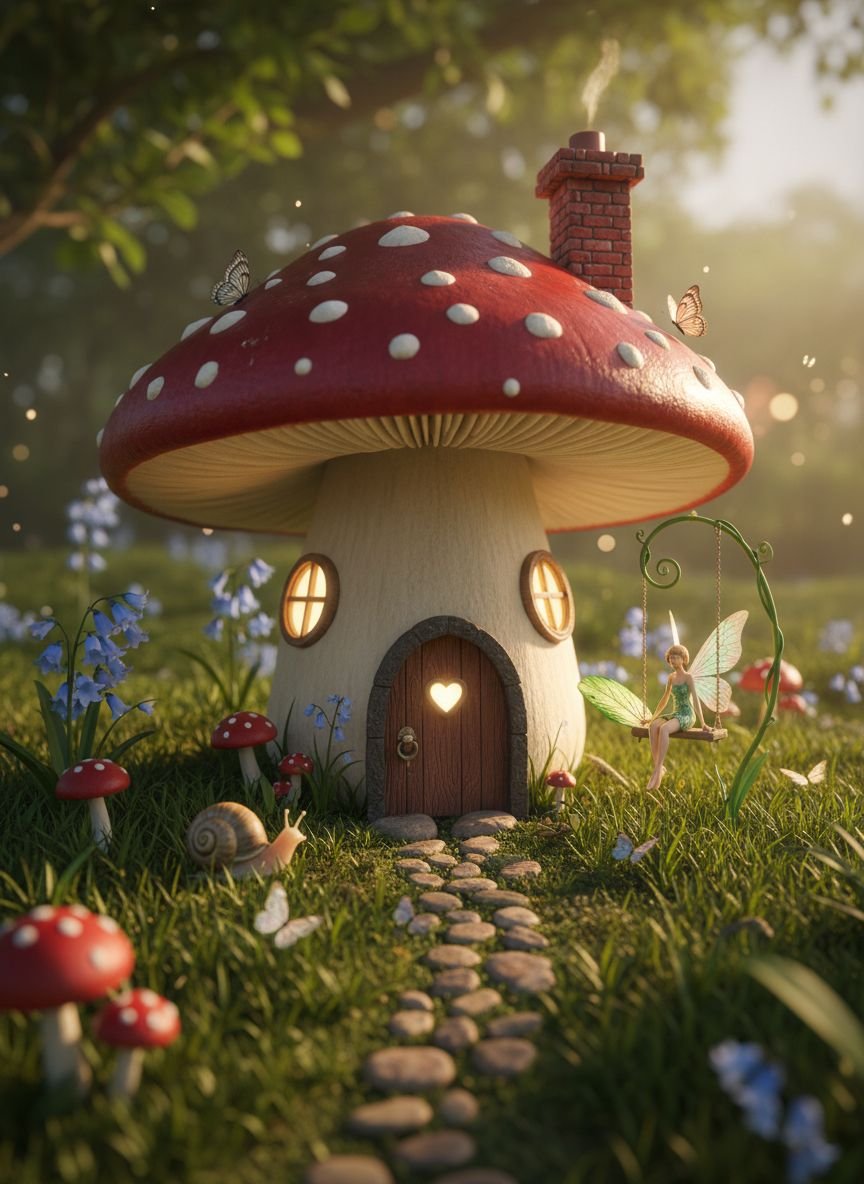
Red and white toadstools are iconic in fairy lore. This design leans heavily into that color palette. Use a mushroom-shaped house as the main feature. Surround it with red flowering plants like begonias or impatiens to echo the roof color. White stones for the pathway provide a high-contrast look that pops against dark potting soil.
This style is less about realism and more about fantasy. It appeals to those who love bold colors and playful themes. You can make your own mushrooms using polymer clay or painted stones if you want to save money. The bright colors make this garden stand out in shady corners where green plants might visually disappear.
Pro Tip: Coat any hand-painted accessories with a clear UV-resistant spray to stop the colors from fading in the sun.
Fairy Garden in a Hanging Basket

Take your garden to the sky. A hanging basket fairy garden keeps delicate miniatures safe from pets and foot traffic. The challenge here is viewing angle. Since the basket hangs high, you need to design for a side view or hang it lower. Wire baskets lined with coco coir work best. You can cut small holes in the liner to poke plants through the sides, creating a floating green sphere.
Choose trailing plants like string of pearls or creeping jenny. They drape over the edge, softening the basket’s rim. Secure your accessories well. Use floral wire to pin houses and benches into the soil so they do not tumble out when the wind blows. This design adds vertical interest to porches and balconies.
Pro Tip: Hanging baskets dry out very fast. Check the soil moisture daily, especially during hot summer afternoons.
Rustic Fairy Garden with Clay Accents
Rustic design focuses on earth tones, unglazed pottery, and raw materials. Skip the glitter and plastic. Use broken clay shards to build walls. Make fences out of real twigs tied with twine. The plants should look wild and native. Succulents, thyme, and ornamental grasses fit this vibe well.
The color palette should be terracotta, sage green, and brown. This monochromatic approach feels sophisticated and modern. It blends seamlessly with desert landscaping or modern minimalist patios. The texture of the clay contrasts beautifully with the soft leaves of the plants. This type of garden ages gracefully; a little weathering on the clay only adds to the charm.
Pro Tip: Soak new clay pots in water before planting. Dry clay pulls moisture from the soil, which can dehydrate your new plants.
“Get The Look”: Essential Materials
To build these designs, you need a basic toolkit. Here are the items that appear in almost every successful project:
- Substrate: High-quality potting mix blended with perlite for drainage.
- Hardscape: River rocks, pea gravel, and flat slate pieces for paths.
- Greenery: Sheet moss (preserved or live) to cover bare dirt.
- Adhesive: Waterproof outdoor glue or floral wire to secure miniatures.
- Tools: Long tweezers and a spoon for placing items in tight spots.
Indoor Fairy Garden in a Glass Bowl
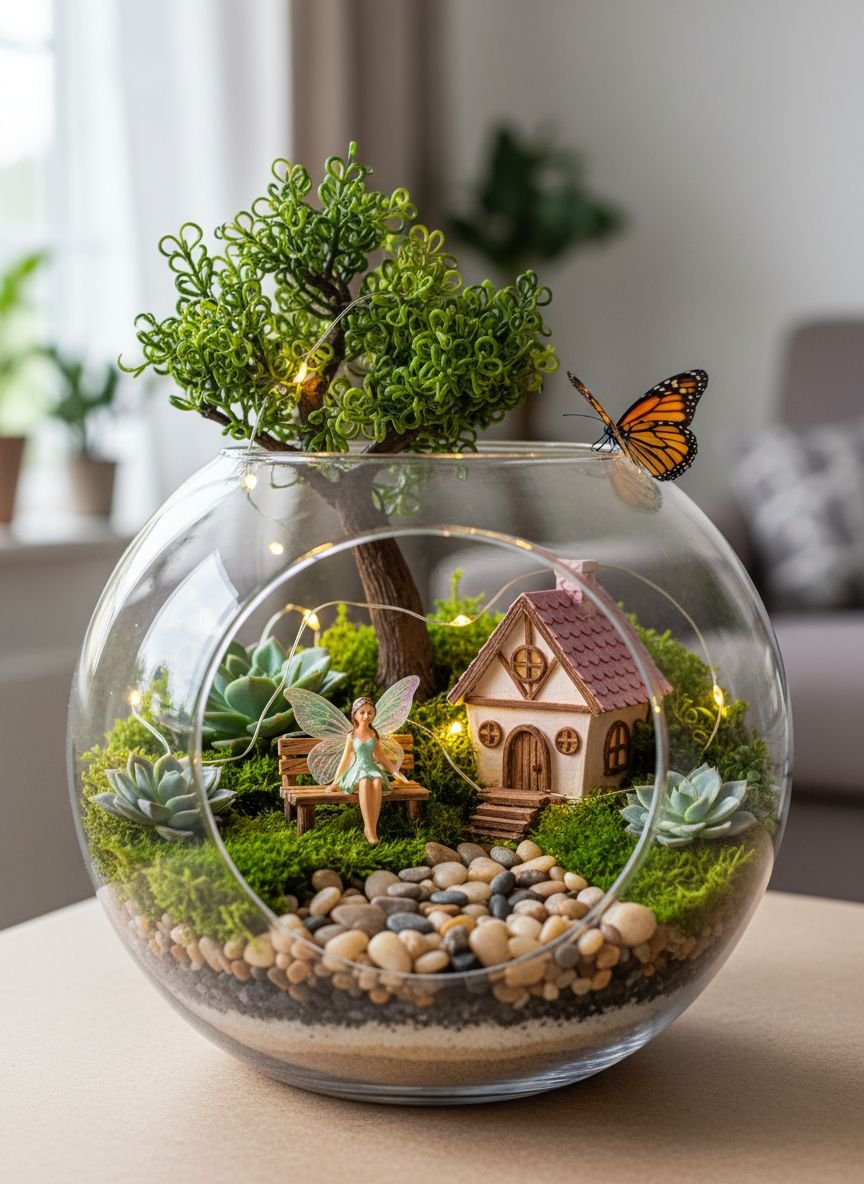
A wide, shallow glass bowl creates a sleek, modern look. Unlike the tall lantern, this is an open-air design. It sits perfectly on a coffee table. Because there is no drainage hole in most glass bowls, you must create a drainage layer. Put an inch of gravel at the bottom, followed by activated charcoal, then soil. This stops roots from rotting in standing water.
Use plants that grow slowly and stay compact, like polka dot plants or pilea. White sand creates a clean, bright surface that looks great through the glass. Layering different colored sands or stones at the edges creates a visual pattern visible from the outside. This design treats the soil layers as part of the art.
Pro Tip: Water sparingly using a spray bottle or a syringe to target the roots without flooding the bowl.
Fairy Garden with a Stone Path and Archway
An archway creates a clear entrance and a sense of arrival. You can buy metal miniature arches or bend flexible willow branches to make your own. Place the arch at the front of the pot. Lead a stone path through it toward a focal point in the back. This forces the perspective and gives the layout a professional structure.
Climbing plants are essential here. Train a small ivy or a creeping fig to grow up the sides of the arch. This integrates the hardscape with the nature. The stone path should be irregular. Fit flat stones together like a puzzle, leaving small gaps for moss to grow through. This “overgrown path” look suggests the fairies have been there for a long time.
Pro Tip: Use tweezers to place the tiny stones for the path to keep your fingers from disturbing the leveled soil.
Fairy Garden in a Repurposed Birdcage
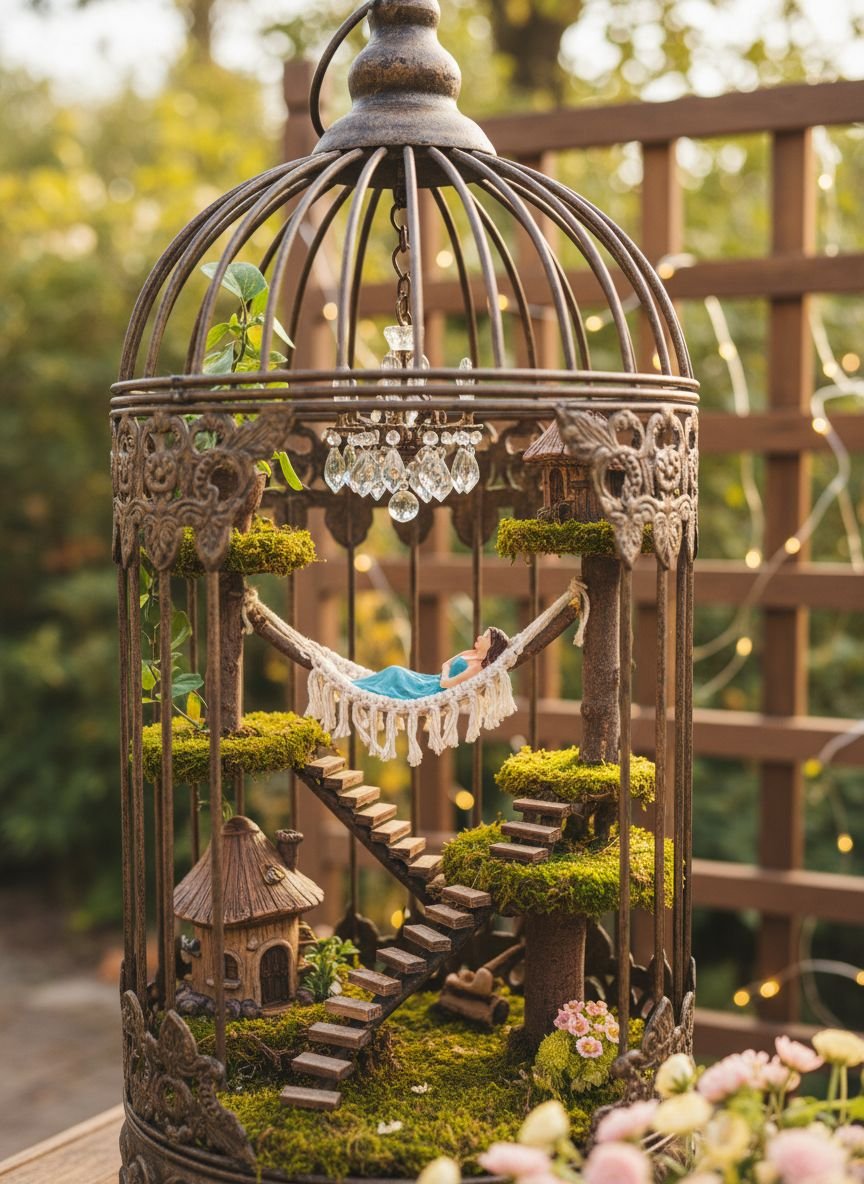
Birdcages offer built-in architectural interest and a convenient hook for hanging. The metal bars allow plants to grow out and light to get in. Line the bottom tray with a coco liner or plastic sheet to hold the soil. This design works well with vining plants that can twist around the bars, blurring the line between the cage and the garden.
The cage implies captivity or protection, creating a unique narrative. A small swing hanging from the top of the cage adds dynamic movement. Because the space is enclosed, it feels like a private sanctuary. Paint the cage a pastel color or white to make the green plants pop, or leave it rusty for a vintage look.
Pro Tip: Choose a cage with a removable bottom or a large door so you can easily access the plants for maintenance.
Gnome and Fairy Garden Combo Scene
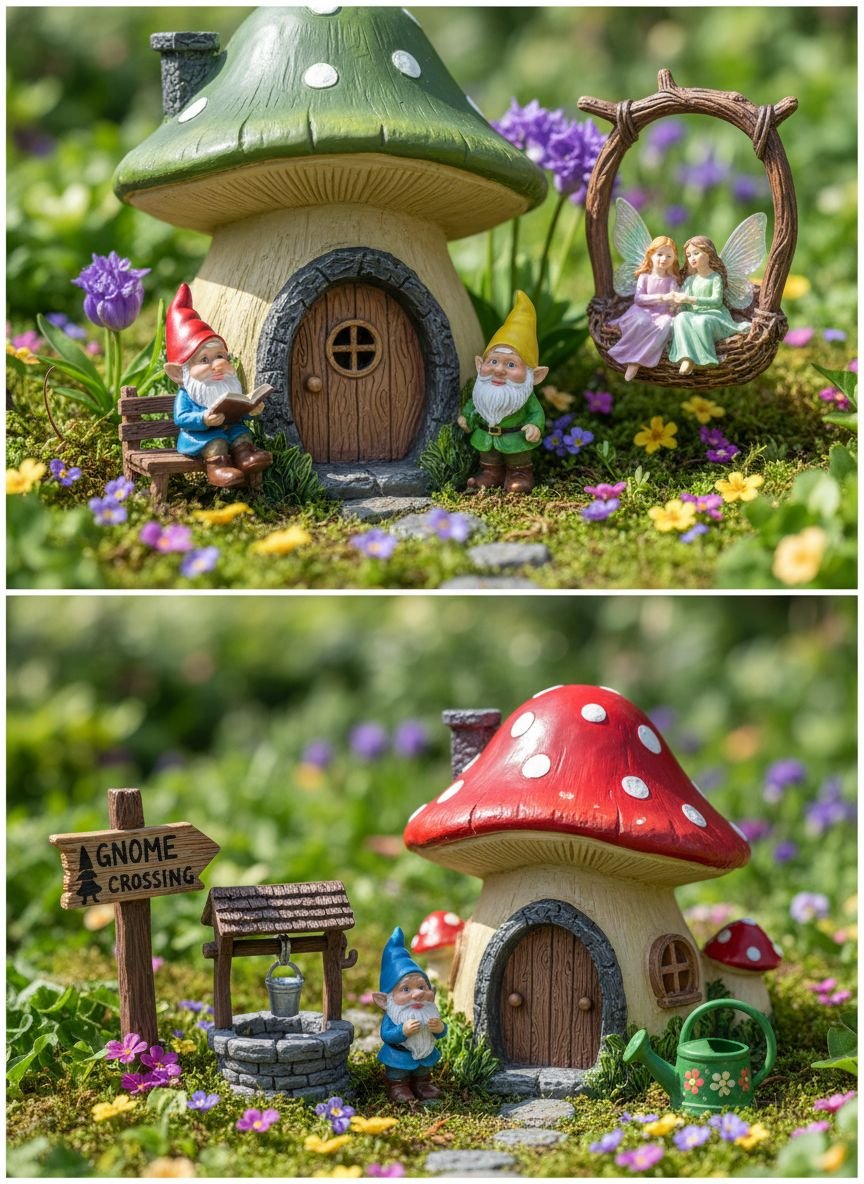
Why choose between gnomes and fairies? Combine them for a bustling community feel. The key to mixing these is zoning. Give the gnomes a “working” area, like a vegetable patch or a woodpile. Give the fairies a “leisure” area, like a flower garden or a tea table. Connect the two zones with a bridge or a path.
This adds storytelling elements. You can arrange the figures so they appear to be interacting. Maybe a gnome is delivering mail to a fairy house. This dynamic setup keeps the garden interesting because you can move the figures around to tell different stories each week. It is particularly engaging for families with kids who want to play with the garden.
Pro Tip: Keep the scale consistent. Ensure your gnomes and fairies are roughly the same size so the perspective does not look off.
Related posts :
Fairy Garden with Miniature Vegetable Patch
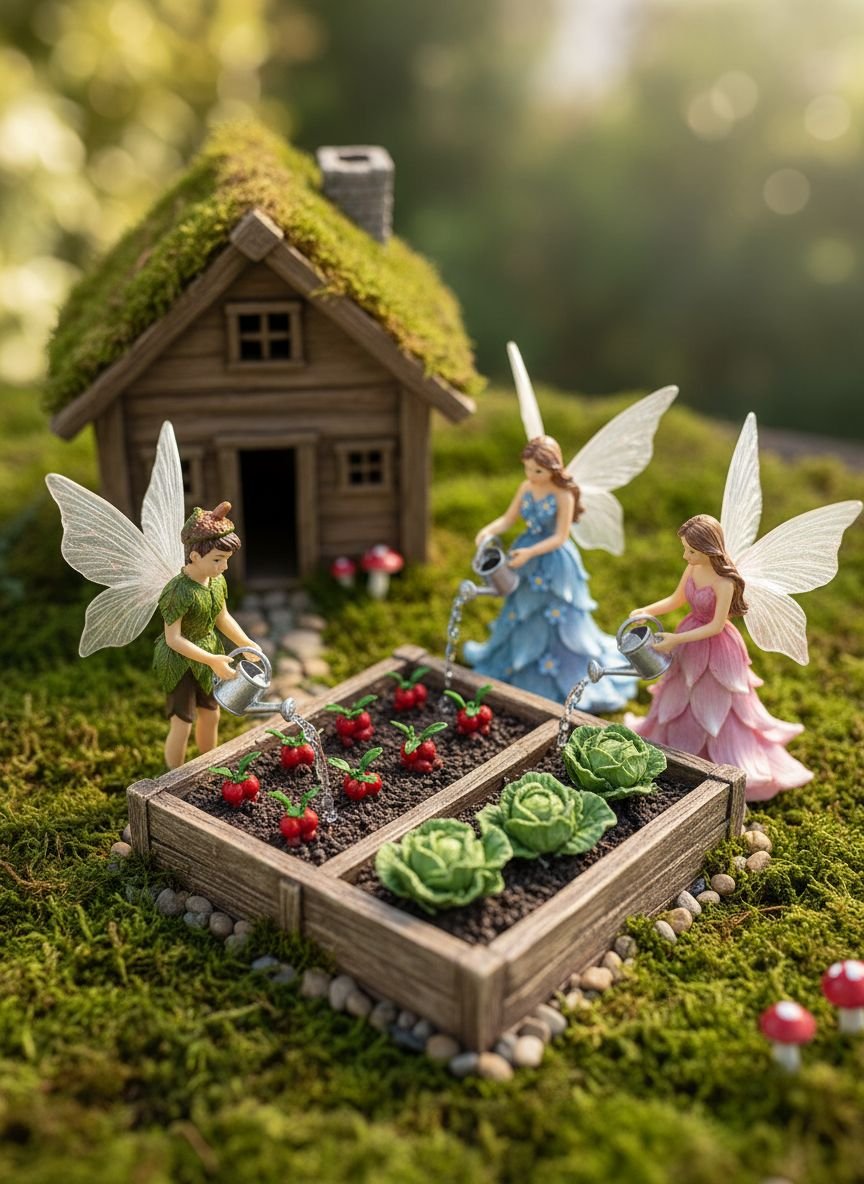
This design mimics a productive farm on a tiny scale. It is incredibly cute and detailed. Use rows of coffee beans to look like dirt mounds. Make “vegetables” out of polymer clay, or use real plant parts. Orange tips of roots can look like carrots; small red berries can mimic tomatoes.
Use popsicle sticks to create detailed signage for each crop row. A tiny wheelbarrow and a watering can complete the look. This theme celebrates the harvest and looks great in a kitchen window. If you want real plants, use micro-greens. They sprout fast and look like tiny lettuce heads before they get too big.
Pro Tip: If using real micro-greens, be prepared to trim them with scissors every few days, as they grow very quickly.
Memorial Fairy Garden with Candle Lantern
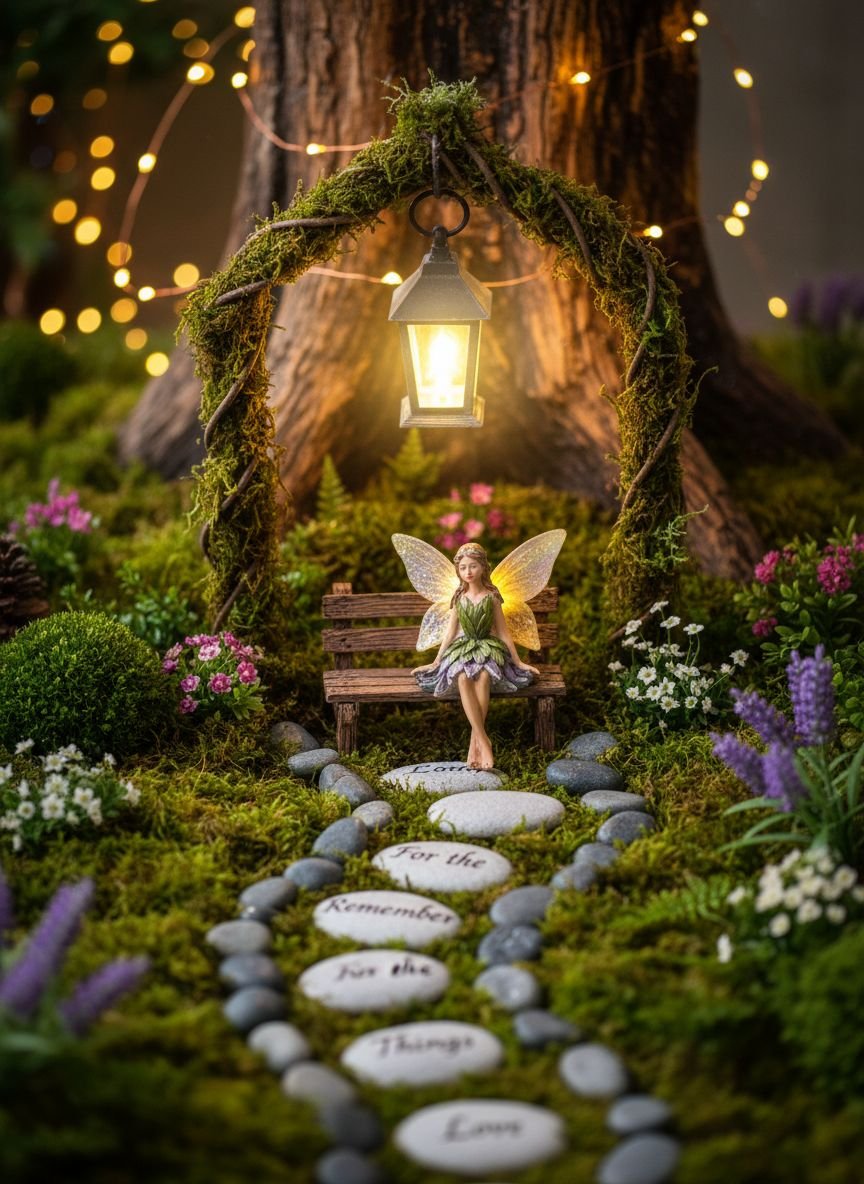
Gardens are often places of memory and reflection. A memorial fairy garden uses symbols of peace to honor a lost pet or loved one. Use a central angel statue or a personalized stone. Soft colors like white, pale blue, and silver foliage (like dusty miller) create a calming atmosphere.
Include a solar-powered candle or a small lantern. When it lights up at night, it serves as a gentle reminder of the person or pet. This garden is usually kept simple and uncluttered. The focus is on the emotional connection rather than complex landscaping. It is a beautiful, therapeutic project to work on during difficult times.
Pro Tip: Choose evergreen plants so the garden remains green and lively even in the middle of winter.
Fairy Village in a Raised Wooden Crate
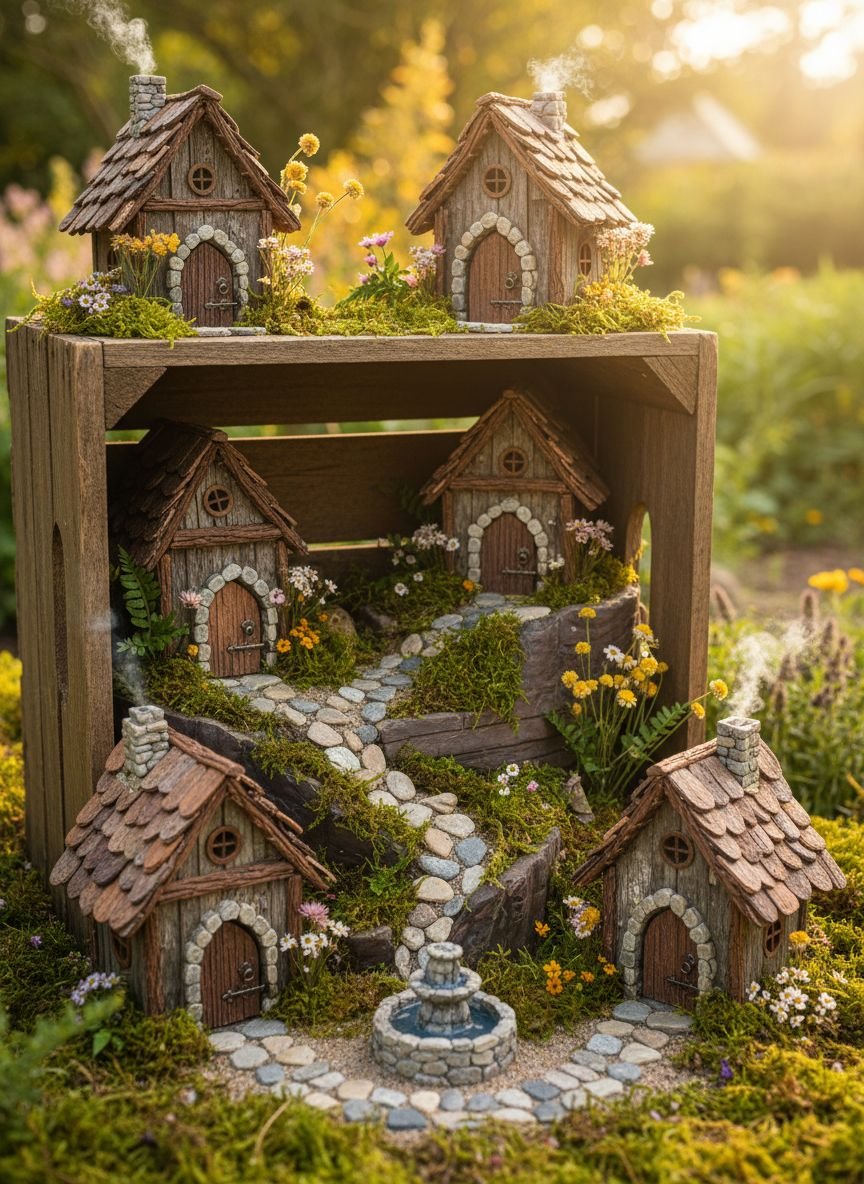
Wooden crates, like apple crates or wine boxes, provide a rustic, square frame. They are deeper than trays, allowing for better root growth. You can partition the crate into different “yards” to create a row of houses, like a street. This fairy village look allows you to use multiple houses that might not fit in a round pot.
Line the crate with heavy-duty plastic and poke holes for drainage. The wood exterior looks great on a wooden deck. You can stack two crates to create a multi-story apartment complex for fairies. This modular approach lets you expand the garden over time by adding more crates.
Pro Tip: Elevate the crate on brick feet to prevent moisture from getting trapped underneath and rotting your deck.
Fairy Garden with Whimsical Water Feature
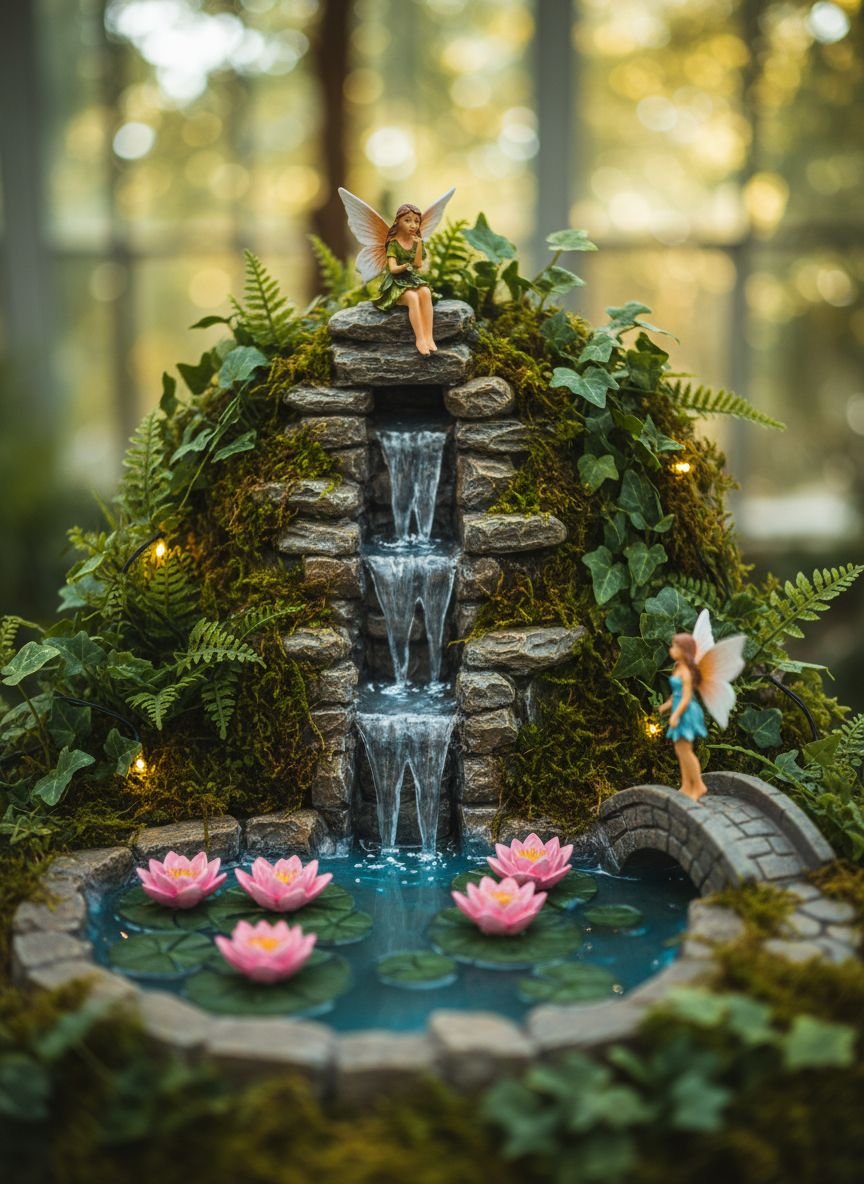
Water adds sound and motion. You do not need a pump to create the look of water. Blue glass pebbles or crushed blue glass create a stunning “dry creek” effect that catches the sunlight. If you want real water, use a small solar pump in a buried saucer.
Build the garden around this water feature. A bridge crossing the “stream” is a classic focal point. Plants that look like reeds or tall grasses placed at the water’s edge increase the realism. The reflection of the sky in real water (or the sparkle of the glass) adds a new dimension to the texture of the garden.
Pro Tip: If using real water, change it frequently to prevent mosquito larvae and algae buildup.
Popular Asked Questions
What is the best soil for a fairy garden?
You should use a high-quality potting mix, not garden soil. Garden soil is too heavy and can bring in bugs. Potting mix is light and drains well. For succulents, mix in some sand or perlite to keep the roots dry.
Do fairy gardens need drainage holes?
Yes, they absolutely do. Without holes, water sits at the bottom of the pot. This causes the roots to rot and kills your plants. If your pot has no holes, drill some or use a layer of gravel at the bottom.
How do you keep fairy garden accessories from falling over?
Wind and squirrels can knock over tiny pieces. Glue a long nail or a piece of wire to the bottom of your houses and figures. Push this spike into the soil to anchor them firmly in place.
Can I leave my fairy garden outside in winter?
It depends on the materials. Ceramic pots can crack in freezing weather. Resin houses might fade. It is best to bring the garden into a garage or shed during freezing months, or use frost-proof pots and plants.
Conclusion
Building a fairy garden is more than just a craft project; it is a way to engage with nature on a manageable scale. Whether you choose the rugged look of a Tree Stump Fairy Garden or the portable charm of a Teacup Garden, the key is to have fun with textures and layers. Start small. Pick one design from this list, gather your materials, and create something magical this weekend.


Leave a Comment