
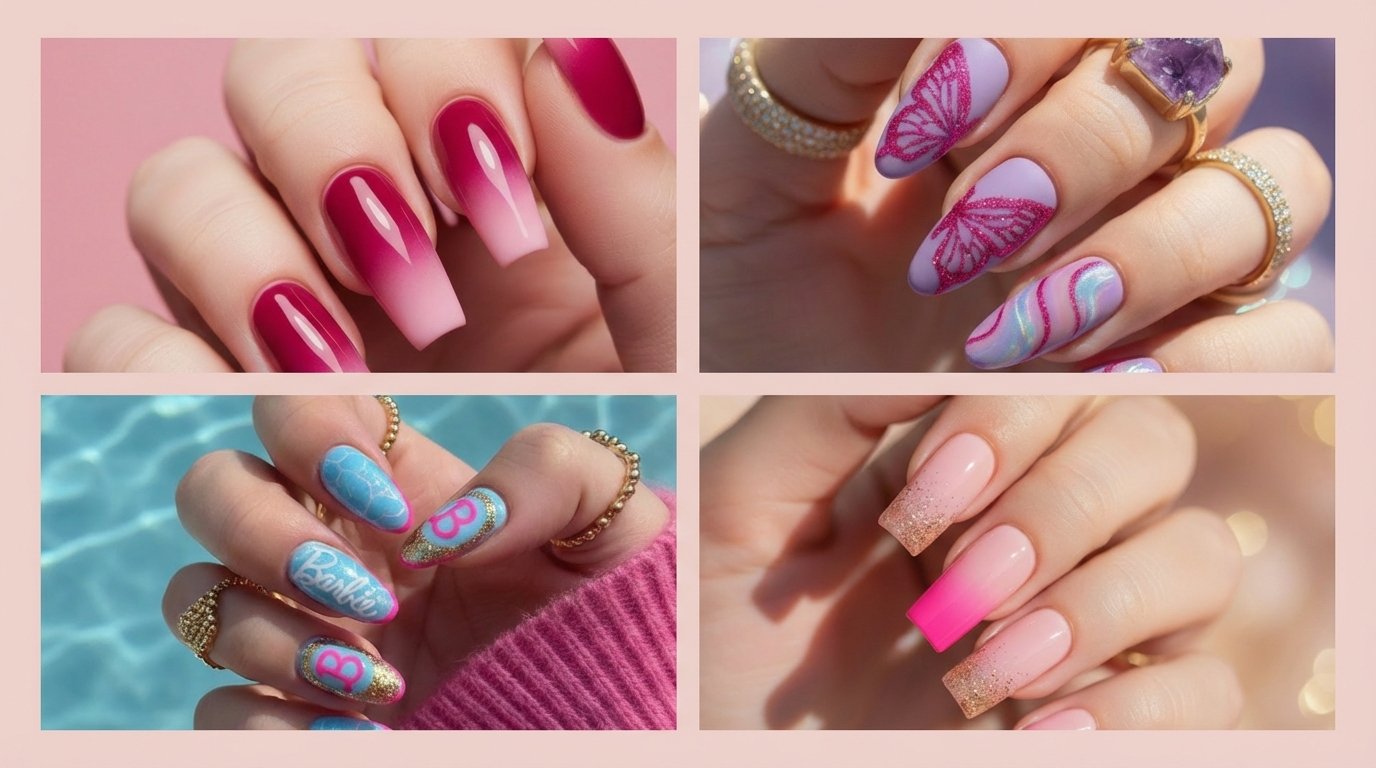
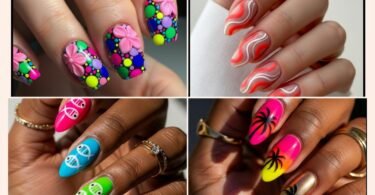
The Barbiecore trend has officially transcended fleeting viral moments to become a staple aesthetic in the beauty world. If you are looking to channel confidence, femininity, and high-energy glamour, Barbie pink nails are your ultimate accessory. This guide curates the most electrifying, chic, and wearable pink nail designs that dominate Pinterest feeds and salon requests in 2026. Whether you need a subtle pastel for the office or a neon chrome explosion for a night out, these styles provide the perfect blueprint for your next manicure. We break down exactly how to achieve these looks, the specific shades to ask for, and how to maintain that flawless high-gloss finish for weeks.
Key Takeaways
- Variety of Finishes: From reflective chrome to soft matte, Barbie pink is versatile enough for any occasion.
- Customization: Learn how to adapt hot pinks for cool or warm skin undertones to ensure your hands look radiant.
- DIY vs. Salon: Discover which intricate designs require a professional tech and which ones are easy to replicate at home with stickers and polish.
- Maintenance: High-pigment pinks require specific top-coat routines to prevent fading and chipping.
Table of Contents
- Chic Baby Pink Vibes
- Reflective Pink Chrome
- Playful French Tip Remix
- Signature Barbie Logo Pop
- Elegant B Logo Detail
- Pink Swirls
- Iconic Barbie Silhouette
- Magenta Florals
- Sweet Heart Accents
- Holographic Sparkle
- Whimsical Fairy Butterflies
- Gradient Ombre Magic
- Pastel Barbie Bliss
- Popular Asked Questions
- Conclusion
Chic Baby Pink Vibes
A soft, milky baby pink offers a sophisticated entry point into the Barbie aesthetic without screaming for attention. This look relies on a sheer, buildable formula that creates a “your nails but better” effect, often referred to as the “clean girl” take on Barbiecore. The visual appeal lies in the glossy, jelly-like finish that reflects light beautifully, making the nail plate look healthy and hydrated. Unlike opaque neons, this style uses semi-transparent layers to achieve a delicate wash of color that suits every skin tone. It whispers luxury rather than shouting it, making it perfect for corporate settings or minimalist wardrobes. To achieve this, start with a ridge-filling base coat to ensure a perfectly smooth canvas. Apply two thin coats of a sheer bubblegum pink polish, allowing the natural white of your free edge to peek through slightly. Finish with a high-shine, plumping top coat to mimic the look of gel. This design works exceptionally well on short, squoval nails, emphasizing neatness and natural beauty over length.
Pro Tip: To prevent this light color from looking streaky, float the brush over the nail rather than dragging it, and always cap the free edge.
Reflective Pink Chrome
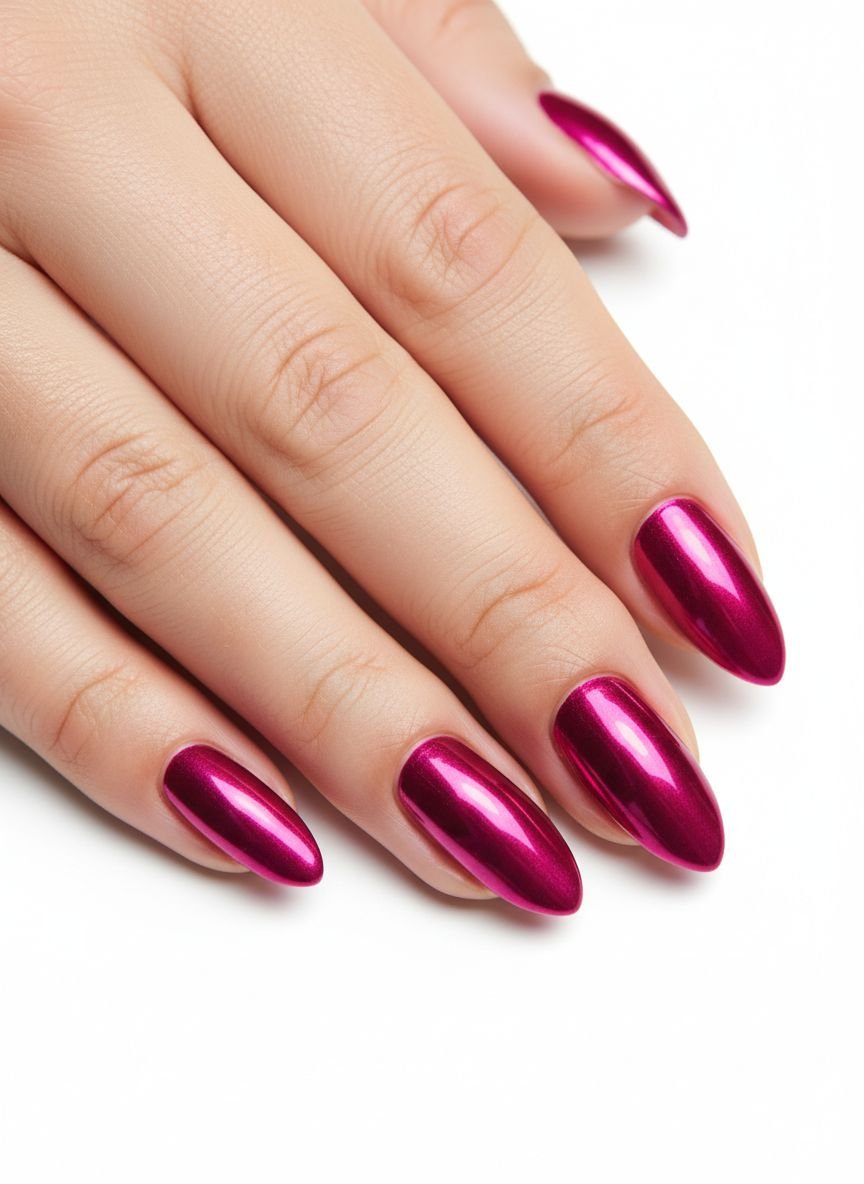
Chrome powder has revolutionized nail art, and when applied over a hot pink base, the result is a futuristic, high-octane manicure that demands attention. This design features a mirror-like surface that shifts from deep magenta to blinding silver-pink depending on the lighting. The texture is perfectly smooth but visually complex, offering a depth that standard metallic polishes cannot achieve. The design principle here is high contrast and high shine; it acts almost like jewelry for your hands. This look is particularly stunning on almond or stiletto shapes, where the curves of the nail enhance the light-bending effect of the chrome. Implementation requires a gel system for the best results. You will need to apply a “no-wipe” top coat over your cured pink gel color, cure it for exactly 30 seconds (or until tacky but set), and then buff the chrome powder vigorously into the warm nail. The friction creates that seamless mirror finish. A final layer of top coat seals the powder in, preventing it from rubbing off or dulling over time.
Pro Tip: Use a dedicated sponge applicator for the chrome powder to avoid transferring oils from your fingers, which can ruin the mirror effect.
Playful French Tip Remix
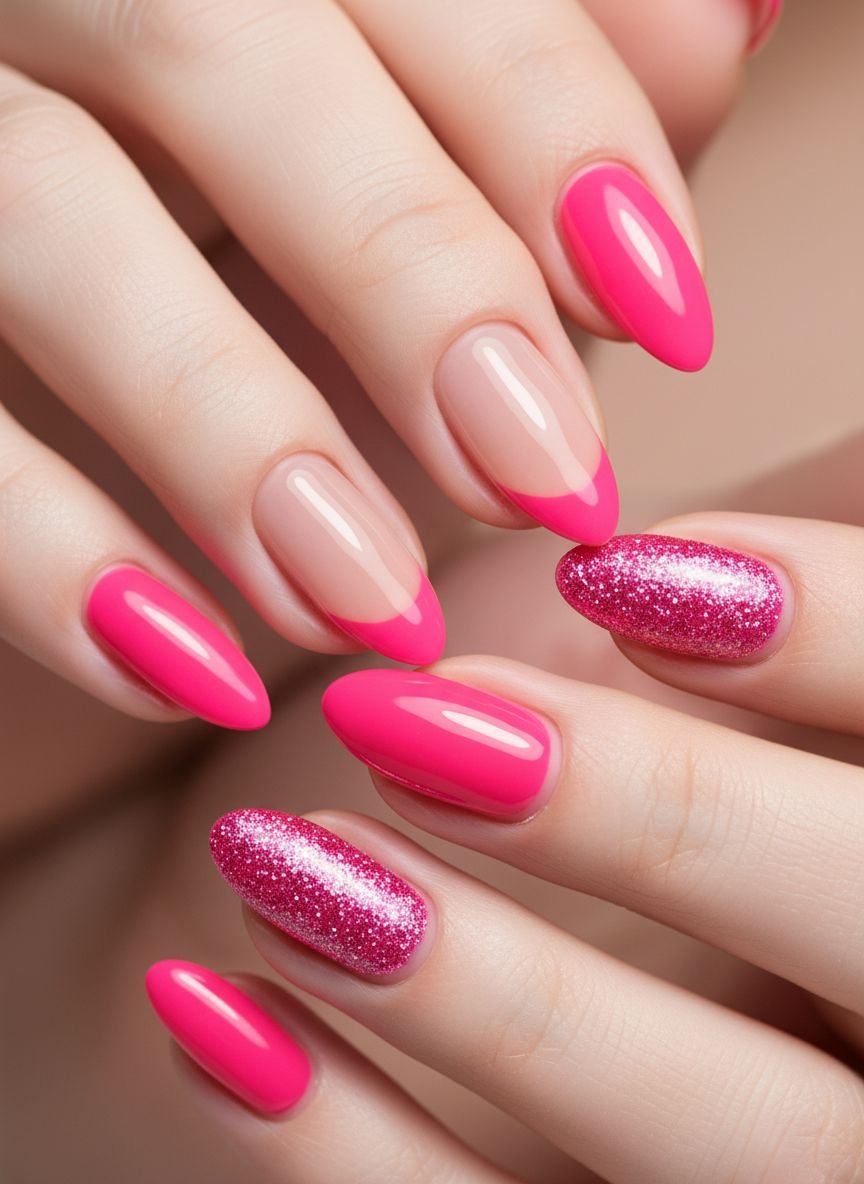
The classic French manicure gets a vibrant makeover by swapping the traditional white tip for a bold, electric Barbie pink. This style balances timeless elegance with a fun, youthful twist, making it appropriate for both brunch and the boardroom. The negative space of the nude base lengthens the fingers, while the pop of pink at the tip adds a playful energy that defines the Barbie brand. You can play with the width of the tip—a micro-thin line for a subtle nod to the trend, or a deep, dramatic smile line for a bolder statement. The key to this look is a crisp, sharp line between the nude and the pink. Use a fine liner brush rather than the polish bottle brush to paint the tips. Stabilize your hand on a flat surface and rotate your finger, rather than moving the brush, to get a steady curve. For an extra dose of glamour, outline the smile line with a razor-thin stroke of silver glitter or place a tiny rhinestone at the center of the cuticle.
Pro Tip: If you have shaky hands, use a silicone nail stamper. Paint the pink polish on the stamper and gently press your nail tip into it for a perfect French curve every time.
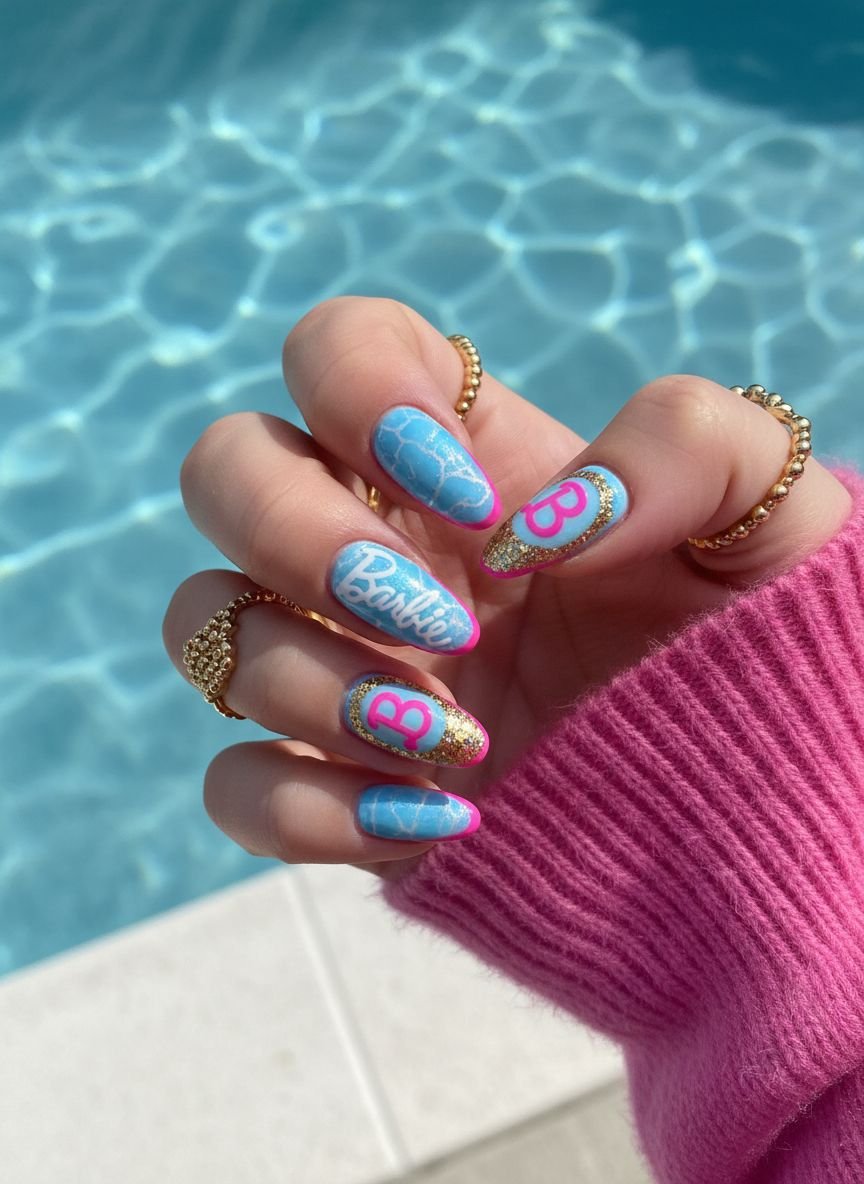
Signature Barbie Logo Pop
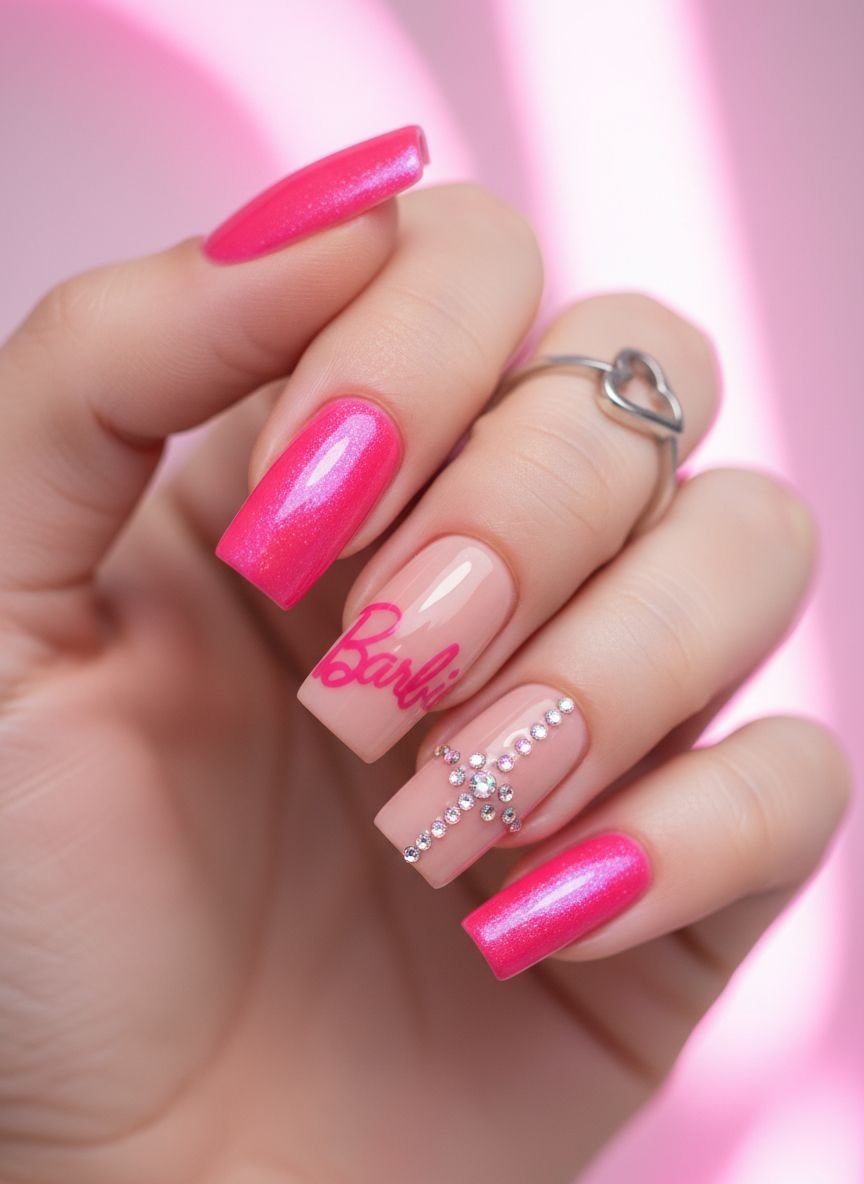
For the die-hard enthusiast, nothing says “Barbie” quite like incorporating the iconic script logo directly into your nail art. This design is a literal translation of the trend, serving as a badge of honor for the aesthetic. The visual impact is strong and graphic, usually set against a white or pale pink background to ensure the logo stands out. The font—a whimsical, retro cursive—evokes nostalgia and instantly identifies the theme. This style leans heavily on pop art principles, utilizing recognizable branding as a decorative element. While hand-painting the logo requires advanced steadiness and patience, water decals or high-quality nail stickers offer a flawless alternative for DIYers. Apply a white gel base and cure. Cut the logo decal close to the design, soak it in water for 10-15 seconds, and slide it onto the nail. Smooth out any air bubbles with a silicone tool before sealing with two layers of top coat. The double seal is crucial here to ensure the edges of the sticker do not lift or snag on clothing.
Pro Tip: Place the logo on your ring finger or thumb as an accent nail to keep the manicure from looking too busy or cluttered.
Elegant B Logo Detail
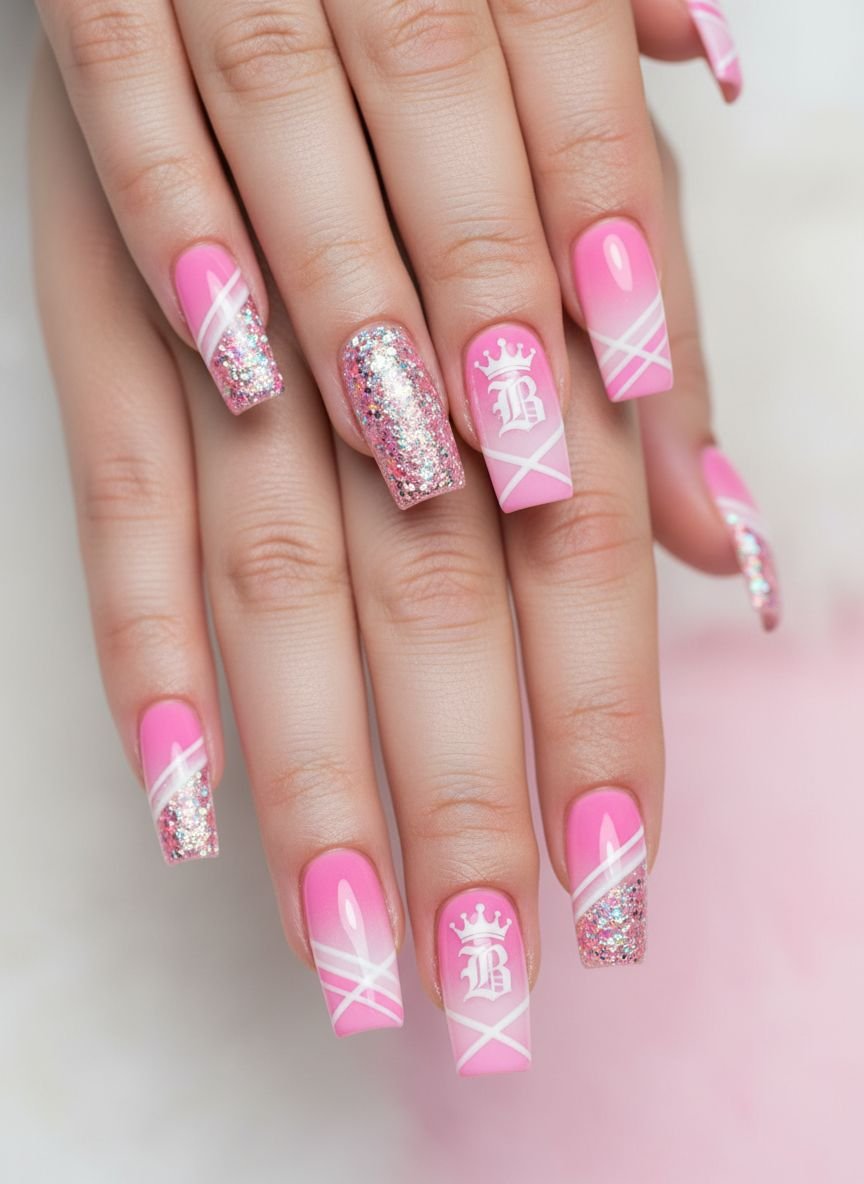
If the full script logo feels too loud, the stylized “B” monogram offers a more understated, high-fashion alternative. This design often mimics the look of luxury brand monograms, using the curly “B” in a repeating pattern or as a single, large statement piece. The aesthetic is preppy and polished, reminiscent of vintage high-school varsity jackets or high-end designer bags. You can execute this in a monochromatic palette—think a hot pink “B” on a soft pink matte background—to create texture and interest without overwhelming the eye. The contrast between matte and gloss finishes can elevate this design significantly. Paint your base color and apply a matte top coat. Then, using a detail brush and glossy gel top coat (or a pink gel color), draw the “B”. The glossy letter will pop against the velvet-like matte background, creating a sophisticated tactile experience. This technique, known as “gloss-on-matte,” adds a layer of professional artistry that looks incredibly expensive.
Pro Tip: Use a dotting tool to create the rounded endpoints of the “B” first, then connect them with a fine liner brush for perfect symmetry.
Save this idea to your Pinterest.
Comparison: Gel vs. Acrylic for Barbie Designs
| Feature | Gel Polish | Acrylic Extensions |
|---|---|---|
| Durability | Lasts 2-3 weeks, flexible on the nail. | Lasts 3-4 weeks, hard and protective. |
| Best For | Short to medium natural nails. | Long lengths (Coffin/Stiletto shapes). |
| Finish | Naturally glossy, thinner profile. | Can be thicker, great for 3D encapsulation. |
| Removal | Soak-off in 15-20 minutes. | Requires filing and longer soak time. |
| Vibe | Clean Girl, Minimalist Barbie. | Diva, Maximalist, Long Canvas Art. |
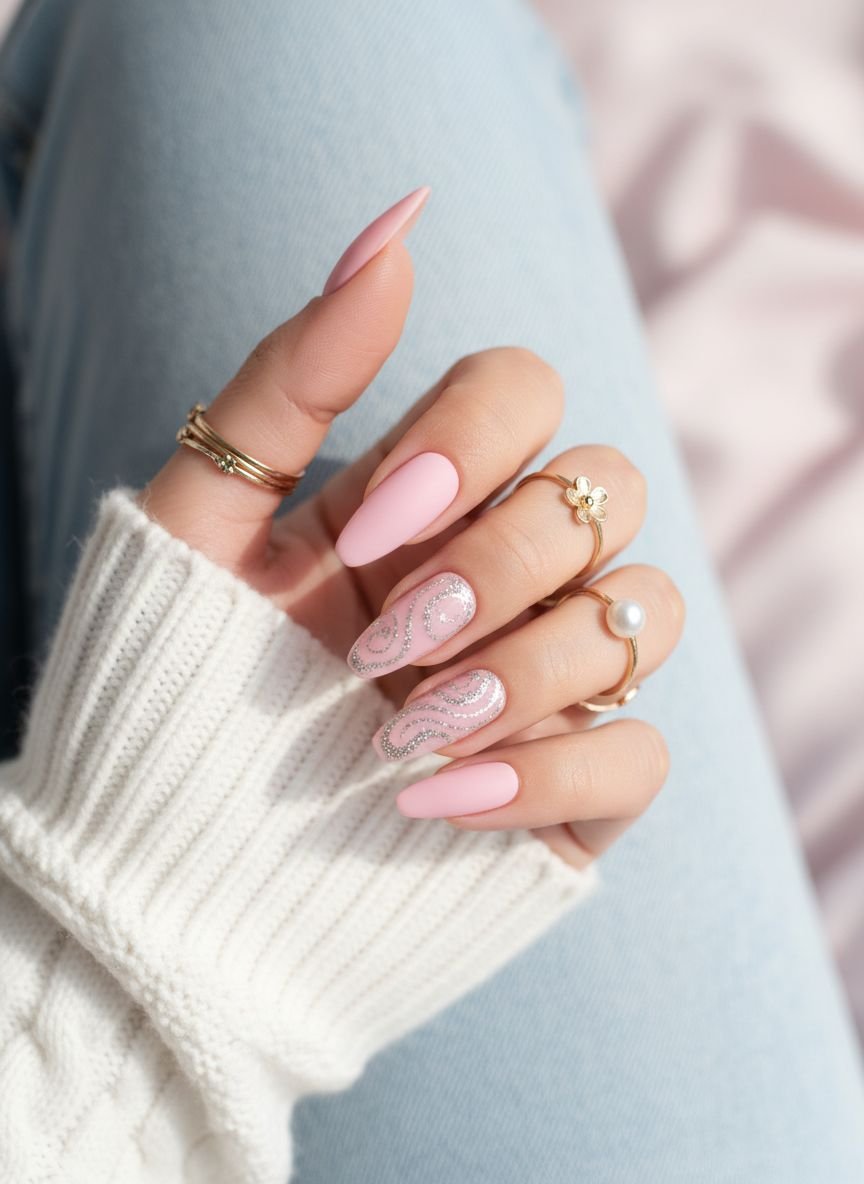
Pink Swirls
Channeling the groovy vibes of the 70s, pink swirl nails combine retro patterns with the modern hot pink palette. This design features organic, flowing lines that curve across the nail plate, often mixing two or three shades of pink—from pastel to magenta—along with white or negative space. The lack of straight lines makes this design forgiving and incredibly fluid, creating a sense of movement and energy. It is a whimsical, abstract approach that feels artistic and bespoke. To recreate this, you do not need precision tools; a simple striper brush is sufficient. Start with a nude or sheer pink base. Load your brush with the darkest pink and draw a wavy line from the cuticle to the opposite tip. Follow this curve with a lighter pink line, and perhaps a white one, leaving small gaps of the base color showing through. Vary the thickness of the swirls to keep the design dynamic. This style looks fantastic on all nail lengths but is particularly effective on longer oval or almond shapes where the lines can elongate the appearance of the nail.
Pro Tip: Flash cure your gel polish for 10 seconds after painting each swirl line. This “freezes” the polish in place so the colors don’t bleed into each other while you paint the next line.
Iconic Barbie Silhouette
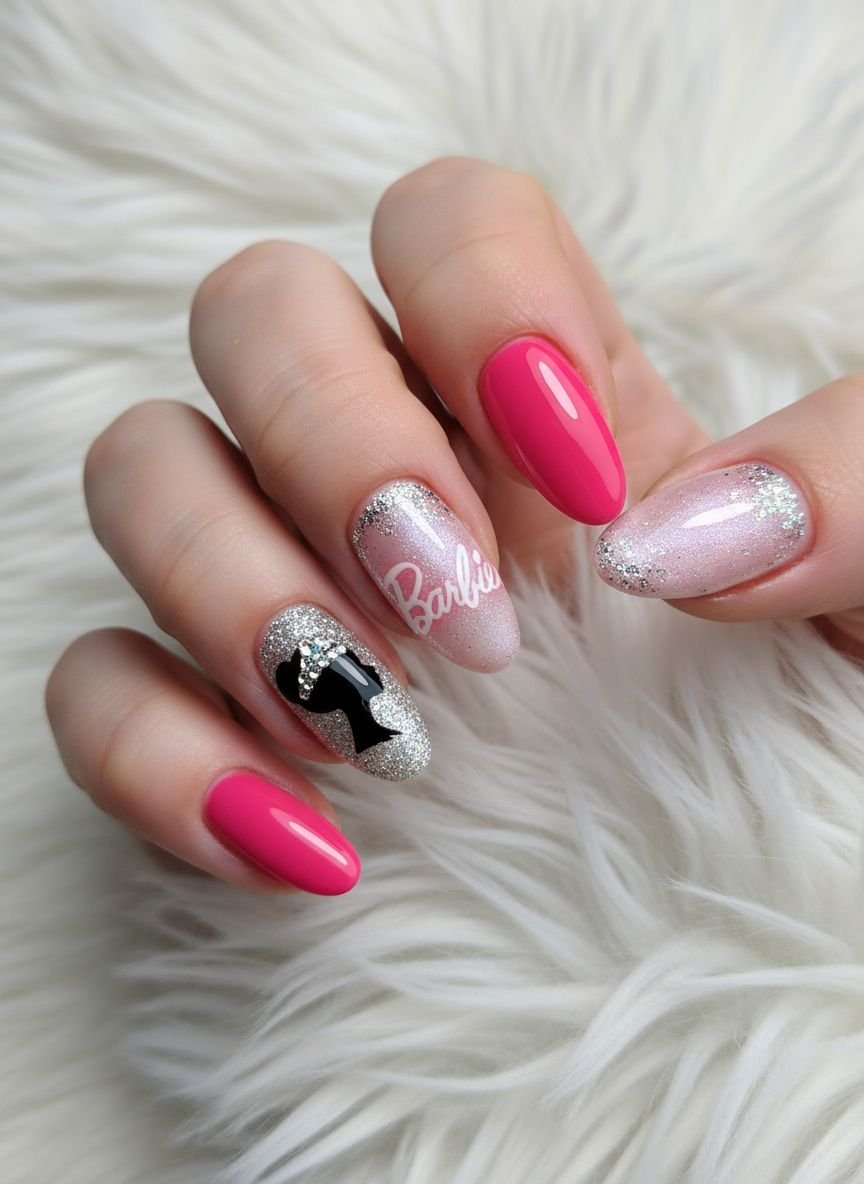
The silhouette of the Barbie ponytail profile is one of the most recognizable images in pop culture. Featuring this black or dark pink silhouette against a bright pink background creates a striking focal point that is both retro and chic. This design pays homage to the original 1959 doll and the vintage fashion illustration style associated with the brand. It is a graphic, bold choice that works best as an accent nail, usually on the ring finger, flanked by solid pink nails or glittery companions. The stark contrast between the silhouette and the background is the key design principle here. For those who aren’t professional artists, using a stencil or a vinyl decal is the most effective way to get the sharp, crisp edges required for the profile to be readable. Apply your hot pink base and let it dry completely (or cure it). Place the stencil firmly, apply a thin layer of black polish, and remove the stencil immediately while the polish is still wet to avoid jagged edges.
Pro Tip: If hand-painting, break the silhouette down into shapes: a circle for the head, a swooping curve for the ponytail, and a small slope for the nose. Connect them slowly.
Magenta Florals
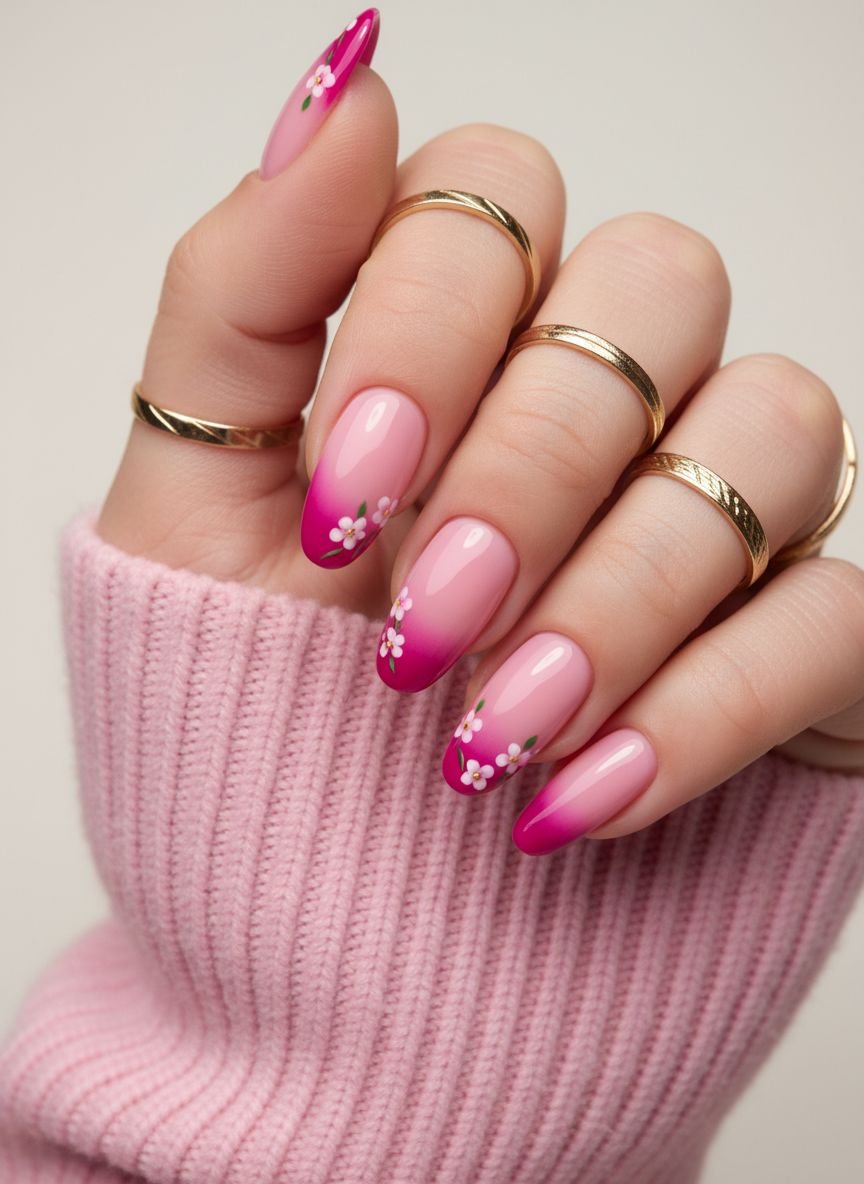
For a softer, more romantic take on the trend, magenta floral nails blend the boldness of Barbie pink with the delicacy of nature. This design features tiny, detailed flowers—hibiscus, roses, or daisies—painted in shades of hot pink and white. It bridges the gap between the “Cottagecore” and “Barbiecore” aesthetics, resulting in a look that is fresh, summery, and feminine. The texture is usually smooth, but the visual complexity of the petals adds depth. This style is perfect for spring and summer months or vacation wear. You can achieve this look using a dotting tool. To make a simple flower, place five dots of magenta polish in a circle. While the polish is wet, use a fine brush to drag the polish from the outside of the dot toward the center, creating a petal shape. Place a small yellow or white dot in the center to finish. The result is a stylized, cute floral pattern that pops against a pale pink or clear base.
Pro Tip: Vary the size of the flowers. Place one large flower at the cuticle or corner of the nail and scatter smaller ones around it for a balanced composition.
Sweet Heart Accents
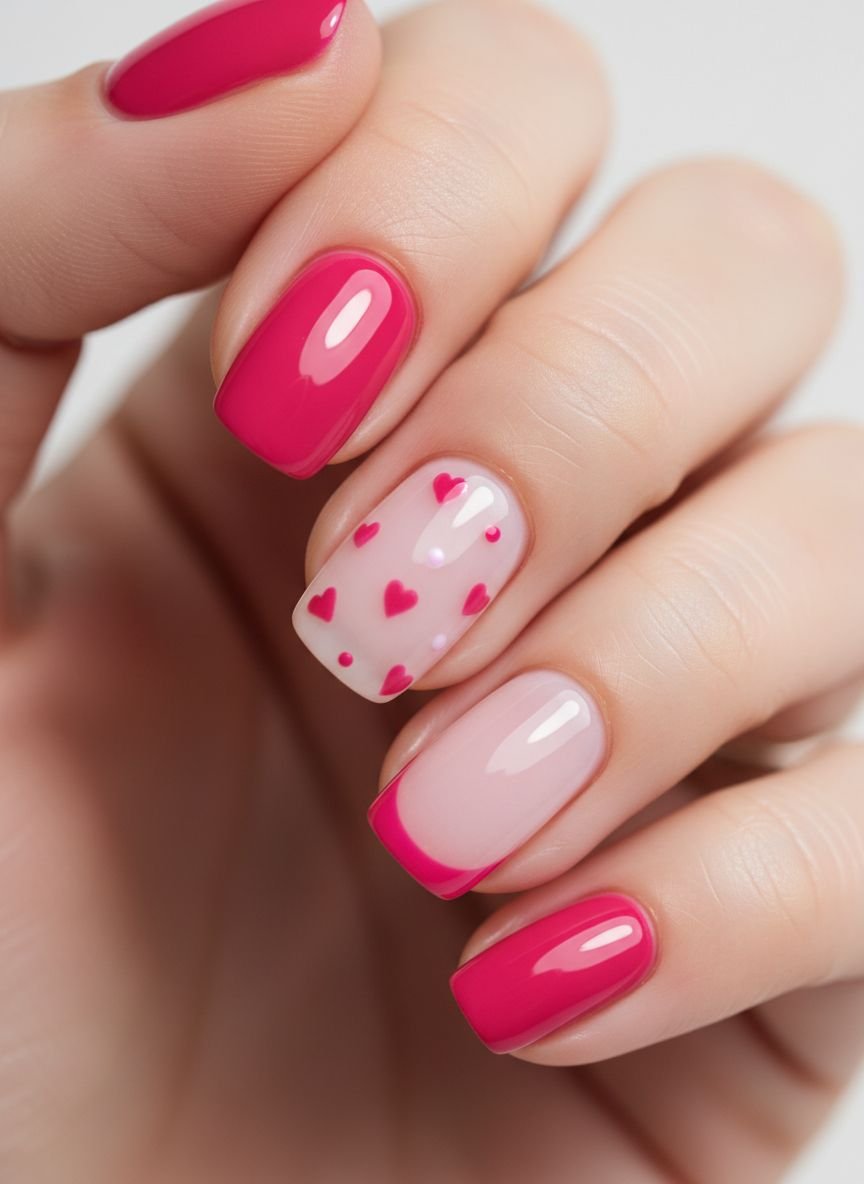
Hearts are intrinsic to the Barbie aesthetic, representing love, kindness, and girl power. Incorporating heart accents into your manicure is a timeless way to embrace the theme. This can range from a single, tiny heart placed at the base of the cuticle (the “micro-heart” trend) to an all-over print of hand-painted hearts. The vibe is playful, innocent, and incredibly cute. A popular variation is the “aura” heart, where the pink color diffuses softly from the center of the nail, or the “cutout” heart, where the heart shape is left negative space surrounded by pink. For a sharp, graphic heart, use the dotting tool method: place two dots side-by-side and drag them down to meet at a point. This creates a perfect heart shape every time. For a more sophisticated look, try a “French tip heart,” where the two curves of the heart form the tip of the nail. This requires a longer nail shape, like almond or stiletto, to execute effectively.
Pro Tip: Use a red-pink or a deep berry shade for the hearts on a light pink background. The slight tonal difference adds sophistication and keeps the design from looking like a sticker.
Holographic Sparkle
If chrome is the future, holographic glitter is the party. This design utilizes chunky, light-refracting glitter suspended in a clear or pink jelly base. The result is a dazzling, multi-dimensional look that shifts through the entire rainbow spectrum while maintaining a dominant pink hue. It screams “Disco Barbie” and is perfect for festivals, parties, or anyone who wants their hands to be the center of conversation. The glitter captures light from every angle, hiding imperfections in the nail plate and offering incredible durability—glitter polishes are notoriously chip-resistant. You can apply this as a full coverage look or as a “glitter gradient” fading from the cuticle or tip. To get maximum density without thick layers, use the sponge technique. Paint the glitter polish onto a makeup sponge and dab it onto the nail. The sponge absorbs the clear base, depositing only the glitter particles for a solid wall of sparkle.
Pro Tip: Removal of glitter polish can be difficult. Soak a cotton ball in acetone, place it on the nail, and wrap it in foil for 10 minutes to slide the glitter off effortlessly without scraping.
Get The Look: Essential Tools
To recreate these masterpieces, ensure you have these staples in your kit:
- Fine Liner Brush: For swirls, French tips, and detailed logos.
- Dotting Tool Set: Essential for flowers and hearts.
- Chrome Powder & Sponge: For the reflective finish.
- Cuticle Oil: To keep the skin around your high-voltage nails hydrated.
- High-Gloss Top Coat: The secret to the “plastic fantastic” Barbie finish.
Whimsical Fairy Butterflies
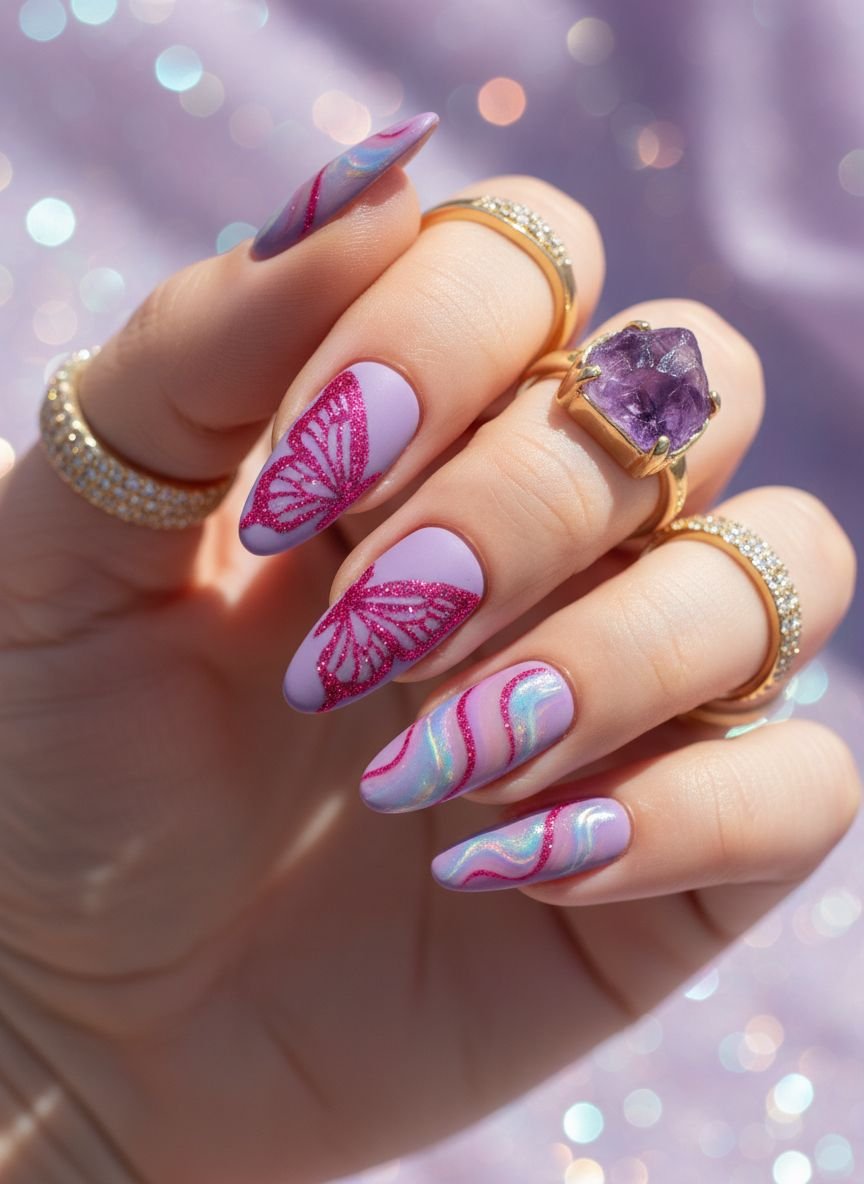
Combining the magic of “Fairycore” with Barbie pink, butterfly nail art is a whimsical and enchanting choice. This design typically features butterfly wing patterns painted close up on the nail (mimicking the macro view of a wing) or small, delicate butterflies fluttering across a nude base. The color palette mixes hot pink with black veins and white dots, creating a high-contrast pattern that is visually stunning. This style represents transformation and freedom, adding a layer of meaning to your manicure. The “butterfly wing” tip is a popular variation, where the tip of the nail is painted to look like the edge of a wing. This is best achieved with a steady hand and a striper brush. Paint the base color, then draw the black veins radiating outward. Fill the spaces near the edge with a darker pink or purple to create a gradient, and finish with tiny white dots along the black lines to mimic the natural patterns of a butterfly.
Pro Tip: Use a sheer, iridescent top coat over the finished design. It gives the wings a gossamer, realistic shimmer that looks magical in sunlight.
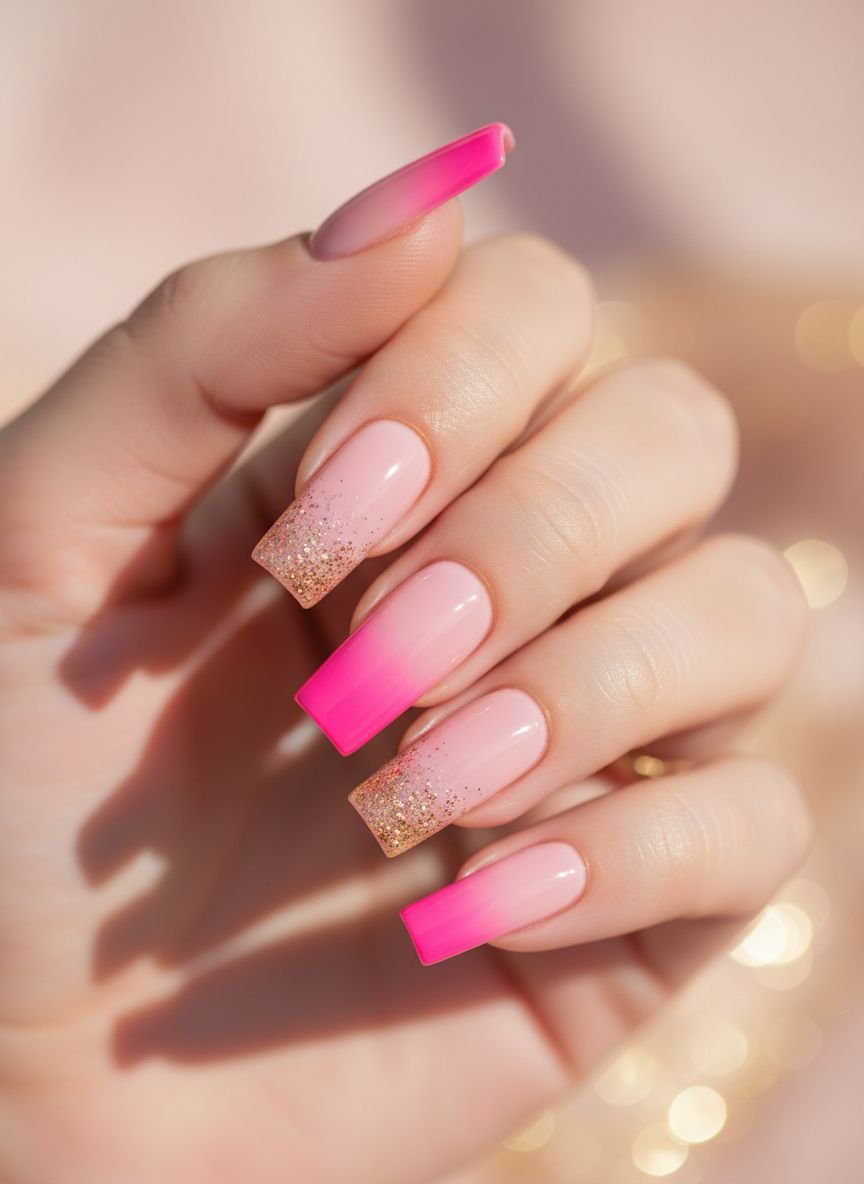
Gradient Ombre Magic
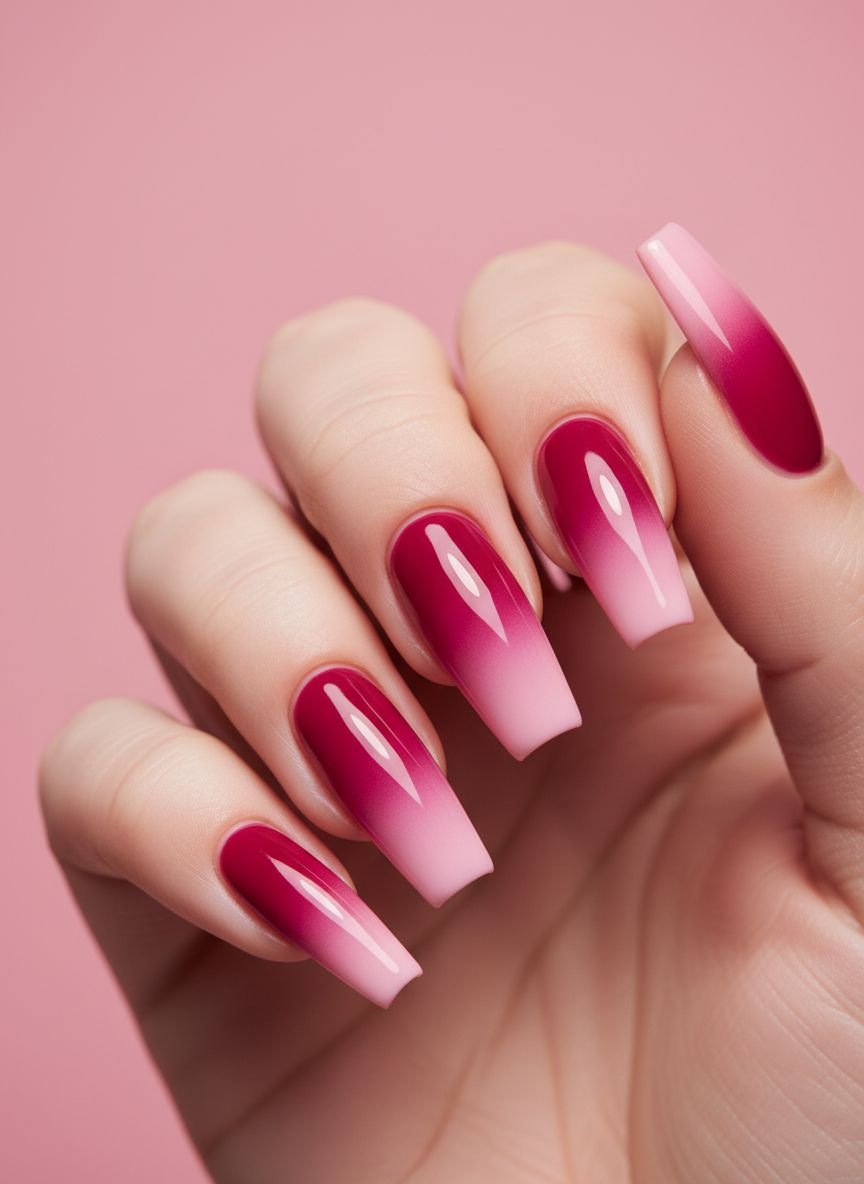
The ombre effect is a seamless blend of two colors, creating a soft, dreamy transition that looks professionally airbrushed. For a Barbie-inspired ombre, the fade usually transitions from a milky white or nude at the cuticle to a vibrant hot pink at the tips. This mimics the look of the classic “Baby Boomer” French fade but with a high-energy color injection. The result is elegant yet bold, avoiding the harsh lines of a traditional French manicure. It lengthens the appearance of the nail and looks beautiful as it grows out since there is no hard demarcation line at the cuticle. To DIY this, apply your nude base color and let it dry. On a makeup sponge, paint a stripe of nude and a stripe of hot pink, slightly overlapping them. Dab the sponge gently onto the nail, moving it slightly up and down to blend the colors. Repeat this process 2-3 times to build opacity. The texture will look bumpy initially, but a thick layer of top coat will smooth it out into a perfect gradient.
Pro Tip: Apply liquid latex or tape around your cuticles before sponging. This makes cleaning up the messy polish on your skin incredibly easy—just peel it off when you’re done!
Pastel Barbie Bliss
Not every Barbie look needs to be neon. The pastel variation focuses on the softer, sweeter side of the doll’s history, reminiscent of the 1980s “Peaches ‘n Cream” Barbie. This design uses a palette of mint green, soft lilac, and pale lemon yellow alongside a dominant pastel pink. It is a “skittle” manicure approach where each nail might be a different pastel shade, or a single nail features a color-blocked pastel geometric pattern. The vibe is cheerful, spring-like, and approachable. Matte finishes work exceptionally well with pastels, turning your nails into what look like sugary candies. The key here is color selection; ensure all your pastel polishes have the same white undertone so they look cohesive together. If doing a geometric design, use striping tape to section off areas of the nail. Paint one section pink and another mint, peel off the tape while wet, and reveal crisp, clean lines.
Pro Tip: Pastel polishes can sometimes be chalky or streaky. Apply three very thin coats rather than two thick ones to ensure even, opaque coverage without ridges.
Popular Asked Questions
Which polish is the “right” Barbie pink?
There isn’t just one! However, the most iconic “Barbie Pink” is generally considered a cool-toned, fluorescent hot pink (Pantone 219 C). For nail polish, shades like DND #640, Color Club’s neon pinks, or OPI’s “Hotter than You Pink” are cult favorites that perfectly capture that plastic-fantastic vibrancy.
How do I pick the perfect pink for my skin tone?
The secret lies in your undertones. If you have cool undertones (veins look blue), opt for pinks with blue or purple bases (magenta, fuchsia). If you have warm undertones (veins look green), choose pinks with coral, peach, or orange bases. If you are neutral, you are lucky—almost every pink will look radiant on you!
Are chrome nails easy to maintain?
Yes, but they need protection. The chrome powder can rub off at the free edge if not sealed properly. To make them last, ensure your nail tech applies a strong base gel and seals the chrome powder with two layers of top coat, paying special attention to “capping” the tip of the nail to prevent lifting.
Can I do Barbie nail art at home?
Absolutely. While intricate hand-painting takes practice, you can achieve the look easily using nail stickers, decals, and press-ons. A simple coat of hot pink polish topped with a heart sticker and a glossy top coat gives you a salon-quality look in minutes without needing artistic skills.
Conclusion
From the subtle elegance of baby pink to the futuristic shine of magenta chrome, the Barbie pink nail trend offers a spectrum of styles for every inner diva. These designs are more than just a beauty choice; they are a declaration of confidence, fun, and unapologetic femininity. Whether you choose to DIY with a simple ombre sponge technique or visit a salon for sculpted acrylics, the key is to wear the color with attitude.


Leave a Comment